Showing posts with label HTML Tutorial. Show all posts

Friday, June 7, 2013

HTML Tutorial 4: Tags Without Ends


HTML Tags with no ending tags


After a long break I am gonna write another tutorial on HTML. This will be the number 4 tutorial of HTML. Today I would like to share some tags which don't have any endings! I mean you can just start these tags but they have no corresponding end tags. 


You might be interested to read the previously published HTML tutorial. These are as below: 


Now I can proceed to the Tutorial 4: HTML Tags with No Ends. Have a look at the image below. 
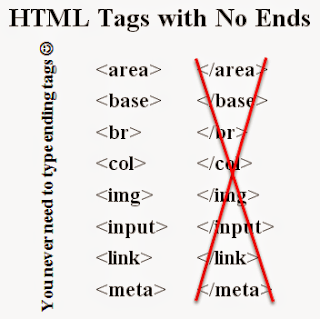
HTML Tags with no corresponding end tags


The above image doesn't include all the tags that have no ends. See the complete list below: 

  • <area> 
  • <base> 
  • <basefont>
  • <br> 
  • <col> 
  • <frame> 
  • <hr> 
  • <img> 
  • <input> 
  • <isindex> 
  • <link> 
  • <meta> 
  • <param>  

These tags have no corresponding ends. You just need to start them. 

For example: The <br> tag is used to create a line break. I mean it is used to create a new line. And when you create another line break the first one automatically ends. So it is needless to put an end tag to the <br> tag. That's why HTML standard excludes the corresponding end of the <br> tag. 

The same thing happened to the other tags mentioned in the list above. Another example could be the <img> tag. It is used to link to the image. Is it necessary to end an image with the help of an ending tag? Not at all. That's why the image tag is also don't have any ending tag. 


* XHTML always requires end tags. (Quite disappointing!) 


The <p> Tag: 

What about the <p> tag? By this time you all know about this tag. It is used to create a paragraph. And it has a corresponding end tag too. You can also guess - </p>. But many HTML authors even don't know this exists! 

However if you avoid the ending tag, I mean the </p> tag, your browser will never complain. The document will work quite fine. It is somewhat like the <br> tag. But the <br> tag has no end by rules. 

You can consider the rule as Omitting Tags. Yes, there are some tags in HTML which have end tags but you can avoid them. 


Hope you enjoy today's tutorial. Because this is an interesting feature of HTML in that sense that some tags have no ends. Some end tags you can omit as you wish. Stay in touch to get more . . . 


Stay with Marks PC Solution to get more interesting IT topics!


Friday, May 24, 2013

HTML Tutorial 3: Most Common Tags Used in HTML Documents


HTML Example


I'm sorry for the delay to publish new posts but something was wrong with my PC. That's   why I was in trouble with this and not able to write something new. Well I'd like to continue the HTML tutorial. 


In this post I will discuss about some tags which are very common in preparing HTML documents. But before you go, don't forget to look at the following posts if you haven't already gone through:


Let's talk about the most common tags of HTML documents. You should also have a close look at our example document. Some of these tags are also used in that document. I think this will be helpful for you. 


Most Used Tags of HTML


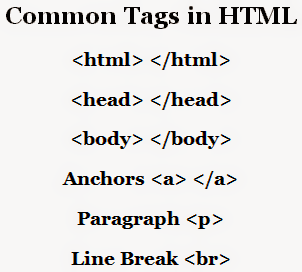
  • Structural Tags: <html>, <head>, and <body> are the main structural tags of any HTML document. Each and every HTML document must contain these tags. Title   tag - <title> is also very important for an html document. Besides there are tags which are very common for all HTML documents. These are discussed below:

  • Anchors <a href> </a>: This tag is used to create anchor text. For example: <a href=http://munnamark.blogspot.com>Marks PC Solution</a>. The browser will show only Marks PC Solution hiding the link of our site. When someone clicks on the text, he will be directed to Marks PC Solution home page 

  • Paragraph <p>: This tag is used to create a new para. It has no end tag! You just need to place a <p> tag when you want to create a new para. 

  • Line Break <br>: This tag is used to break the current line. It is similar to pressing Enter button in Word Processors like MS Word or Wordpad. This tag has no end tag too!  You can break a like just by typing <br> before that line. 

  • Bold <b> </b>:  This tag is used to bold the text. For example: <b>Bold</b>. The result will be Bold

  • Italic <i> </i>: This tag is used to italicize the text. For example: <i>Italic</i>. The result will be Italic

  • Underline <u> </u>: This tag is used to underline a text. For example: <u>Underline</u>. The result will be Underline

  • Heading Tags: Start Tags: <h1>, <h2>, <h3>, <h4>, <h5>, <h6>.                                       End Tags: </h1>, </h2>, </h3>, </h4>, </h5>, </h6>. These tags are used to define the titles of the document. For example, <h1> is used for the document header title. <h1>Marks PC Solution</h1>. <h2> is used for the document section title. <h2>Your Ultimate Choice for Computer, Internet, Blogging, SEO & PC Troubleshooting Tips</h2>. Thus <h3>, <h4>, <h5> and <h6> decreases the font size of the title. 


Don't be confused by someone or by yourself! There are many other common tags for HTML documents. But these are just for giving you an idea. 


You should be careful while using the tags and their related attributes. Because any error in using the tags may result wrong output. Even a minor mistake may create serious problem. Because you may not be quick enough to find the errors! 

By the way, the rules and stadard of HTML varies from time to time. Sometimes your browser is able to show the document correctly even if there is any error in the source file! But it doesn't mean that you will not try to keep the document accurate. Whatever you do, do it with care. Best of luck. 


Stay with Marks PC Solution to get more interesting IT topics!


Sunday, May 19, 2013

HTML Tutorial 2: Basic Parts of HTML Document


HTML Image with example Codes


In my previous post, I started writing about HTML. As it was the first tutorial of HTML, I just showed you the example of an HTML document without giving detailed information of that document. 

In this post, I'm gonna discuss about the essential parts of an HTML document. Essential parts mean those parts which are very common for each and every HTML document. I mean the HTML tag, the Header, the Title and the Body. 

Before you start, please have a look at the HTML Tutorial 1 if you haven't go through this already. 

After reading the tutorial 1 look at the image below:


Basic parts of an html document with name and code


Here you can see all the four parts that I used in the example document. Let's what are they actually:


The HTML Tag: <html>

Every HTML or XHTML document start with <html> tag and ends with </html> tag. Even if you right click on this page and hit on view source/ view page source option you will see the html of this post. At the top you will see <html> tag, and and the bottom you will see </html>. 

That means the whole document is considered as HTML by the browser. So, whenever you create a new HTML document, you must start it with <html> tag and end with </html> tag. 


The Document Head: <head> Tag

This tag is placed just below the <html> tag. This is the head of your document. It may include many other tags. Most importantly, the header tag includes the document title, I mean the <title> tag. 


The Document Title: <title> Tag

Your document should have a Title. Title should be started with <title> tag and it will be ended by </title> tag. Basically title is the name of your document. It will not appear in the document text! You will be able to see the title just at the browser tab. See the example image of Tutorial 1


The Document Body: <body> Tag

This is your actual contents. What do you wanna write or create in an HTML document should be within <body> </body> tag. It may include thousands of other tags which are necessary to decorate your document. 


By this time, hopefully you have a basic idea about an HTML document and its essential parts. You should notice every tag starts with <> and ends with </>. Actually some tags don't have any closing tag! And some tags don't need to be closed. 

Which tags don't need to be closed and which don't have any ending tag at all will be discussed later. And in my next post, I will discuss the different tags used in the Tutorial 1


HTML is not very tough learn. But the area of HTML is huge. Latest version of HTML is HTML 5. HTML may include new rules in the future just like as new words and phrases are added to a language. So you will never be able to finish your HTML course. It is a life long learning. 

All you need is patience to be skilled in HTML. Learn the rules one by one and step by step. Use them in your works and practice the rules. You should be fine with HTML. 

Stay with Marks PC Solution to get more interesting IT topics!


HTML Tutorial 1: Creating a Simple HTML Document


HTML Codes Example


If you're regular in this site, you should know I am not a programmer. Several times, I've mentioned that I'm a person with no programming knowledge. Even my HTML knowledge is not good enough. Just few days ago, I decided to enrich my knowledge on HTML. I will publish HTML lessons for you. Thus you will be also learning HTML with me! Whenever I learn something about HTML, I will publish it here. 


I'm not gonna discuss about the history of HTML. Hope you all know that HTML- Hypertext Markup Language. Whatever you see on your browser when visiting any site, your browser shows it through HTML. You can easily view what a website includes. Do as below:

  1. Open any website in your browser. 
  2. Right click on it. 
  3. A menu will appear.
  4. Click on View Source/ View Page Source. 
  5. A new window will open with the HTML of that website. You will see thousand lines codes! This is how your browser see a website. 


Today I would like to start with an example. In this lesson you will learn how to create a simple HTML document. I mean you will get an idea about the basic structure of an HTML document. 

Okay let's start. The following texts are the properties of an HTML document. 
  • Copy the texts, and paste them in a notepad file. 
  • Save the document as HTML Lesson 1 with .htm or .html extension. I mean the saved file name should look like this: HTML Lesson 1.htm or HTML Lesson 1.html
  • Remember, you can save it by any other word but it should end with .htm or .html extension.
  • I recommend you to save the file on your desktop for quick access. 

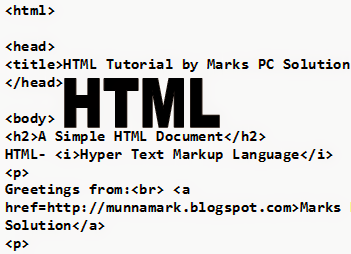
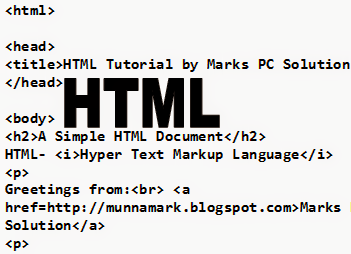
<html> 
<head> 
<title>HTML Tutorial by Marks PC Solution.</title> 
</head> 
<body> 
<h2>A Simple HTML Document</h2> 
HTML- <i>Hypertext Markup Language</i>  
<p>                
Greetings from:<br> <a href=http://munnamark.blogspot.com>Marks PC Solution</a> 
<p> 
Prepared by: <b>Md. Abdur Rahaman</b> 
<br>&copy;2013 Marks PC Solution
<br>Protected by: DMCA 
</body> 
</html> 


After saving the document a new file will be appeared on your desktop named HTML Lesson 1. Double click on that file. It should be opened with your default net browser. If it doesn't then right click on that file and choose open with a browser. 

After opening the document in a browser you will get the following result in the browser window:

Basic HTML Document Example


You should notice the difference between your input (HTML Code) and output (Result in the browser). In compared to the HTML you have written on the notepad is more than double what you're getting in the browser window! Are you confused with that? Actually no unnecessary commands are used in the above HTML code. Each and every symbols and characters of the above HTML code are the basic properties of any HTML document. Without them, no HTML document can be prepared. 


In my next lesson of HTML, I will discuss about the basic parts of an HTML document. And I will also try to clarify the tags, symbols, codes used in this example. Get ready for that! 


Note: In the above code, I have created gaps between parts. After html tag, head tag I have used enter. Basically in the document this space will have no effect. This space is only for your better understanding. 


Stay with Marks PC Solution to get more interesting IT topics!