Showing posts with label Web Development. Show all posts

Friday, June 7, 2013

HTML Tutorial 4: Tags Without Ends


HTML Tags with no ending tags


After a long break I am gonna write another tutorial on HTML. This will be the number 4 tutorial of HTML. Today I would like to share some tags which don't have any endings! I mean you can just start these tags but they have no corresponding end tags. 


You might be interested to read the previously published HTML tutorial. These are as below: 


Now I can proceed to the Tutorial 4: HTML Tags with No Ends. Have a look at the image below. 
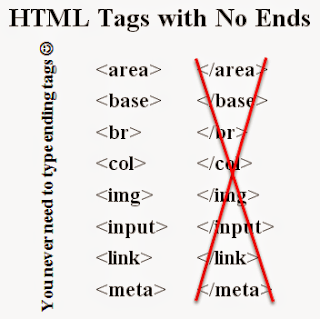
HTML Tags with no corresponding end tags


The above image doesn't include all the tags that have no ends. See the complete list below: 

  • <area> 
  • <base> 
  • <basefont>
  • <br> 
  • <col> 
  • <frame> 
  • <hr> 
  • <img> 
  • <input> 
  • <isindex> 
  • <link> 
  • <meta> 
  • <param>  

These tags have no corresponding ends. You just need to start them. 

For example: The <br> tag is used to create a line break. I mean it is used to create a new line. And when you create another line break the first one automatically ends. So it is needless to put an end tag to the <br> tag. That's why HTML standard excludes the corresponding end of the <br> tag. 

The same thing happened to the other tags mentioned in the list above. Another example could be the <img> tag. It is used to link to the image. Is it necessary to end an image with the help of an ending tag? Not at all. That's why the image tag is also don't have any ending tag. 


* XHTML always requires end tags. (Quite disappointing!) 


The <p> Tag: 

What about the <p> tag? By this time you all know about this tag. It is used to create a paragraph. And it has a corresponding end tag too. You can also guess - </p>. But many HTML authors even don't know this exists! 

However if you avoid the ending tag, I mean the </p> tag, your browser will never complain. The document will work quite fine. It is somewhat like the <br> tag. But the <br> tag has no end by rules. 

You can consider the rule as Omitting Tags. Yes, there are some tags in HTML which have end tags but you can avoid them. 


Hope you enjoy today's tutorial. Because this is an interesting feature of HTML in that sense that some tags have no ends. Some end tags you can omit as you wish. Stay in touch to get more . . . 


Stay with Marks PC Solution to get more interesting IT topics!


Friday, May 24, 2013

HTML Tutorial 3: Most Common Tags Used in HTML Documents


HTML Example


I'm sorry for the delay to publish new posts but something was wrong with my PC. That's   why I was in trouble with this and not able to write something new. Well I'd like to continue the HTML tutorial. 


In this post I will discuss about some tags which are very common in preparing HTML documents. But before you go, don't forget to look at the following posts if you haven't already gone through:


Let's talk about the most common tags of HTML documents. You should also have a close look at our example document. Some of these tags are also used in that document. I think this will be helpful for you. 


Most Used Tags of HTML


  • Structural Tags: <html>, <head>, and <body> are the main structural tags of any HTML document. Each and every HTML document must contain these tags. Title   tag - <title> is also very important for an html document. Besides there are tags which are very common for all HTML documents. These are discussed below:

  • Anchors <a href> </a>: This tag is used to create anchor text. For example: <a href=http://munnamark.blogspot.com>Marks PC Solution</a>. The browser will show only Marks PC Solution hiding the link of our site. When someone clicks on the text, he will be directed to Marks PC Solution home page 

  • Paragraph <p>: This tag is used to create a new para. It has no end tag! You just need to place a <p> tag when you want to create a new para. 

  • Line Break <br>: This tag is used to break the current line. It is similar to pressing Enter button in Word Processors like MS Word or Wordpad. This tag has no end tag too!  You can break a like just by typing <br> before that line. 

  • Bold <b> </b>:  This tag is used to bold the text. For example: <b>Bold</b>. The result will be Bold

  • Italic <i> </i>: This tag is used to italicize the text. For example: <i>Italic</i>. The result will be Italic

  • Underline <u> </u>: This tag is used to underline a text. For example: <u>Underline</u>. The result will be Underline

  • Heading Tags: Start Tags: <h1>, <h2>, <h3>, <h4>, <h5>, <h6>.                                       End Tags: </h1>, </h2>, </h3>, </h4>, </h5>, </h6>. These tags are used to define the titles of the document. For example, <h1> is used for the document header title. <h1>Marks PC Solution</h1>. <h2> is used for the document section title. <h2>Your Ultimate Choice for Computer, Internet, Blogging, SEO & PC Troubleshooting Tips</h2>. Thus <h3>, <h4>, <h5> and <h6> decreases the font size of the title. 


Don't be confused by someone or by yourself! There are many other common tags for HTML documents. But these are just for giving you an idea. 


You should be careful while using the tags and their related attributes. Because any error in using the tags may result wrong output. Even a minor mistake may create serious problem. Because you may not be quick enough to find the errors! 

By the way, the rules and stadard of HTML varies from time to time. Sometimes your browser is able to show the document correctly even if there is any error in the source file! But it doesn't mean that you will not try to keep the document accurate. Whatever you do, do it with care. Best of luck. 


Stay with Marks PC Solution to get more interesting IT topics!


Sunday, May 19, 2013

HTML Tutorial 2: Basic Parts of HTML Document


HTML Image with example Codes


In my previous post, I started writing about HTML. As it was the first tutorial of HTML, I just showed you the example of an HTML document without giving detailed information of that document. 

In this post, I'm gonna discuss about the essential parts of an HTML document. Essential parts mean those parts which are very common for each and every HTML document. I mean the HTML tag, the Header, the Title and the Body. 

Before you start, please have a look at the HTML Tutorial 1 if you haven't go through this already. 

After reading the tutorial 1 look at the image below:


Basic parts of an html document with name and code


Here you can see all the four parts that I used in the example document. Let's what are they actually:


The HTML Tag: <html>

Every HTML or XHTML document start with <html> tag and ends with </html> tag. Even if you right click on this page and hit on view source/ view page source option you will see the html of this post. At the top you will see <html> tag, and and the bottom you will see </html>. 

That means the whole document is considered as HTML by the browser. So, whenever you create a new HTML document, you must start it with <html> tag and end with </html> tag. 


The Document Head: <head> Tag

This tag is placed just below the <html> tag. This is the head of your document. It may include many other tags. Most importantly, the header tag includes the document title, I mean the <title> tag. 


The Document Title: <title> Tag

Your document should have a Title. Title should be started with <title> tag and it will be ended by </title> tag. Basically title is the name of your document. It will not appear in the document text! You will be able to see the title just at the browser tab. See the example image of Tutorial 1


The Document Body: <body> Tag

This is your actual contents. What do you wanna write or create in an HTML document should be within <body> </body> tag. It may include thousands of other tags which are necessary to decorate your document. 


By this time, hopefully you have a basic idea about an HTML document and its essential parts. You should notice every tag starts with <> and ends with </>. Actually some tags don't have any closing tag! And some tags don't need to be closed. 

Which tags don't need to be closed and which don't have any ending tag at all will be discussed later. And in my next post, I will discuss the different tags used in the Tutorial 1


HTML is not very tough learn. But the area of HTML is huge. Latest version of HTML is HTML 5. HTML may include new rules in the future just like as new words and phrases are added to a language. So you will never be able to finish your HTML course. It is a life long learning. 

All you need is patience to be skilled in HTML. Learn the rules one by one and step by step. Use them in your works and practice the rules. You should be fine with HTML. 

Stay with Marks PC Solution to get more interesting IT topics!


HTML Tutorial 1: Creating a Simple HTML Document


HTML Codes Example


If you're regular in this site, you should know I am not a programmer. Several times, I've mentioned that I'm a person with no programming knowledge. Even my HTML knowledge is not good enough. Just few days ago, I decided to enrich my knowledge on HTML. I will publish HTML lessons for you. Thus you will be also learning HTML with me! Whenever I learn something about HTML, I will publish it here. 


I'm not gonna discuss about the history of HTML. Hope you all know that HTML- Hypertext Markup Language. Whatever you see on your browser when visiting any site, your browser shows it through HTML. You can easily view what a website includes. Do as below:

  1. Open any website in your browser. 
  2. Right click on it. 
  3. A menu will appear.
  4. Click on View Source/ View Page Source. 
  5. A new window will open with the HTML of that website. You will see thousand lines codes! This is how your browser see a website. 


Today I would like to start with an example. In this lesson you will learn how to create a simple HTML document. I mean you will get an idea about the basic structure of an HTML document. 

Okay let's start. The following texts are the properties of an HTML document. 
  • Copy the texts, and paste them in a notepad file. 
  • Save the document as HTML Lesson 1 with .htm or .html extension. I mean the saved file name should look like this: HTML Lesson 1.htm or HTML Lesson 1.html
  • Remember, you can save it by any other word but it should end with .htm or .html extension.
  • I recommend you to save the file on your desktop for quick access. 

<html> 
<head> 
<title>HTML Tutorial by Marks PC Solution.</title> 
</head> 
<body> 
<h2>A Simple HTML Document</h2> 
HTML- <i>Hypertext Markup Language</i>  
<p>                
Greetings from:<br> <a href=http://munnamark.blogspot.com>Marks PC Solution</a> 
<p> 
Prepared by: <b>Md. Abdur Rahaman</b> 
<br>&copy;2013 Marks PC Solution
<br>Protected by: DMCA 
</body> 
</html> 


After saving the document a new file will be appeared on your desktop named HTML Lesson 1. Double click on that file. It should be opened with your default net browser. If it doesn't then right click on that file and choose open with a browser. 

After opening the document in a browser you will get the following result in the browser window:

Basic HTML Document Example


You should notice the difference between your input (HTML Code) and output (Result in the browser). In compared to the HTML you have written on the notepad is more than double what you're getting in the browser window! Are you confused with that? Actually no unnecessary commands are used in the above HTML code. Each and every symbols and characters of the above HTML code are the basic properties of any HTML document. Without them, no HTML document can be prepared. 


In my next lesson of HTML, I will discuss about the basic parts of an HTML document. And I will also try to clarify the tags, symbols, codes used in this example. Get ready for that! 


Note: In the above code, I have created gaps between parts. After html tag, head tag I have used enter. Basically in the document this space will have no effect. This space is only for your better understanding. 


Stay with Marks PC Solution to get more interesting IT topics!


Thursday, May 16, 2013

Stat My Web: Get Detailed Analysis of Your Site


Stat My Web PNG Image


There are many sites that collects and shows information about blogs and websites. Some of them are very reliable and some of them are not. Alexa, Google Analytics, Web Rank Stats are some of the examples. 


Today I am gonna discuss about such a site that gives you detailed analysis and information about your blog or website. Maybe some of you are familiar with Stat My Web. This website shows you a comprehensive analysis of your site. It provides a statistics summary, inpage analysis, alexa status, safety & security, popular pages, keywords and many other information about your site. 


Look at the image below. This is the statistics summary of Marks PC Solution on Stat My Web.

Website Statistics by Stat My Web


But this is a minor part of the statistics. If you enter the URL of your site on Stat My Web then you will find the details. 


Okay let's find out the statistics for your site. First you need to visit Stat My Web. Remember, no sign up is required! This is a great thing. You don't need any account for getting analysis. There is a search box at the top right corner just below the tabs. You can either search your site by Name (ie. Marks PC Solution) or simply copy and paste the URL of your home page (ie. http://munnamark.blogspot.com). 

I suggest you to enter the URL directly instead of searching it by name. Because information will be gathered automatically if you enter the URL in the search box. 


Analyzing the Results

After entering the URL, results will be arranged in a few parts. 

Brief Description: This is the first part of the result. See the example of Marks PC Solution brief description.  

Munnamark.blogspot.com is ranked #162,025 on the world wide web by Alexa. The lower the Alexa rank, the more popular the website is considered to be. Munnamark.blogspot.com has an estimated earning potential of $118 USD per day from advertising revenue, giving it a value upwards of $38,071 USD. We have found the average page load time to be 0.100369 seconds. This website has a GooglePageRank of 0 (out of 10), and has a reach of 931 average unique visitors per day, with about 8,380 daily average page views.This website is listed in Yahoo directory. The primary IP address is 74.125.227.43. We give this website a SEO score of 23.8%.

Web Statistics Summary: The second part of the result is statistics summary. Here you will get Alexa rank, Google Pagerank, Daily Visitors, Revenue Status etc. 


Inpage Analysis: It gives you a knowledge about the structure of your page. It might be useful for webmasters. I don't know much about it. 


Alexa Traffic Analysis: This part is taken from Alexa. And almost similar to what information you see about your on Alexa. 


Safety and Reputation: This part is taken from the WOT (Web of Trust). It measures the Trustworthiness, Vendor Reliability, Privacy and Child Safety. Marks PC Solution gained Excellent Rating in all the four aspects.


Popular Pages: This part shows the 10 most popular page URLs. With this analysis, you will be able to know what topics are driving the most visitors to your site. 


Keyword Rankings: Here you will find some keywords which play an important role in driving traffic to your site. You can target the keywords which are very popular. 


Others: There are some other tools which are not very important for you. I mean you might have nothing to do with these tools. Such as- HTTP Header Analysis, DNS Records, Directory Listing Analysis, Web Hosting Server Location Map etc. 


Besides you will get more information by navigating the site. Look at the right pane of Stat My Web. There are three sections: 
  • Navigation Menu
  • Advanced Charts
  • Website Tools

The last one is important for you. Yes I mean, Website Tools. There are few tools which may be useful for you. Such as: 
  • Website Worth
  • Domain Look Up
  • IP Address
  • Domain Availability
  • Ping Test
  • Get Website Information
  • Speed Test 

I expect, this post will help you to know about the site Stat My Web. And thus you can get the detailed information about your blog or website. Leave comment to share with us . . . 


Stay with Marks PC Solution to get more interesting IT topics!


Wednesday, April 17, 2013

Replace your Traditional Comment Box with DISQUS!


DISQUS PNG Logo


Hi! Start writing after three days. Because I was so busy last few days, and don't get enough time and idea to write about. Today I will talk about how to replace the traditional comment box of blogs or website with a beautiful disqus comment box. 


You might notice many websites or blogs (WordPress, Blogger, Tumbir) doesn't have any traditional comment box. They use comment luv or disqus. Coomment luv is better than disqus but you have to pay for it. But you're getting disqus for free without charge! So why don't try it? 

By the way if you don't like to add any third party comment box then please read the post: Full Tutorial on Blogger Comment Optimization. This will help you to understand how to optimize the traditional blogger comment option. 

DISQUS works with almost any platform: 
  • Blogger
  • WordPress
  • Drupal
  • Tumbir
  • HTML & JS
  • Other Websites/ Blogs


If you wanna implement this comment option in your site first you have to register an account. Sign up here by email and then confirm it. Now do the following:
  1. After sign up, Go the dashboard. 
  2. Now you have to add your site by giving its Name, URL and Shortname and then continue. 
  3. Now you have to go to the Settings option to optimize the comment options.
  4. You can also use the tools option to import your existing comments into Disqus! 
  5. Now you have to find the code. It should be like that- Get this for your site or something like that. 
  6. Then you have to edit your site's template or code. If you are using blogger then please  Backup your Blogger Template avoid any accident so that you can get your existing template back without losing something.
  7. For WordPress site the Disqus have a plugin. You have to just upload a file into your WordPress site. Then it will be automatically added. 

I have another surprise for you! By implementing DISQUS on your site, you can publish Ads too! Go to the Discovery under settings option. There you will find four options. If you choose  any of the first three options other than Just Comments Ads will be place just below the comment box. Thus you can monetize your site too!  


I also implemented disqus on Marks PC Solution. But after using it for few hours I got disappointed. So I removed it. I like Commen Luv. But they have no free service. Comment Luv is really professional. I am gonna miss it! :(


Stay with Marks PC Solution to get more interesting IT topics!


Sunday, February 24, 2013

How to Add Facebook Like box on Website or Blog


Facebook Like Box by Marks PC Solution


If you have a Facebook fan page or an official Facebook page of your blog or website, then you can place it in your site. Certainly this will ease your interaction with visitors or fans. Another issue you should keep in mind that it is also a part of SEO. Placing a like box may attract visitors to visit your site! 

Earlier I wrote about how to create a pop out like box in your site. And also discussed how to create Facebook fan page. Remember: You must have a fan page to create a Facebook Like Box. If you don't know please read this first: 


If you're ready then I can start. Read carefully. 

To add a like box in your website or blog you have to place two codes in two different places. These are as below: 

Code 1: Place this code on your page once, just after the opening <body> tag. If your site already has this code then you don't need to place it again. 

<div id="fb-root"></div>

<script>(function(d, s, id) {
  var js, fjs = d.getElementsByTagName(s)[0];
  if (d.getElementById(id)) return;
  js = d.createElement(s); js.id = id;
  js.src = "//connect.facebook.net/en_US/all.js#xfbml=1";
  fjs.parentNode.insertBefore(js, fjs);
}(document, 'script', 'facebook-jssdk'));</script>


Code 2: Place this code on your page wherever you want the plugin to appear on your page.
<div class="fb-like-box" data-href="http://www.facebook.com/markstips" data-width="240" data-height="350" data-show-faces="false" data-stream="false" data-header="false"></div>

You know, the second code is the main code. And the first one is just to help the second one. If your HTML has already the first code then you don't need to paste the code again. 


Customization: The Red Parts of Code 2
  • Name: The word markstips should be replaced with your page name.  
  • Width: Current width is 240. You can increase or decrease. 
  • Height: Current height is 350. Change it if necessary. 

Tips: Try to place the second at the footer of your page. It will be helpful to load the site faster. Not only this code, you should place any Java Code at the bottom. If more java codes are placed at the header it will dramatically affect your site's loading time


Implementing the Code on Blogger: 

Code 1: Template > Edit HTML > Proceed > Now find <body tag by pressing Ctrl + F > After few lines paste the code from code 1 above > Save. If you placed any code like it earlier then you don't need to paste again. 

Code 2: Layout > Add a Gadget > HTML/ JavaScript > Copy and paste the code from Code 2 above > Save


Now view your blog or refresh it. You will be able to see this within few seconds. If the server is down, then the like box may delay to appear on your site. Until then, keep waiting. 


Advice: If you don't think the like box not important for you, or if you think it consumes your site space then you can try this one: Pop Out Facebook Like Box. 

If this code is not working properly, or if you face any problem to implement the code, then try to make the code directly from Facebook Developers


Stay with Marks PC Solution to get more interesting IT topics!


Wednesday, February 20, 2013

How to Add Twitter Tweet & Follow Button on Blog or Website


Twitter Birds PNG Logo


Social sharing options are great tools to spread your web contents throughout the world. There are many powerful social sites like Facebook, Google, Twitter etc. These sites have their own social sharing buttons. Today I will talk about Twitter Buttons

In this post you're getting two buttons. The first one is Tweet button which you can use for sharing on Twitter. And the 2nd one is Twitter Follow button. But if you want you can use the two buttons in a single gadget! View the demo below: 


Look at the codes below. There are two codes. The first one is tweet button. And the second one is Follow button. If you wanna use both the two then copy and paste these codes into your HTML. You can place them separately or combined as your wish. 


<a class='twitter-share-button' data-size='large' data-url='http://munnamark.blogspot.com/' data-via='markspcsolution' href='https://twitter.com/share'>Tweet</a>
<script>!function(d,s,id){var js,fjs=d.getElementsByTagName(s)[0];if(!d.getElementById(id)){js=d.createElement(s);js.id=id;js.src=&quot;//platform.twitter.com/widgets.js&quot;;fjs.parentNode.insertBefore(js,fjs);}}(document,&quot;script&quot;,&quot;twitter-wjs&quot;);</script>

<a href="https://twitter.com/markspcsolution" class="twitter-follow-button" data-show-count="true" data-size="large">Follow @markspcsolution</a>
<script>!function(d,s,id){var js,fjs=d.getElementsByTagName(s)[0];if(!d.getElementById(id)){js=d.createElement(s);js.id=id;js.src="//platform.twitter.com/widgets.js";fjs.parentNode.insertBefore(js,fjs);}}(document,"script","twitter-wjs");</script>


Installing Codes on Blogger:


Blogger > Layout > Add a Gadget > HTML/ JavaScript > Copy and paste the above code(s) > Save > View your blog. 


Remember: Notice the red parts of the codes. Replace the URL and twitter username which are marked in the code. 

For other websites, you need to copy and paste the above codes in appropriate place. But try to keep this code at the bottom for fast loading of your page. 


You can also customize your buttons directly from twitter


Tips: Always try to place java codes at the end of your site. It will help to load your page faster. 


Stay with Marks PC Solution to get more interesting IT topics!

Thursday, February 7, 2013

Test and Optimize the Load Time of your Site


How to test the loading time of your website


Today I'm gonna talk about improving the loading time of website or blog. Well this is not a new post in this blog. You will find the following posts related to this one: 

To be honest, I'm not an expert in optimizing websites or blogs. Again I can say, someone shouldn't be HTML or CSS expert to improve the loading time. There are lots of free online tools to test the loading time of website or blog. Today I will discuss about a site named Pingdom Tools

  • First of all you need to visit here
  • Enter your  Home Page URL in the blank box and hit Test Now button. 
  • Within few seconds you will get an score or result as the above image. 
Just under this short result you will get some buttons named as:
  • Waterfall
  • Performance Grade
  • Page analysis 
  • History
Each of this options will show you a detailed analysis of the tested URL. If you analyse the result then you will be able to know which part of your site needs to be optimized. 

Here are few suggestions for you: 
  • Use the minimum number of images
  • Use the minimum number of CSS/Java/HTML scripts
  • Try to place the Java/HTML script to the bottom of the site
  • Do not upload your scripts in the slow servers
  • Try to keep the size of image minimum
  • Avoid using any unnecessary scripts that is only for beautification purpose 

Stay with Marks PC Solution to get more interesting IT topics!


Wednesday, January 2, 2013

How to Optimize and Improve the Loading Time of Websites


Couple of weeks ago I discussed about Pagespeed. It was about how much faster your site is according to Google Pagespeed. Today I will discuss about Web Page Optimization that is very similar to pagespeed topic. 

Bloggers are too much busy with SEO. And many of them are not interested in WSO. But they don't know Web Site Optimization is also a part of SEO. A site that takes huge time to load will be deprived of returning visitors. But Google focus on Returning visitors while considering page rank!

Today's discussion about the loading time of any website including blog or forum. In Google Page Speed there you can get only a score out of 100 with few suggestions. But in WebSiteOptimization.com you will get a detailed information about what to do to improve the loading time. 

Follow the steps below to analyze your site:
  1. Visit WebSite Analyzer
  2. Enter your site's URL ìn the box named- Enter URL to diagnose and hit on the submit button. (ie. http://munnamark.blogspot.com)
  3. Retype the captcha character in the box provided and hit on continue button.
  4. Now you get the report of your site in detail named as Web Page Speed Report.

In this report you will get necessary information about your whole website. Each element of your site will be discussed separately. Thus you can understand which parts of your site need to be optimized. 

Though everything is clearly defined in the report I'm gonna discuss about the most important things to focus:
  • Number of Objects: Make sure your total number of objects is less than 20. Object may be any graphic designs, buttons etc. The more the objects in your page the more time it will take to load. Because it may increase HTTP requests.  
  • Image Size and amount: You may like to use more images. But excessive use of images will increase the loading time as it may increase HTTP requests. 
  • Number of CSS Files: Don't use too much external CSS files. Because they are placed at the head of your HTML and need to be load faster than any other contents. So keep as few CSS files as possible. 
  • Position of number Java Scripts: Place JavaScript at the end of the body if possible. So that they can't slow down the loading of the contents. And don't use too much external JavaScript in the page. Keep Java Script size within 20 KB. 
  • Size of the Page: Keep the total size of the page within 100 KB if possible.  

Stay with Marks PC Solution to get more interesting IT topics!