Tuesday, November 13, 2012

10 Exceptional Features of Windows 8- Upgrade to Enjoy!


I've already written more than 3 posts about Windows 8. But all of these were related to preview versions. And I'm writing this post just after installing the Final Version in my PC. 
  1. Built in Security for your overall PC protection! 
  2. Built in Reader to view your PDF and XPS files! 
  3. Live tiles that let you know the latest weather forecast, news updates, sports updates and so many.
  4. Touch friendly and drag and drop interface that eases the use of mouse. Don't be afraid. You can also use the keyboard shortcuts for Windows. 
  5. Efficient use of hardware.
  6. Task Manager with new useful features. (Shift+Ctrl+Esc)
  7. New apps for view image and video, using camera.
  8. New apps for Mail, Messaging and connect with people. You can also integrate your Facebook account with Windows Mail. 
  9. Great way of multitasking. Quickly switch between the apps. Press Alt+Tab or just move your mouse at the top left corner of the screen to switch the app. 
  10. New Start Screen! That irritates many users. This is the most important visual change of Windows 8. But if you use this for a week, you will enjoy this. This new start screen will be useful for searching apps, files and settings too. Just press the Start Button and type your query. Immediately you will get the result! 

Facing problem to view My Computer Icon on Desktop? Click here


Activate Final Version of Windows 8 (All Versions)


Stay with Marks PC Solution to get more interesting IT topics!

Tuesday, November 6, 2012

Guidelines before and after Getting AdSense!


This topic might be very useful for those who wanna place AdSense Ad in their websites or blogs. In this post I'm giving you some guidelines that maybe useful for you to get Adsense and to maintain it after getting this. 

If you carefully follow these guidelines, it will be easier for you to earn some cash from Adsense. Otherwise you may suffer just like me! Regular visitor of this site should know that I've already rejected 4 times from AdSense Program! And waiting to be rejected for the 5th time! 

Let's start our AdSense concern. AdSense provide a specific set of rules for publishers. You can find it here- AdSense Program Policy. But very few of them read this carefully and consequently they suffer and lose their account. 

So I will try my best to make the rules clear to you. Let's start. 


To Get AdSense (Before getting Ad): 

  • Your site must be easy to navigate. And it should be user friendly. 
  • It shouldn't contain any types of illegal, matured, adult or violent contents.
  • It shouldn't redirect users to unwanted websites.
  • It shouldn't contain any copyrighted material.
  • It shouldn't contain any types of hacking, cracking or gambling related contents.
  • It shouldn't contain any 
  • Don't place any third party Ads (Although AdSense allow this)
  • Your site should have sufficient visitors. But make sure that it doesn't get traffic only from a certain source. And never participate any paid-to-click program to increase your site traffic. 
  • And finally try to publish the unique contents that drives more traffic. 


After Getting AdSense- Be Careful 
  • The very first thing you need to do after getting AdSense is to be careful. Because your AdSense account maybe disabled at any time! 
  • Never click your own Ads. And not a single click to test. 
  • Never encourage others to click the Ads by any means.
  • Never try to make artificial clicks.
  • Place the Ads in a way so that it does't disturb the visitors.
  • The Ads should be distinguishable from your site's contents.
  • And finally follow all the rules that you did before getting AdSense.

If this post is useful for you then please let me know it by your valuable comment. 


Stay with Marks PC Solution to get more interesting IT topics!

Monday, November 5, 2012

Show your Recent Blog Posts as Headline !!


Recent posts widget can increase your page views to a great extent. When someone is on your blog and reading a topic he may find another topic useful from recent post list. So adding a recent posts widget is also important for attracting readers to stay long in your site. 

But there maybe many other widgets in your blog. And adding too much widget is boring and it also looks odd. 

Today I'm gonna share a code with you. This code will show your recent posts as headline! And certainly it will be space effective. It will take space just as a single line. All you need to do, is just add an HTML/ JavaScript gadget at the top of your site. 

  1. First, sign in to your blogger account and go to design.
  2. Then hit on layout button from the left pane.
  3. Click on Add a Gadget (Select gadget from top).
  4. Choose HTML/ JavaScript.
  5. Now copy and paste the following code into the content box.
  6. Now save the gadget and view your blog.

<script style="text/javascript" src="https://sites.google.com/site/munnamark/test/Recent%20Post%20Headline%20Widget.js?attredirects=0&d=1"> </script><script style="text/javascript"> var nMaxPosts = 7; var sBgColor; var nWidth; var nScrollDelay = 175; var sDirection="left"; var sOpenLinkLocation="S"; var sBulletChar="•"; </script> <script style="text/javascript" src="http://munnamark.blogspot.com/feeds/posts/default?alt=json-in-script&callback=RecentPostsScrollerv2"> </script><span style="font-size: 55%;" > <a target = "_blank" http://munnamark.blogspot.com/2012/11/show-your-recent-blog-posts-as-headline.html " >Get this Widget</a>


Remember, here I used my blog link. You must change the red part of the code with your blog name. And just change the red part. Nothing else.


Customization: You can also customize the code as below.


  • Max Posts = 7. That means how many posts will be shown. You can change this as 5, 6 or more.
  • Scroll Delay = 175. If you write 100, it will increase the speed. And if you wanna make it slower then use more than 175.
  • Direction = Left. That means your post will be moved from right to left. You can also use right. 


Stay with Marks PC Solution to get more interesting IT topics!


Sunday, November 4, 2012

Find your IP Address and Get Detailed Information about any IP Address!


Many days ago I wrote about how to find your IP address. And in this post I'm gonna write something more for you. If you read this post carefully, you will be able to know
  • How to find IP address
  • How to collect detail information about an IP including its location, ISP etc
  • Whether it is blacklisted or not
  • How to Trace Email
Not only the above, but also you can do many things with the sites I'm sharing with you right now.

There are many sites available in the web for doing these tasks. But I am recommending you only the following sites:
  1. WhatIsMyIPAddress.com
  2. IP-LOOKUP
  3. WhatIsMyIP.com
But my personal choice is the first one. I mean What Is My IP Address. Let's start our operation. 

Click here to start. And let the page load in your browser. Now you will notice your IP at the screen as below.


Here you can see the detailed information about your own IP. If you wanna know something about any other IP then type its address in the Additional IP Details box and press on it. It will show you the full information about it.

You can also check whether an IP is blacklisted or not. Click here to start this operation. And you should type the IP address if it is not your own IP in the check black list box. 

If you wanna check from where an email is sent to u then click here

And you'll get the all services here at a glance provided by this site. 


Stay with Marks PC Solution to get more interesting IT topics!

Saturday, November 3, 2012

How to Change the Drive Letters


Few days ago my PC got some problems. And I need to reinstall my Windows 8. After installing a fresh Windows, I got surprised! Drive D was missing from my drive list! 

What happened actually? D drive was automatically named as E. And all the drives' names were replaced by the next letter. Such as E with F, F with G and G with H. Though I don't the actual reason maybe it is caused by the new Windows, but I can show you how to get rid of this change. 

If you face the same problem, or just want to change the name of your drives, you can follow my instruction. 
  1. Right click on My Computer icon from desktop and select Manage.
  2. Now hit on the Disk Management from the left panel.
  3. Here you will get the list of your drives.
  4. Then right click on any drive that you wanna change, and hit on Change Drive Letter and Paths.
  5. Now Click on the Change and Select another letter for this drive from drop down list. 
  6. Finally hit on the OK button for twice. Open your Explorer to see the change. 


Stay with Marks PC Solution to get more interesting IT topics!

Thursday, November 1, 2012

Use Alexa Toolbar Get Higher Ranking on Alexa !!


Alexa is a popular ranking site. The main feature of Alexa ranking is that, it ranks the sites from 1 to last. Just few months ago, Google was top in the alexa ranking. But few days ago it loses its first position to Facebook

Though alexa ranking doesn't matter much for a site. But day by day alexa ranking is getting importance. Sometimes it is very difficult to compare some sites if they have same Page Rank in Google. But in alexa ranking there is no chance to get same position. 


When you use Alexa Toolbar in your browser (only Firefox, Google Chrome and IE) it sends data to their server. It measures how much time do you spend on a site. And how much time you gave on that site. It also shows you the ranking of a website in search result. 


It measures the rank of a site based on: 
  • How much time a person spend on a site
  • How much pageviews does he made
  • How many people visit the site within a particular time
  • From where the visitors come to the site 
All of the above data are collected by Alexa Toolbar. So if you visit your site with Alexa Toolbar installed on your browser, then I can guarantee that your alexa ranking will increase significantly. 

Suppose your alexa ranking is 20500000. If you use alexa toolbar and browse your site your ranking will be less than 300000 !! And if some of your friend visit your site with alexa toolbar, your ranking will be less than 10000 ! 


So why do you avoid this chance? Install it now in your browser. 


To install the alexa toolbar visit this site- http://www.alexa.com/toolbar. Then click on Install Alexa Extension. Then follow the steps that appears in your browser. 

And if you're using Google chrome then you can directly click here. Currently, you can use this toolbar only with Firefox, Google Chrome and Internet Explorer. Make sure you're using updated version of each browser. 

My personal choice is Google Chrome if you wanna use Alexa Toolbar. Because it will allow you to use the toolbar both as standard view and and toolbar view. 


Don't forget to inform your friends about advantages of alexa toolbar. Because the more people visit your site with alexa toolbar, the higher will be your ranking! 


Stay with Marks PC Solution to get more interesting IT topics!

Tuesday, October 30, 2012

Remove Powered by Blogger Widget from your Blog!


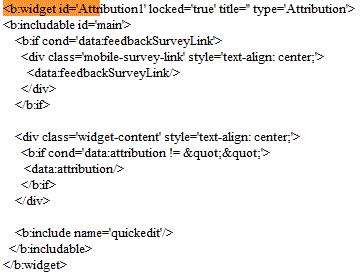
You may wanna remove the powered by blogger text from your blog that shows at the end of the page. But this task is not very easy if you don't know the proper way. If you try to do it just by editing the template, for sure you will not be able to do so! 

Because this text is set up by a widget. Without proper guide you can't find this code! So, in this post you're getting a guide to remove this text. Follow my instruction. 
  1. Sign in to your blogger account. 
  2. Then hit on the template button. 
  3. Click on the Edit HTML option and proceed to the next step.
  4. Then mark the option named     
  5. Now you've to delete a minor portion of the template just below this line- <b:section class='foot' id='footer-3' showaddelement='no'/>
  6. Press Ctrl + F to find this line. And select and delete the following lines as shown in the image below.


When you press the delete button you will show the following image:


Hit on the delete widgets button as indicated in the image and save your template. Now view your blog to see the change! 

Stay with Marks PC Solution to get more interesting IT topics!