Showing posts with label Security. Show all posts

Tuesday, July 2, 2013

Protect your Documents, Workbooks & Presentations by Password !!


Protect your Documents, Workbooks and Presetations by Password


If  you're a regular visitor of Marks PC Solution you should notice, we've published lots of tutorials on Microsoft Windows, Microsoft Office and other software. We've also published many tutorials and tips regarding security issues. You can find those tips by using the search box. Or you can search by categories: Tips n Tricks, Tutorials, Microsoft, Windows, Security etc.  Today, I would like to share another tips on security.


Many of you might be familiar with the password protection system of Microsoft Office. If you're working with highly confidential documents, workbooks and presentations (ie. Exam Questions, Online Account Information, Personal Information, Other Secret files),  then this is a good idea to encrypt those files by password.


But if you are not acquainted with the password protection system you should go through the whole post. You should know, the different versions of MS Office keeps the password option differently. You will not find it similar in Office 2003, 2007 and 2010. That could be difficult for you to find the password option. That's why I'm gonna discuss about all versions. :)

Note: The procedure is very similar in MS Word, Excel and PowerPoint.


Setting Password in MS Office Documents


Office XP and 2003:

These two versions are almost similar. All the options and tools are located at the same place. Maybe they are different just by color! Let's start -

Open MS Office Document (Word/ Excel/ PowerPoint) > Go to Tools Menu > Select Options > Hit on the Security Tab > Type your Password on Password to Open Box > Hit OK > Save the Document.

Now whenever you will open the document, first you have to enter the password. Then you will be able to access the file.

I apologize for not sharing any image. I don't use 2003 anymore. I have been using Office 2010 for last two years. But this is very easy. You will have no problem to set password in Office 2003. Upgrade to Office 2010 or 2013 to enjoy exiting features!


Office 2007:

You know Office 2007 brings a dramatic change in the interface. Its ribbon interface is absolutely different from Office 2003 or XP. But Office 2010 and 2007 are almost similar except small changes in few options. Okay start -

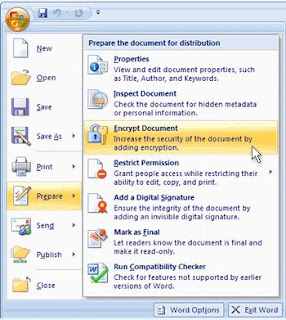
Open any of the Office Programs (Word, Excel or PowerPoint) > Now hit on the Office button from the top left corner > Choose Prepare and then Select Encrypt Document > A small Password box will appear > Type the Password > Hit OK > and then Confirm it > Save the Document.

Look at the image below:


Office 2010:

Though Office 2007 and 2010 are very similar, but there are some significant changes in some of the options. A major change is the disappearance of the Office button. Instead of Office button, you will see the File button in 2010. See how to do -

Open either Word, Excel or PowerPoint file > Click on the File button from the upper-left corner > Choose Info > Hit on the Protect Document from Permission section > Choose Encrypt with Password > Type your desired Password in the box and hit OK > Type again to confirm it > OK > Save the Document.

You can take help of the image below:


Note: If you don't save the document after setting the password, then it will be removed automatically. Password will be enabled after saving the document. And remember, this password has no recovery options as you can do in Gmail, Yahoo or Facebook! So be careful!


Removing/ Changing the Password

Sometimes you may set a password for testing purpose only. For example you set password in a document that doesn't need password at all. And every time you're required to type it when accessing that file. Or maybe you want to change it. But when you try to remove or change that password you can't find any option to remove it. How disgusting!  :)

Well this is easier than you think! If you wanna change the password then repeat the whole process again until the password box appears. Then type a different password and save the document.

And if you would like to remove the password then just leave that box blank and save the document. Password will be removed. 


Hopefully this post will be helpful for you . . . :)


Stay with Marks PC Solution to get more interesting IT topics!


Friday, January 25, 2013

How to View Saved Password of Google Chrome?


Saved Password


This is an exclusive post. Only few net users know about it. So far I can guess only 20% people might know this trick! I was little bit confused whether I should write about this or not. Because if this trick is used by a criminal-type people certainly it will be harmful for the good guys. 

Finally I've decided to write about it. Because it will also help you protect your password from other people. 


When you sign in to any online account giving your pass and username your browser offers to save the password. So that you don't need to do this again and again. Certainly this is very handy and comfortable. But if your password goes to the wrong hands will this comfort exist anymore?? 

Or you may forget your account password. But your browser saved this earlier. How can you view this? Today I will discuss how to manage your saved passwords or how to view them. 
  1. Open your Chrome browser
  2. Look at the top right corner. Just below the close button you will get Customize and Control button. Hit on the button. 
  3. Choose Settings from the drop down menu. 
  4. Scroll down to the bottom and hit on Show advanced settings . . . 
  5. Now find Passwords and Forms option. 
  6. Hit on Manage Saved Passwords.
  7. Immediately you'll get a new window showing your online accounts with saved passwords.
  8. Select any account and click the show button to view saved password. 
  9. If you wanna remove any saved password then hit on the cross button. 
  10. Finally hit OK and exit. It's easy. 

How to view saved password of Google Chrome


If you wanna stop your browser to offer to save password then unmark the option Offer to save password from Passwords and Forms option found at the step 5. Take help from the image below. 

How to Manage Saved Password in Google Chrome


Stay with Marks PC Solution to get more interesting IT topics!


Sunday, December 30, 2012

How to Change or Create Password in Windows 8


If you're still using the earlier versions of Windows then you may thought creating or changing a password in Windows 8 is same as previous versions. But those who are working with Windows 8 know that this is not same at all. 

When you are installing Windows 8 for the first time then you can set a password at the end of the installation process. If you skip that step during the time of installation then you will have to set it from the PC settings. 

In earlier versions of Windows password can be managed from a control panel item named User Accounts. This item is still available. But you can't manage your password from here. Today I will show you the easiest way to do this task. 

Remember: Your Windows should be genuine or it may ask you to activate windows while doing this task. So, if you have any problem regarding activation then visit: Windows 8 Activation Process
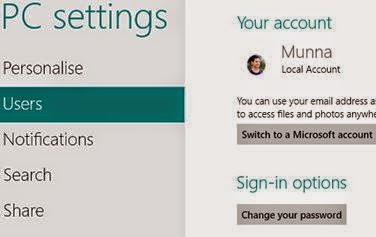
  1. Press Start + W > type Password > select Change your password. Or you can simply press the Start button and click on user icon from the top right corner. Then choose Change account picture and choose Users. Both do the same job. 
  2. Now as you can see in the image below, hit on the Change your password under the sign in option. Click on it to change. 
  3. Now you can change or create your password from here as you did in earlier versions. 
  4. You can also set a picture password from here. Do it with caution if you're a beginner! 
You can also change your password in running condition if forgotten !! Visit here to know more: Change Windows Password if Forgotten


Stay with Marks PC Solution to get more interesting IT topics!


Saturday, December 29, 2012

How to Change Windows Password without Knowing it !!!


Today I'm gonna write about an amazing trick for you! By this time you've already understood about what I'm talking about. Yes, you can change windows password without knowing it. But PC should be in a running condition! 

This is a very easy method. If you're new user then you might face some problems. But mid level user can do this within few minutes. But your PC should be in the Administrator mode to do this task. 

This system has been tested for Windows 8 and 7. But this method may also work on Windows XP. Okay let's start. 

  1. Open Command prompt as Administrator. XP users don't require Administrative mode. 
  2. Now type this command and press enter- net user
  3. Now type another command and press enter- net user Administrator *
  4. Type the new password and press enter.
  5. Retype the password and press enter.
  6. If password is changed then you will see the message- the command completed successfully
Remember: When you typing the new password, you cursor will not be moved. Don't be afraid.  You can take help from the image below:


And don't forget to create a Password Reset Disk to avoid any accident. If you have the reset disk you can change your password if forgotten. 


Stay with Marks PC Solution to get more interesting IT topics!


Tuesday, December 4, 2012

How to create Password Reset Disk for Windows XP


Anytime you may forget your password. Or someone who knows your password may change it to challenge you! 

That’s why Windows XP has a system to create a reset disk for forgotten password. No matter how many times the password has been changed. This disk will allows you to reset the password until you re install Windows XP on your system.

And if you're using Windows 7 or 8 then Read This

And don’t be confused. This reset disk only work with your computer. It will not work in any other system.

To create a reset disk, all you need is just a USB flash drive and your current password (if any).

Let’s start-

  1. To open Control Panel Press Start + R > Type Control > Press Enter
  2. Double click on User Accounts and Choose Administrator
  3. Now select Prevent a forgotten password from the left panel\
  4. Press Next > Next > Type Current Pass (if any) > Next > Next
  5. Finish


Caution: Anyone can change your password using this disk! So, keep it in your safe. 


Create Password Reset Disk for Windows 7 or 8


Stay with Marks PC Solution to get more interesting IT topics!


Saturday, November 3, 2012

How to Change the Drive Letters


Few days ago my PC got some problems. And I need to reinstall my Windows 8. After installing a fresh Windows, I got surprised! Drive D was missing from my drive list! 

What happened actually? D drive was automatically named as E. And all the drives' names were replaced by the next letter. Such as E with F, F with G and G with H. Though I don't the actual reason maybe it is caused by the new Windows, but I can show you how to get rid of this change. 

If you face the same problem, or just want to change the name of your drives, you can follow my instruction. 
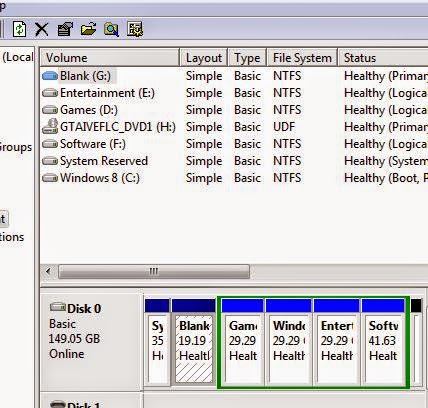
  1. Right click on My Computer icon from desktop and select Manage.
  2. Now hit on the Disk Management from the left panel.
  3. Here you will get the list of your drives.
  4. Then right click on any drive that you wanna change, and hit on Change Drive Letter and Paths.
  5. Now Click on the Change and Select another letter for this drive from drop down list. 
  6. Finally hit on the OK button for twice. Open your Explorer to see the change. 


Stay with Marks PC Solution to get more interesting IT topics!

Sunday, August 19, 2012

How Secure is Your Password?


Today I'm gonna share a funny site with you. This site will tell you how secure is your password. The most interesting thing is that it will show how much time is required by a desktop PC to crack your password!

Of course I don't know how much useful it is. But one thing I can assure you is that it will be very interesting. 

Let's try it. Visit this site- http://howsecureismypassword.net/ to start the fun. Under HOW SECURE IS MY PASSWORD? you will find a box to enter your password. When you type it will show a text something like that - 

SHOW SETTINGS
It would take a desktop PC about6 billion yearsto crack your password


Below this text you will find a button named SHOW DETAILS. If you click on it then it will show the details of your password like below: 

SHOW DETAILS

HIDE DETAILS
  • Length: 15 characters
  • Character Combinations: 62
  • Calculations Per Second: 4 billion
  • Possible Combinations: 768 septillion

  • After this details there may come some other information depending on your password. It will give you some recommendations if necessary. And might say whether your password is secured or not. 


Stay with Marks PC Solution to get more interesting IT topics!

Saturday, August 11, 2012

How to Create Password Reset Disk?


For your computer security you can set start up password. Whenever you turn on PC, Windows ask you to enter password. Then you enter password and get access to the desktop. And all of us know that it is a normal process. 

But, if your forget your password? Then what? 

You might think experts can easily break it and have access to the PC! And as you're not expert so enter the DVD in the drive and start installing Windows again. And you lose all of your files and folders that is stored on installation drive. 

But you can avoid such type of hazard very easily. I don't advise you to write down your pass in the diary or calender. Because this is not safe. Just spend few minutes to create a password reset disk. It's safe and easy. And there is no risk. Follow the steps below: 
  1. First make sure you've connected your USB Flash Drive in the port. You don't need to format the disk. And your files will not be affected. 
  2. Then go to the User Accounts from Control Panel.
  3. Now hit on the Create a password reset disk option from the left panel.
  4. You'll see Forgotten Password Wizard. Click Next.
  5. Select the drive that is to be used as reset disk. Click Next.
  6. Enter the current password if any. Otherwise leave it blank. 
  7. Click next and wait for the processing. Click Next again. Then Finish.
The disk is ready for use. Now open your USB drive and look for a 2 KB file named userkey.psw. This is the file that can help you to reset the password. Don't delete it. 


Now restart your PC and try to access by entering a wrong password. You'll see the Reset Password option. Click on it and type a new password. And from now you can use this password. 

You can change your password as many time as you wish by the same disk. 

Click to enlarge image

Caution: Anyone can change your password if he knows about your reset disk. So make sure that unauthorized person is not familiar with your reset disk. 

NB: This system has been tested on Windows 7 and 8. And it will work only on that PC from where the disk is created.  

Fun Fact: You've to create this disk before forgetting password. After forgetting this password, you can't create this disk. 


Stay with Marks PC Solution to get more interesting IT topics!

Friday, July 13, 2012

Add a Password on Zipped folder - Windows XP Only


In windows XP, you can protect your files and folders by adding a password. And no software is necessary for this purpose! All you need is just to create a ZIP file and set a password. Let's do it.
  1. First, select the files and folder that needs to be password protected.
  2. Now right click on it and send it to Compressed (zipped) folder. 
  3. Double click on the zipped folder to open it. 
  4. Now click on the file menu and select Add a password.
  5. Type and confirm the password in the Add Password window and hit OK.
  6. From now, whenever someone tries to open this folder, he will be supposed to enter the password to open the file. 
Click to enlarge image


And sorry to note this system has been removed from Windows 7 and Windows 8. 


Stay with Marks PC Solution to get more interesting IT topics!

Friday, July 6, 2012

How to Make Windows 7 Genuine - Simple & Easy Way

More than 50% computers are running on Windows 7 OS! This is the market leader now. However the Microsoft is going to launch Windows 8 Final Version at the end of the October, 2012

If you're a victim of software piracy and use illegal version of Windows 7 then you may get continuous error message from desktop. And every time when you open your PC a message will tell you to buy a genuine version of windows. Actually this message is very annoying. 

Sometimes you may need to make your OS genuine to install Microsoft Security Essentials. 

In my previous post I wrote about the easiest way to make Windows XP genuine. And in this post I am showing the way to make Windows 7 Genuine! Let's find out how.
  1. Download the Zipped file from here
  2. Now extract the file.
  3. Now double click on Windows 7 Loader.
  4. Then click on install button and restart your PC when asked.
  5. And if you're looking for Advanced Settings then select the Advanced options located at the bottom left corner of the window.

Tips: In Windows Vista, 7 or 8 don't set your Windows Update Setting automatic. It will consume your internet data and not give you a better result actually. To change automatic update go to Properties of Computer > Windows Update >  Change Settings > Important Updates > Select Check for updates but let me choose whether to download or install them. 


Stay with Marks PC Solution to get more interesting IT topics!

How to Make Your XP Genuine- Just by Double Click!!

It's 2012! That means 10 years have been passed since Microsoft released Windows XP for the first time. Though this OS is obsolete still nearly 50% users use XP in their Computers. 

Sometimes you may have trouble to make your XP genuine. If your XP detected as invalid once  then you are in a deep trouble. You've to install it again. Besides while installing Microsoft Security Essential your OS must be genuine. In that case your Windows XP will show continuous error message about software piracy. 

So, in this post you'll get the easiest way to make Windows XP genunine. Follow the steps below.
  1. Download the 1 KB zipped .reg file from here
  2. Double Click on the zipped file to open it.
  3. Now double click again and hit yes > OK.
  4. Now restart your PC and enjoy the genuine Windows XP.
Note: This tips has been tested on Windows XP SP 2. Other service packs were not tested. To check your service pack version, go to properties of My Computer. 


Make Windows 7 Genuine - Simple and Easy Steps


Stay with Marks PC Solution to get more interesting IT topics!

Saturday, June 16, 2012

Hide your Hard Disk Drives from My Computer!!


Sometimes you may not want your friends to access your files and folders. Or you may like to hide a specific drive or all drives of your hard disks. And this trick will also help you to make your friend surprised! 

Group Policy Editor will allow you to do this task. You can do it by following few steps. Let's try: 
  1. Open Run or Press Windows Logo + R.
  2. Now type gpedit.msc and press Enter.
  3. Then hit on Administrative Templates from the left panel located under User Configuration.
  4. Double Click on Windows Components and find Windows Explorer then open it.
  5. Now find and open Hide these specified drives in My Computer. 
  6. Click on Enabled and select Restrict All Drives or the drive you wanna hide and hit OK.


If you again get them back, then follow the above steps. But in the 6th step select Disabled or Not Configured and then Apply ==> OK. Now check My Computer. If the drives are not shown then restart your PC. 


Note: This tricks is for your computer security. You can also surprise others. But don't try to harm people or don't make them scared. 


Stay with Marks PC Solution to get more interesting IT topics!

Friday, May 11, 2012

How to Create a Master Password in Firefox?


Earlier I wrote about how to set a strong password either for online or for computer security. If you wanna know how to create a strong password, read this post

Today's world is based on online. Few years ago, only people with IT profession used to live with computer, internet and technology. But today, a very normal person has to depend on information technology. He has to create Email IDs, Online Accounts and he has to remember the passwords too! 

For different reasons a person naturally needs to have more than one Email ID. And he may have many online accounts. And to remember the ID and password as well as type them again and again is a boring job. To ease the users' work every browser offers to save password and username. 

To be honest, to save password is really helpful for users. But at the cost of security who wants to save his password? 

When you save your password and if someone has access to your computer then he might see your password! 

To protect users' privacy Firefox provides an option to set a Master Password. If you have master password then nobody can see your saved password without entering the master password. And before signing in to any site you must enter your Master Password. 


Setting a Master Password

  1. First of all, make sure you are using Firefox Browser. Or download it from here.
  2. Then go to the Option under Tools menu. 
  3. Now hit on Security Tab and then click on Use a master password.
  4. Here you will see a new window asking you to enter Master Password. Set your desired password and hit OK. 
  5. Now nobody can use your accounts or view your passwords without entering Master Password.


If I Forget Master Password!


If you forget or can't remember your master password then visit the following page. It will give you an option to reset your Master Password. But remember, it will delete all existing password too! 

Copy and paste this link in your address bar. Now click on Reset button located at the bottom of the windows.


Stay with Marks PC Solution to get more interesting IT topic!

Friday, May 4, 2012

How to Make a Strong Password?


Strong passwords are important protections to secure your desktop, laptop or different online accounts. So, make your password strong. 

Keys to password strength: length, complexity and uniqueness. 

  • An ideal password is long enough with combination of letters, punctuation, symbols and numbers.
  • Use at least 10 or more characters whenever possible. 
  • Although it is difficult to manage separate password for each account you have to do so. Cyber criminals steal passwords on websites with very little security, and then they try to use that same password and user name in more secure environments, such as banking websites.
  • Change your passwords often so that it can be difficult for hackers to hack. 
  • The greater the variety of characters in your password, the better the security. However, password hacking software automatically checks for common letter-to-symbol conversions, such as changing "and" to "&" or "to" to "2."
  • Use the entire keyboard, not just the letters and characters you use or see most often.

Create a Password That is Strong & Easy to Remember 

There are many ways to create a long, complex password. Here are some suggestions that might help you remember it easily:


  • Marks pc solution
  • Markspcsolution
  • MarksPCSolution
  • Marks PC Solution
Note: Always remember that space is considered as a character in password! Capital letter and small letter is also considered as different characters in case of password. 


Test your Password Strength with a Password Checker


Avoid the Following Mistakes while Creating a Password: 


  • Don't use any dictionary word of any language. 
  • Sequences or repeated characters. Examples: 12345678, 222222, abcdefg. 
  • Adjacent letters on your keyboard. Examples: qwerty, poiuy, asdfg. 
  • Personal information. Your name, birthday, driver's license, passport number, or similar information.
  • And must not use your mobile or telephone number. 


Stay with Marks PC Solution to get more interesting IT topic!

Tuesday, May 1, 2012

How to set a password on logon screen?


Most of the computer users are familiar with user account password. It can be set during the windows startup. It prevents the unauthorized access to a computer. But this password can only protect you from a normal user. An expert can easily break this and have access to your computer.

But in this post I am gonna show you a trick that can add an extra layer of security of your computer.

  1. Follow the steps below:
  2. Press Start + R to open Run
  3. Type syskey in the Run and press enter
  4. Now hit yes and then update (Make sure that Encryption enabled option is selected)
  5. Whenever you hit on update immediately a new window named Startup Key will appear
  6.  Now select Password Startup
  7. Type your password here and confirm it then hit ok.


Note: Remember, if you enable this password once then it can’t be disabled. You can change the password only. You can also hide the password box during the startup. 
To do so, repeat the steps 1 to 4 and in the step 5 select System Generated Password and Store Startup Key Locally. In this way you can deactivate the startup password. 

Friday, March 30, 2012

How to Format a Virus Affected Flash/ Pen Drive?


In general, when we need to format a pen drive or hard disk drive then we open My Computer Window. Then select the drive and right click on it. Then we can format it. 

But when pen drive is affected by virus, then the task gets some difficulties! Don't worry. Because in this post I am gonna show you how to format a virus affected USB Flash Drive. 

Make sure your computer is secured with a strong and reliable security software. I prefer Microsoft Security Essential. Then scan your flash drive with it. And try to format it. 

If you're fail to format it. Then follow another method. At first, make a right click on My Computer from your desktop. Then select the manage option. Now at the left panel you will find an option named Disk Management. Click on it and you will see all of your disk drives listed here. Now you will be able to format any drive you need. Right click on them and hit on format. 

Follow the images below: