Showing posts with label Software. Show all posts

Tuesday, July 2, 2013

Protect your Documents, Workbooks & Presentations by Password !!


Protect your Documents, Workbooks and Presetations by Password


If  you're a regular visitor of Marks PC Solution you should notice, we've published lots of tutorials on Microsoft Windows, Microsoft Office and other software. We've also published many tutorials and tips regarding security issues. You can find those tips by using the search box. Or you can search by categories: Tips n Tricks, Tutorials, Microsoft, Windows, Security etc.  Today, I would like to share another tips on security.


Many of you might be familiar with the password protection system of Microsoft Office. If you're working with highly confidential documents, workbooks and presentations (ie. Exam Questions, Online Account Information, Personal Information, Other Secret files),  then this is a good idea to encrypt those files by password.


But if you are not acquainted with the password protection system you should go through the whole post. You should know, the different versions of MS Office keeps the password option differently. You will not find it similar in Office 2003, 2007 and 2010. That could be difficult for you to find the password option. That's why I'm gonna discuss about all versions. :)

Note: The procedure is very similar in MS Word, Excel and PowerPoint.


Setting Password in MS Office Documents


Office XP and 2003:

These two versions are almost similar. All the options and tools are located at the same place. Maybe they are different just by color! Let's start -

Open MS Office Document (Word/ Excel/ PowerPoint) > Go to Tools Menu > Select Options > Hit on the Security Tab > Type your Password on Password to Open Box > Hit OK > Save the Document.

Now whenever you will open the document, first you have to enter the password. Then you will be able to access the file.

I apologize for not sharing any image. I don't use 2003 anymore. I have been using Office 2010 for last two years. But this is very easy. You will have no problem to set password in Office 2003. Upgrade to Office 2010 or 2013 to enjoy exiting features!


Office 2007:

You know Office 2007 brings a dramatic change in the interface. Its ribbon interface is absolutely different from Office 2003 or XP. But Office 2010 and 2007 are almost similar except small changes in few options. Okay start -

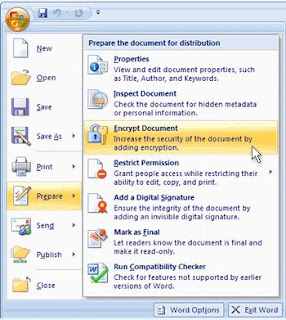
Open any of the Office Programs (Word, Excel or PowerPoint) > Now hit on the Office button from the top left corner > Choose Prepare and then Select Encrypt Document > A small Password box will appear > Type the Password > Hit OK > and then Confirm it > Save the Document.

Look at the image below:


Office 2010:

Though Office 2007 and 2010 are very similar, but there are some significant changes in some of the options. A major change is the disappearance of the Office button. Instead of Office button, you will see the File button in 2010. See how to do -

Open either Word, Excel or PowerPoint file > Click on the File button from the upper-left corner > Choose Info > Hit on the Protect Document from Permission section > Choose Encrypt with Password > Type your desired Password in the box and hit OK > Type again to confirm it > OK > Save the Document.

You can take help of the image below:


Note: If you don't save the document after setting the password, then it will be removed automatically. Password will be enabled after saving the document. And remember, this password has no recovery options as you can do in Gmail, Yahoo or Facebook! So be careful!


Removing/ Changing the Password

Sometimes you may set a password for testing purpose only. For example you set password in a document that doesn't need password at all. And every time you're required to type it when accessing that file. Or maybe you want to change it. But when you try to remove or change that password you can't find any option to remove it. How disgusting!  :)

Well this is easier than you think! If you wanna change the password then repeat the whole process again until the password box appears. Then type a different password and save the document.

And if you would like to remove the password then just leave that box blank and save the document. Password will be removed. 


Hopefully this post will be helpful for you . . . :)


Stay with Marks PC Solution to get more interesting IT topics!


Thursday, June 13, 2013

Explore Apps from Windows Store!


Windows Store Tile Image


Most of you are now familiar with the exciting features of Windows 8 - the latest Operating System released by Microsoft. But how many of you are familiar with the Windows Store? This is the most exclusive part of Windows 8. Because no internet browser can take you to the Windows Store unless you're a user of Windows 8! 


Windows Store only belongs to the Windows 8 users. Whenever you start Windows 8, you must find the live tile of Windows Store at the start screen. If you hit on the Store icon, a new window will open containing the apps. There are some categories such as Games, Entertainment, Education etc. But have you noticed that there is no search option? Isn't it very strange? 


Definitely this is very strange that Windows Store has no search option itself! But there is an alternative search option for you. Newly designed Windows Search option allows you to find the necessary apps from Windows Store. Today I will discuss how you can search necessary apps from Windows Store


Requirements: 

Nothing special is required to explore Windows Store. But you should know, only Windows 8 users have access to the Store. And you must have a Windows Live ID. It can either be Hotmail or Live Mail. 

For Example: markspc@hotmail.com, markspc@live.com etc. 


How to Use the Store: 

Very easy. But sometimes you might be confused. First time when I visited the Store, I was looking for the search option. Actually there is no search option in the Store. You have to use the Windows Search option. 

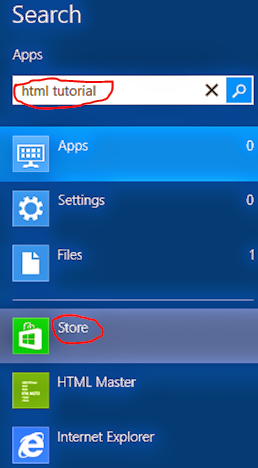
  • To find the apps > Simply press Start + F to enable Search, type something in the box for example- HTML Tutorial > Then hit on the Store > Immediately the Store will be running on a new Window. 
Hint: Actually you don't need to press Start + F ! Just press Start and type the name of your desired application. Search option will be enabled automatically. Also have a look at the image below to see how to search: 

Windows 8 Search Option to search Apps on Store


  • Choosing the Apps: The Store may gather more than hundred apps for you for a single search query depending on the number of apps stored on it. But you may need only one or two of them. You can shorten the list in many ways. You can use the price, rating or reviews to select the apps. If are now willing to pay money, then choose only free apps from the category. When you will select only free apps, the list will be sorted fast! 

  • Installing the Apps: Before installing any app, check the rating and reviews of that app if any. And you should also read the details of that app. And you must check what permissions that app wants from you. If everything is okay then you can hit on the Install button. If you're not signed in with Windows Live ID, you may need to type the email and password. Now the app will be downloaded and installed. No action is necessary during the installation. Everything will be done automatically done. 

  • Uninstalling the Apps: This happens to me very often! Several times I've removed the apps immediately after installing them. Sometimes apps may not be as how you want. It that case you can remove it and look for a better alternative. To remove an app, press Start > then right click on the app you wanna remove > hit on the Uninstall button from the bottom. 


Ads with the Free Apps: Free apps may include the ads of Microsoft. Some apps don't required net connection to operate. But they will shows ads from Microsoft. If you don't like ads then you can disconnect your net while running those apps. But you must be connected to the net to run the apps that require internet access. 


Enable/ Disable Live Apps: Some apps are live. They consume your bandwidth even when you are not using them! If you don't want them collect data from internet then go to the start screen by pressing Start button > Right click on that app > choose Turn Live Tile Off from the bottom. Or when you wanna enable it do the same thing again. 


The last thing I would like to tell you, Store is a great place to find free and premium apps. It's a good step taken by Microsoft. Previously Microsoft had no app store for the users. But apple has a very rich app store for their users. We should use the Windows Store to use the apps, and we should also help to enrich it by rating and reviewing the apps. And I think it will be helpful for the Store to supply more apps for us! 


And if my post is being read by a developer I request you to cooperate the Store :) 


Stay with Marks PC Solution to get more interesting IT topics!


Wednesday, May 8, 2013

Age Calculator by Microsoft Excel !!


Microsoft Excel Age Calculator


Often you may need to calculate your age. Or someone may ask you to calculate his/ her date. And sometimes you may need to calculate the difference between two dates. There are many third party tools (small software) to calculate the difference between the two days. 


If you're using Windows 7/ 8 then you don't need any other tool to calculate the difference between two dates. Because Windows 7 and 8 has a nice calculator. It allows you to calculate age or date difference. 

To calculate a date using Windows 7/8 calculator- 
  1. Press Start + R > type calc > hit Enter
  2. Now go to the View menu and choose Date Calculation
  3. Now enter the From date and To date and hit on Calculate button. 


But my today's discussion is not this one. Today I'm gonna show you how to calculate the age or the difference between two dates using Microsoft Excel! You just need to download a file and then open it. Download the file from the link below:


Download


This is a zip folder. After downloading the folder, first you need to unzip it. There are 3 files:
  • A Read Me file
  • An xls file for Office 97-2003 users
  • An xlsx file for Office 2007 and 10 users
Open the file that is compatible with your version of Microsoft Excel. After opening the file you will see some text as showing in the image above. Now do the following:
  1. Input current date in the day, month and year column.
  2. Input your birth date or the date from where you want to calculate in the day, month and year column.
  3. Now you get the difference or your age in the Age row. 


Remember: Formulas used in this file for calculation are hidden. Never try to change it unless you're capable. If you make any mistake then it will not show you the correct result. If you wanna change the formulas, first you have to keep a back up copy of the file. 


Hopefully this file will be very useful for you. If you wanna know about something or expect something from us, just leave a comment with your feedback/ opinion. 


Thanks for visiting Marks PC Solution . . . 


Stay with Marks PC Solution to get more interesting IT topics!


Monday, March 11, 2013

Use 7-Zip to Open .Rar file or .Zip file


Isn't it very strange to write about such an easy topic in this site? Maybe. But I'm gonna share a personal experience with you. After that you answer whether this post is unnecessary or not. 

Few days ago I joined as an Internee at Uttara Bank Ltd. My first assignment in the bank was to print a file that officials failed to open. The Branch Manager knew about my computer skills. He asked me to troubleshoot the problem. 

The task was very easy. It was simply a file with .rar extention. A mail was sent from Head Office. There were two files. So it was compressed by WinRar. As officials were not familiar with this file type they were confused. Then I just visited to the Filehippo and download the 7-Zip. After installing this I opened the file and printed this. :) 


By the way, all of you (except new users) might be familiar with zip or rar files. There are many free as well as premium applications to compress the files or unpack the zipped files. But today I'm gonna discuss about 7-Zip


Let's have a look at what 7-Zip is actually- 
  • 7-Zip is an open source file archiver with a high compression ratio.
  • It is mostly used to zip and unzip the files and folders.
  • Supported Packing and Unpacking Formats: 7z, XZ, BZIP2, GZIP, TAR, ZIP and WIM
  • Supported Unpacking Formats: ARJ, CAB, CHM, CPIO, CramFS, DEB, DMG, FAT, HFS, ISO, LZH, LZMA, MBR, MSI, NSIS, NTFS, RAR, RPM, SquashFS, UDF, VHD, WIM, XAR and Z.
  • Finally the installation size is really smart. Less than 3 MB! 


First you've to download 7-Zip from the above link. The download size is approximately 1 MB. Then install this on your PC. Installation process is very simple. There is no confusing option. 

Portable version is also available. You can download it from here. [Note: If you use portable version you can't get the app shortcuts when right click on files or folders]

After installing it on your PC, 7-Zip icon may appear on your Desktop or Program list. And when you right click on any file or folder you will see the options of 7-Zip. 


To Open/ Extract a .Rar File or Folder: 
  1. Make a right click on that file/folder. 
  2. Choose 7-Zip > Open Archive.
  3. Now you can see the files stored on that folder.
  4. Hit on Extract button to unzip those files. 

To Compress/ Zip Files or Folders: 
  1. Make sure the necessary files or folders are kept in the same folder.
  2. Now select the files and Click right.
  3. Choose 7-Zip > Add to Archives.
  4. Choose the Archive Format > Compression Level and other options as your need.
  5. Hit OK.


Instructions for Portable Version: 

The portable version is same as installed version except one thing. You will not get the shortcuts in mouse right click. All you need to do is just open the application from your PC where you've stored it. The application should be named as: 7-ZipPortable.exe

When you need to run this program, simply click twice on it. Immediately after clicking on it, 7-Zip will run. Now, if you wanna archive something first go to the proper Location > Select the Files or Folder > Hit on Add > Choose the Destination Folder, File Format > Compression Level etc > Hit OK

And if you wanna extract something then simply select the files and hit on Extract. If you do not choose any specific location for the extracted file then they will be extracted to the current folder. 


Also have a look at the image below. Important buttons for using 7-Zip are marked there! 


How to zip and unzip using 7-Zip


Stay with Marks PC Solution to get more interesting IT topics!


Monday, February 4, 2013

Self Assessment Test by Brain Works !!


Self Assessment Test to evaluate brain usage


Today I'm gonna talk about something different. It can be compared to a psychological test. If you take this test you will be able to know which part of your brain works more than other parts. How you respond to new situations or experiences. 

This test will also help you to realize what will be the effective learning system for yourself. It will show you how you use the parts of your brain and by what percentage. 

This self assessment test is prepared by Synergistic Incorporation Ltd. 
  1. Download the zipped file from the link below and unzip it. 
  2. Click twice on Brain.exe file.
  3. Now you will see the Welcome Screen. Click anywhere or press any key to continue.
  4. Enter Your Name and press Enter.
  5. Read the Introduction message if you want or press any key to continue.
  6. Another message may appear. Read this or skip. Reading will increase your understanding of this software. 
  7. Now you've to answer 20 questions. Answer all the questions. You can use mouse or press A, B or C to answer a question. (Remember: There is no right or wrong answer)
  8. When you finish you will see an image of your brain usage. Focus on your percentage of Auditory, Visual, Left and Right brain usage. 
  9. Then hit on Personal Evaluation and read the full report about your brain. That's it. 

Note: When you run this application on your PC you can't close it, or go to the desktop. To close this program press Alt + F4. And simply press Start + D to go to the Desktop


Stay with Marks PC Solution to get more interesting IT topics!


Saturday, February 2, 2013

Join Audio Files and Convert it to a Single File!


MP3 Joiner


In my very last post, you learned how to cut an audio file. Today you're gonna learn the opposite thing! Today I'm gonna write about how to join some audio files to convert them into a single file. 

You may like a song very much. But you may dislike the few parts of the same song. What do you do then? Split the song as you like and listen to them separately? You may do so but this is really uncomfortable. 

Better you join the files into a single file. There are many programs to join the audio. For your convenience I will use Shuangs Audio Joiner. It has following advantages: 
  • Portable (No installation required)
  • Easy and friendly interface
  • Free or charge
  • Compatible with all running version of Windows
  • Options to control the output file format and size
There is a single problem that is very irritating is that it is little bit slower. However as a free tool  I think this is very handy. 

So we can start our tutorial. Follow the simple instruction below:   
  1. Download the zipped file from the link below. It's 1.3 MB in size. 
  2. Unzip the folder and keep it in a safe location on your Hard Drive. 
  3. Open the folder and hit on AudioJoiner.exe (You can also create a shortcut of it on your desktop). 
  4. Hit on Add button > Find and select your audio files > Click on Join button > Choose Output Format > Next > Choose Bitrate (Select 128 or less to save time) > Next > Select Destination > Give a Name > Hit on Join
  5. Now wait for the mission to be finished. That's it. 
mp3 joiner


Stay with Marks PC Solution to get more interesting IT topics!

Friday, February 1, 2013

Cut Large Audio Audio File: MP3, WAV, WMA, MP2


How to Cut or Split Audio Files


My today's discussion is very common but still I think it will be really useful for you. Today I'm gonna talk about how to cut or split an audio file. Earlier I wrote about- Cut or Convert Audio & Video Files Using VLC !!

Those who already know this tips may think this is very simple. I also know this is a simple trick. But who can't do this, know how useful and necessary this is. I will show you this tutorial using Data Doctor Audio Splitter. 

Data Doctor Audio Splitter is a nice, small and handy tool for cutting audio files. When you wanna cut a song or music to make ringtone, or if you wanna cut a large files that contains more than 1 song this tool will be really useful.  


Features: 
  • Portable 
  • 100% free !
  • Fast and Reliable
  • Simple and easy to use interface
  • Supported Files: MP3, WAV, WMA and MP2

Instructions:
  1. Download the file from the link below and unzip it. Download size will be 600 KB.
  2. Click twice on Data Doctor Audio Splitter.exe
  3. Choose your desired audio song hitting on the Browse button located at the right side.
  4. Now play the song and wait for the desired position where you wanna set your start point. Then click on the Start button to set start point.
  5. When you wanna finish the song click on the End button to set finish point. You can also preview the song before splitting. 
  6. Finally hit on the Split button and give it a name and set a location for it. 
  7. Hit OK. That's all! 


Cut audio and make ring tone!


Stay with Marks PC Solution to get more interesting IT topics!


Monday, January 21, 2013

MS Excel Training: Basics, Salary Sheet, Result Sheet, Electric Bill


MS Excel Training Sheet


Hello Guys! 

Today I've come with something special for you! This is about Microsoft Excel Training. You will get an Excel File with some popular excel sheets. 

Previously I discussed about MS Word: 
But for the first time in this blog, I'm writing about MS Excel. The file contains the following materials:
  • Some Basics about MS Excel
  • Salary Sheet
  • Electric Bill 
  • Result Sheet
  • And some discussions
Hope you will be find it useful. All the sheets are included in a single file. It just 28 KB. After downloading the file you should be able to move different sheet from the bottom. For your convenience each sheet has been named properly.  But it supports only:
  • Office 2007 
  • Office 2010
  • Office 2013
If you're using 2003 or earlier version then first open this file in 2007 or 10. Then you can save the file for using in 2003. 


Stay with Marks PC Solution to get more interesting IT topics!


Friday, January 18, 2013

Resize Image by Free Image Converter


large to small circle


Sometimes you may need to re size high quality images. Maybe you captured some photos by high quality digital camera. Most of the cases a photo maybe over 3 MB in size! 

If a single image is more than 3 MB in size and you have to send 30 images to someone by email then it maybe more than 90 MB. If your net connection is very poor or bandwidth is very limited then can you send these images to that person? 

What do you do in that case? Looking for a good network or not send at all? 

Well this problem has a very good solution. A 3 MB size photo maybe ideal for printing purpose. But only for viewing purpose it is not necessary to be more than 100 KB! And after re-sizing the image your 90 MB image folder will be less than 3 MB!!!


Let's discuss how to re-size the high quality image. 

Follow the instructions below: 
  1. Download the Free Image Converter from this link. Free means free. It has no premium version yet. 100% free of cost. 
  2. Now install this on your PC. It supports all running versions of Windows i.e. XP, Vista, 7 and 8. 
  3. After installing you should find an icon of the image converter on your desktop. Double click on it to open. 
  4. Click on the Add Images button to select few images. Or choose Add Folder option to choose a large image folder. 
  5. Now have a look at the right panel- simple options. Select size and quality. Or keep it in default settings- size 800 * 60 and quality 70. 
  6. Then hit on the Simple Convert. 
  7. Now a new window will ask you to choose a location to store the converted images. Choose a specific folder or create a new one. Done! Just wait for the operation to be finished! 
Note: I've personally tested this software. I've converted my 1 GB photo folder. There were more than 400 photos. After converting the size it was just 20 MB! And it took less than 5 minutes! Quality was also satisfactory. 


Stay with Marks PC Solution to get more interesting IT topics!


Monday, January 14, 2013

Eject and Close CD/ DVD Tray by Mouse!


Eject and Close CD tray


Dear Friends! Today I will share a small soft with you. Soft means 22 KB. And its zipped size is just 8 KB! This software is made for handling your CD/ DVD tray. 

Turn Off Monitor by Mouse Click


You can open your CD/ DVD tray by pressing the button or by ejecting option from My Computer. But you can't close it by mouse click from My Computer. With this software you can open or close your CD/ DVD drive just by mouse click! 

You can place this software anywhere you like. Maybe you like to keep it on your Desktop. This application supports all running version of Windows:
  • Windows XP
  • Windows Vista
  • Windows 7 and 8
Now do the following to use this cute soft:
  1. Download the zipped folder from the link below.
  2. Unzip it.
  3. Keep it on your Desktop
  4. Double click to eject CD/ DVD tray, and click twice again to close it.

Tips: If you're using Windows 7 or 8 then right click on it and select pin to task bar. Now you will see a quick link of this software on your task bar. And you will be able to close and open your CD/ DVD tray just by single click! 


Stay with Marks PC Solution to get more interesting IT topics!


Saturday, January 12, 2013

How to Create Shortcuts for Symbols in Microsoft Word?


Ctrl+Alt+Del


Though graphical user interface has almost smashed away the command line, still keyboard shortcut is very popular among professionals. Still it is the best way to get out the best from any software. Because graphical user interface may let you easily use the software but keyboard shortcuts can give you the productivity. 

Earlier I've provided keyboard shortcuts for different programs. You can also read these:
Today you will learn how to create shortcuts for symbols or special characters in MS Word.  For example: Alt + 1 for ×, Ctrl + Num 0 =  ,  Ctrl + Num 1 = ÷ etc. Okay let's begin: 
  1. At first open MS Word.
  2. Then go to Symbol (Word XP and 2003 users will find it under Insert Menu. And Word 2007 and 2010 should go to the Insert Tab then at the right side there will be Symbol option. Then choose More Symbols from down arrow).
  3. Now you will see the Symbol Window with many symbols arranged under different fonts. 
  4. Select the Symbol or Character you want to make a shortcut for.
  5. Click the Shortcut Key.
  6. In the Press New Shortcut Key box press the key combination you wanna use for the selected symbol. For example: Ctrl + desired letter. Desired letter maybe 1 or num 1, or A, B, C etc. But make sure that this combination doesn't conflict with any existing shortcuts. (Never assign any shortcuts from Ctrl + A to Ctrl + Z. Use Alt key while combining with A to Z)
  7. Finally hit on the Assign button. Or if you wanna remove the previous one then hit on the remove button. That's it. 
Note: Some characters may already have shortcut key combination. You will see the combination when you are in the symbol window. It will be right to the Shortcut Key button. 


Stay with Marks PC Solution to get more interesting IT topics!


Tuesday, January 8, 2013

Office 2010 Activator (KMS) !!


Day by day cracking is being a tough job. But yet very possible. Earlier a software may require a simple serial key to activate. But today there are many other options. Sometimes you might be asked to connect to the internet to activate or sometimes you're asked to make a phone call! 

Microsoft Office 2010 has the same problem. It is not simply activated by the CD key. Sometimes CD key may not be asked during the installation process. If you're required to enter serial then try any of the following: 

YF79C-7Y4B4-PGM89-6BKGJ-46PBT
FC7HF-CF42G-MX6D7-8K9T7-BT9QT
2PWHY-KT4X6-96PYW-XQR7V-HW2W9
PYMDW-8DFY2-Y68BB-XHDGD-CT443
7XD2X-JWJ94-BCHBW-W9WXP-J2WPT
P6RW8-B8X84-FFK73-4BPWM-KRHX3


After installing a trial version of Office 2010 you're allowed to use it for 30 days only. After that it will ruin your peace. It will give you continuous love messages each time you start office. Today I'm gonna share an activator by which you can activate Office 2010 and stop unwanted love messages by MS Office 2010! 
  1. First download the zipped folder from here. It's just 1 MB. 
  2. Unzip it. 
  3. Now hit on the activator. (Disconnect net and close all running office programs) 
  4. Choose Activate Office 2010.
  5. Here you will see a command prompt window. You may ask to type 1 through 3. Type 1 or 2 to start the process and wait for 1 or 2 minutes. 
  6. Then press any key to exit. 
Office 2010 Activator


This KMService will activate Office 2010 for 180 days or 6 months. After finishing this time period run the same process. 

In case if it is failed to activate the office then choose Rearm Office 2010 option. It will activate Office for 30 days. 


Stay with Marks PC Solution to get more interesting IT topics!


Saturday, January 5, 2013

Browse with SRWare Iron: Fast, Simple & Reliable


Even one year ago people were very interested to use Firefox. They were leaving Internet Explorer and moving to Mozilla Firefox. People are still moving from one browser to another. But this time they are moving from Firefox  or IE to Google Chrome. 

Google Chrome is an open source browser. And more than half of total net users are using it now. Its interface is very simple and good looking. Where Firefox looks very boring. Still people would like to use Firefox due to its exclusive add ons. But chrome is also trying to rich their amount of extensions. 

Today my discussion is not about Google Chrome. I will discuss about SRWare Iron that is made by the source code of chromium. You may ask why should I use Iron instead of chrome? Well there are several reasons to avoid chrome. Let me list them: 
  • Chrome contact Google too much. It tries to monitor your online activities and sends information to Google. Certainly this is a threat to your privacy. And Iron don't do anything like chrome. 
  • Chrome creates an unique user ID (!!!) when you install it on your PC. This ID helps Google to identify you. 
  • When you type something in the address bar, chrome sends information to Google what you type in the address bar! Google tries to customize your search according to your need. But people don't like it. 
  • Chrome installs an automatic updater when starts that runs in the background. 
  • Chrome doesn't have built-in ad-blocker. But Iron has it. 
  • And you can use Google Chrome avoiding its limitations and difficulties just by using Iron.

All the problems discussed above is not present in SRWare Iron. It lets you browse with safety, security and reliability.  

If you're interested to know detailed information about Chrome Vs. Iron, then visit here


Stay with Marks PC Solution to get more interesting IT topics!


Thursday, December 27, 2012

Get Weather Forecast by Windows 8 Weather App!


If you're a regular visitor of this site then you might know that several posts have been made about Windows 8. Several times I mentioned about Weather Forecast app of Windows 8. 

Previously I wrote about Windows Reader. Today I will try to give you a detailed information about Weather app. 

This app is named as Weather or Bing Weather. And specially made for Windows 8. And it is not readily available for Download. It is bundled with Windows 8. 

If you're connected to online you can view the world weather through this weather app. It collects information from the server and shows you updates. You can get 10 days weather forecast with historical data. You can also search your desired location and get information of it. 


How to use it? 
This app is very handy to use and easy to navigate. To use this app press the Start Button and click on weather app tile. Immediately it will run full screen. 
  • To find a particular city- Click right button of your mouse and then hit on places button from the top. Then hit on + button and type the name of the city and choose it from the list. 
  • To see the world weather- Click right button of mouse and choose World Weather. Then click on your desired location in the map and get the necessary information.
  • You can also view the historical data, hourly forecast and 10 days forecast of a particular location by this app.

10 Exceptional Features of Windows 8


Stay with Marks PC Solution to get more interesting IT topics!