Monday, December 31, 2012

Animated Greetings Card for Happy New Year!


Dear visitors! 
Happy New Year! Hope 2013 will be a good year for all of you. Also pray for me so that I can give you my best. 

Animated Happy New Year E Card


Today I'm not going to give you any computer tips. This is all about happy new year. Today I will give you a small file. Basically it is an e card made by adobe flash. You can share this with your dearest or nearest people. 

Download Link


Download the file from the link above. It is a zipped folder. Unzip it first. Then click twice on it. You may need flash player. So make sure it is installed on your PC. 
  1. When you double click on the exe file it will open in a window.
  2. Now click on the box to open it.
  3. Then click on the cake to wish.
  4. Now click on the bush at the bottom left corner.
  5. Click on the house. 
  6. Then click on the little start from the bottom right corner.
  7. Click on the tree from the right.
  8. Click on the sky. 
  9. Happy New Year! Welcome 2013. 
Share this post with your friends. Wish them. Forget the bad experiences of previous years. Try to make 2013 memorable! Best of luck. 


Stay with Marks PC Solution to get more interesting IT topics!


Sunday, December 30, 2012

How to Change or Create Password in Windows 8


If you're still using the earlier versions of Windows then you may thought creating or changing a password in Windows 8 is same as previous versions. But those who are working with Windows 8 know that this is not same at all. 

When you are installing Windows 8 for the first time then you can set a password at the end of the installation process. If you skip that step during the time of installation then you will have to set it from the PC settings. 

In earlier versions of Windows password can be managed from a control panel item named User Accounts. This item is still available. But you can't manage your password from here. Today I will show you the easiest way to do this task. 

Remember: Your Windows should be genuine or it may ask you to activate windows while doing this task. So, if you have any problem regarding activation then visit: Windows 8 Activation Process
  1. Press Start + W > type Password > select Change your password. Or you can simply press the Start button and click on user icon from the top right corner. Then choose Change account picture and choose Users. Both do the same job. 
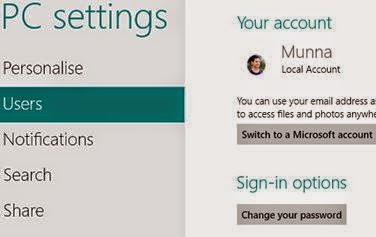
  2. Now as you can see in the image below, hit on the Change your password under the sign in option. Click on it to change. 
  3. Now you can change or create your password from here as you did in earlier versions. 
  4. You can also set a picture password from here. Do it with caution if you're a beginner! 
You can also change your password in running condition if forgotten !! Visit here to know more: Change Windows Password if Forgotten


Stay with Marks PC Solution to get more interesting IT topics!


Saturday, December 29, 2012

How to Change Windows Password without Knowing it !!!


Today I'm gonna write about an amazing trick for you! By this time you've already understood about what I'm talking about. Yes, you can change windows password without knowing it. But PC should be in a running condition! 

This is a very easy method. If you're new user then you might face some problems. But mid level user can do this within few minutes. But your PC should be in the Administrator mode to do this task. 

This system has been tested for Windows 8 and 7. But this method may also work on Windows XP. Okay let's start. 

  1. Open Command prompt as Administrator. XP users don't require Administrative mode. 
  2. Now type this command and press enter- net user
  3. Now type another command and press enter- net user Administrator *
  4. Type the new password and press enter.
  5. Retype the password and press enter.
  6. If password is changed then you will see the message- the command completed successfully
Remember: When you typing the new password, you cursor will not be moved. Don't be afraid.  You can take help from the image below:


And don't forget to create a Password Reset Disk to avoid any accident. If you have the reset disk you can change your password if forgotten. 


Stay with Marks PC Solution to get more interesting IT topics!


Thursday, December 27, 2012

Get Weather Forecast by Windows 8 Weather App!


If you're a regular visitor of this site then you might know that several posts have been made about Windows 8. Several times I mentioned about Weather Forecast app of Windows 8. 

Previously I wrote about Windows Reader. Today I will try to give you a detailed information about Weather app. 

This app is named as Weather or Bing Weather. And specially made for Windows 8. And it is not readily available for Download. It is bundled with Windows 8. 

If you're connected to online you can view the world weather through this weather app. It collects information from the server and shows you updates. You can get 10 days weather forecast with historical data. You can also search your desired location and get information of it. 


How to use it? 
This app is very handy to use and easy to navigate. To use this app press the Start Button and click on weather app tile. Immediately it will run full screen. 
  • To find a particular city- Click right button of your mouse and then hit on places button from the top. Then hit on + button and type the name of the city and choose it from the list. 
  • To see the world weather- Click right button of mouse and choose World Weather. Then click on your desired location in the map and get the necessary information.
  • You can also view the historical data, hourly forecast and 10 days forecast of a particular location by this app.

10 Exceptional Features of Windows 8


Stay with Marks PC Solution to get more interesting IT topics!

Friday, December 21, 2012

The Fastest Possible Ways to Improve Alexa Rank


Certainly Google Page Rank or PR is the most effective and reliable way to estimate the value of a website or blog. No other method is as dependable as PR. But recently Alexa Ranking is becoming a popular ranking method. 

In PR system a site is valued in a scale from 0 to 10. The higher the PR the higher is the rank. In this system thousand of websites might have the same rank. For example, both Google and Facebook's rank is PR 9. 

But in Alexa Ranking the sites are ranked from 0 to last. The lower the position the higher is the ranking. Though Alexa Ranking is still not as popular as PR even many advertisers are interested in it. And hopefully it will be a popular ranking method in the near future. 

Today I will tell you about the best effective ways to improve the Alexa Rank of your site. If you follow these methods properly I'm sure you can easily take your site from 10,000,000 to 100,000 within just 1 month! 

I'm recommending you the following 8 tips. 
  1. Update your site regularly. I mean write new posts on a regular interval. Otherwise your rank will fall.
  2. Create Back Links of your site in those sites which have more traffic. Know More. 
  3. Insert Alexa Traffic Widget in your site. Know more
  4. Use Alexa Toolbar in your browser when browsing your site. And all tell your friends to visit your site with Alexa Toolbar installed. Marks PC Solution Toolbar can also increase your rank. Know more
  5. Claim your site in Alexa. Know more
  6. Create an Alexa Toolbar for your site. Know more
  7. Place a Review Widget in your site. And write reviews of your site in Alexa. Tell your friends to write reviews of your site.  Know more
  8. Submit your site in different search engines to increase links. Know more

And don't forget that visitors are the king! Try to increase your site's visitors. Make sure that your site is: 
  • Fast
  • Easy to navigate and user friendly
  • Good Looking
  • Responsive (If user ask something)
  • Useful (Contents should be popular)


Stay with Marks PC Solution to get more interesting IT topics!


Wednesday, December 19, 2012

Download & Install Marks PC Solution Toolbar!


By this time many of you know that we've a toolbar made using Alexa. But many of you may not be aware of the advantages of this toolbar. 

Marks PC Solution toolbar will give you several advantages. Such as:
  1. This toolbar will help you to directly access your Gmail Inbox when signed in! 
  2. This is a live toolbar. Whenever anything changes it will also change automatically. If you get new email it will be shown in the button. 
  3. It will allow you to visit Google, Bing or Yahoo search with a single click! 
  4. It will show you Alexa ranking of search results in Google. 
  5. You can easily visit our FB Fan Page by this toolbar. 
  6. You can also tweet any page if you have this toolbar installed. 
  7. Most importantly, this toolbar will increase your Web Site ranking if you browse your site with this toolbar installed on your Browser. 

To get the best result, use this toolbar with Google Chrome. You can on or off this toolbar with single click if used in Chrome. 

Currently our toolbar supports 3 browsers. It is available for IE, Chrome and Firefox. To avoid any compatibility issue, make sure that you're using the latest version of your browser. Or upgrade it. 

Download the toolbar from the button below: 

Get our  toolbar!

Stay with Marks PC Solution to get more interesting IT topics!


Place Alexa Review Widget & Boost Your Alexa Ranking!


Dear Visitors! Good evening. Hope you're alright. 

This is another post about Alexa. Hopefully, it will also help you to increase Alexa Ranking. You can also read the following posts with this one: 
Writing reviews for a site in Alexa is very essential to increase the traffic rank. Alexa gives importance to that sites which have more reviews. But is it logical that users will find Alexa Review link for your site? Or would they like to search your site in Alexa? Then they will review it? 

That's very funny. Certainly they will not do it. That's why you should place a Review Widget in your site. So that interested person can easily write a review for your site. Simply copy and paste the following HTML code in your site. You're done! 

Hope you've got my points. Let's do it. (This Method is for Blogger Only!) 
  1. Sign in into your Blogger Account.
  2. Then go to the layout option.
  3. Click Add a Gadget from any suitable place.
  4. Choose HTML/ JavaScript.
  5. Copy and paste the following code with proper modification and save it.
  6. Now save and view your site! 
<a href="http://www.alexa.com/siteinfo/http://munnamark.blogspot.com?p=rwidget#reviews" ><img src='http://www.alexa.com/images/widgets/blue/light/v2-234x60.png' alt='Review http://munnamark.blogspot.com on alexa.com' /></a>

NB: Don't forget to replace the red part of the code with your site url !! 


If your site is not running by blogger then copy the HTML code and place it at any suitable place. And if you're looking for more customization then visit here


If you like Marks PC Solution then write a review for us! 


Review http://munnamark.blogspot.com on alexa.com

Stay with Marks PC Solution to get more interesting IT topics!


Tuesday, December 11, 2012

Join Google Plus Community with Over 500 Million People!


The number of Google + users is being increased rapidly. And I've already posted twice on Google Plus. You can have a look if didn't read this before- 
Today's post is just a follow up of the previous posts. Many of you may be interested to know - How many users does Google + has currently? The answer is bewildering! 

500 Million +


Can you imagine? 500 Million users within less than 2 years! Google + was launched on June 28, 2011. And on December 06, 2012 Google announced that their total users are more than 500 million. Source: Google Official Blog.

It is also said that only 135 million people are active in the Google Plus Stream. And 235 are active through Google. And others are not very active. Even people don't share too much status updates like Twitter or Facebook

Though Google Plus is growing very fast but number of active users are not growing in that rate. I think these are the reasons behind this inactive users:
  • Most of the people are already in Facebook with their friends or society. They love to share their views or opinions in one place.
  • Many users try to stay on Google Plus. But when they found that their friends are using only Facebook, the switch there to get connected.
  • Another reason is the interface. Plus has an interface that is very rich but not user friendly. And people have already liked the Facebook interface. So they don't feel easy with Google Plus.
  • Delay in loading the site is another important cause. The loading time of Facebook is very fast. But Google Plus is a heavy site. When browsing from a slow connection it irritates the users! That's why Google Plus is not very popular in the third world countries where net connection is not faster. 

But Google Plus has few advantages too:
  • Google is integrated with all services of Google- YouTube, Gmail, Blogger etc.
  • Unlike Facebook it is not restricted in schools, colleges, universities or Offices! 
  • While opening a new Gmail account, users are asked to upgrade in Google Plus.
  • New features are adding based on user demands.


Stay with Marks PC Solution to get more interesting IT topics!


How to Create Menu or Tabs in Blogger Blog?


I'm gonna post a new topic after a long break. I'm very sorry for those people are looking for new topics. Actually I was not getting new ideas. If someone is looking for a specific content then he might use this option to inform Marks PC Solution. 


OK let's start our today's concern. This post is specially helpful for blogger users who are trying to set Tabs in their blogs. And many of you may not know that there are two ways for creating tabs. I'm gonna discuss about both the methods one by one. 

Tips for Blogger


Method 1: 
This system is powered by blogger itself. This system allows you to create stand alone pages in your blog. Stand alone means you can only post a single topic in this page. For example, Contact Us or Report Us etc. This system may be less popular but still useful for creating a single but important post. 

To add Tabs in this system follow the instructions below: 
  1. Sign in to your blogger dashboard. 
  2. Now click on the Pages button from the left panel.
  3. If you didn't create any pages earlier then you will see only Home button.
  4. Look at the option Show pages as- Choose Top Tabs.
  5. Click on the New Page button to create a new page and choose Blank Page.
  6. You can arrange the position of the pages by dragging them


Remember, when you click on Blank Page from the New Page option immediately it will take to a new page. You should give a name of the page here. You can also write the contents of that page from here or you can just save it and write the contents later. 


Note: You can also add a web link in the tabs if you choose Web Address instead of Blank Page from the New Page option. 


Method 2: 
This system is somewhat complicated if you're new in blogging. But if you can do it then your blog will be just like a website! In this system your visitor will be able to find multiple posts under each tabs! You can do it just by placing the labels of your posts at the top. Follow the instructions below: 
  1. Sign in to your blogger account.
  2. Now go to the Layout option from the left panel.
  3. Click Add a Gadget from the top. (Or you must drag and place it just below the Header) 
  4. Choose Labels Gadget.
  5. Now click on Selected Labels from the show option and hit the edit button.
  6. Choose the labels from the box below. Never choose more than 8 or 9. Make sure that they can appear within a single line. Otherwise it may create a 2-line tab. That looks very odd. 
  7. After selecting the labels hit on Done button and save the gadgets. Now view your blog.
You must remember:
  • Your posts should be labeled properly to appear in the proper tabs.
  • Labels gadget must be place under the header of the blog.


Stay with Marks PC Solution to get more interesting IT topics!


Tuesday, December 4, 2012

How to create Password Reset Disk for Windows XP


Anytime you may forget your password. Or someone who knows your password may change it to challenge you! 

That’s why Windows XP has a system to create a reset disk for forgotten password. No matter how many times the password has been changed. This disk will allows you to reset the password until you re install Windows XP on your system.

And if you're using Windows 7 or 8 then Read This

And don’t be confused. This reset disk only work with your computer. It will not work in any other system.

To create a reset disk, all you need is just a USB flash drive and your current password (if any).

Let’s start-

  1. To open Control Panel Press Start + R > Type Control > Press Enter
  2. Double click on User Accounts and Choose Administrator
  3. Now select Prevent a forgotten password from the left panel\
  4. Press Next > Next > Type Current Pass (if any) > Next > Next
  5. Finish


Caution: Anyone can change your password using this disk! So, keep it in your safe. 


Create Password Reset Disk for Windows 7 or 8


Stay with Marks PC Solution to get more interesting IT topics!


Sunday, December 2, 2012

Create Automatic Screen Shots of Your Tasks with Steps Recorder!


Dear readers! Couple of months ago I wrote about how to create screen shot by snipping tool. Snipping tool is an easy way to capture image or screen of any window. 

If you're interested to know more about snipping tool then click here

Snipping tool is a manual tool to capture image. But today I will discuss about Steps Recorder which is an automatic tool to capture image or screen. You can use it for different purposes. Say for example, you can use it to make tutorial of something. When are writing about how to do something then you can use this tool to record the process with your written instructions. 


Steps Recorder is built in with Windows 8. But it was also available in Windows 7 named Problem Steps Recorder. Only the name of this app has been changed everything remain same. 

To start and use the recorder follow the instructions below:
  1. Windows 8 users, Press Start and simply type Steps then choose the Steps Recorder. And windows 7 users Press Start + R > type psr > Press Enter.
  2. Now it is active. To start the record press Start record. (Shortcut key- Alt + A)
  3. Now do your normal job that will be recorded. 
  4. Remember, when you click on something it will be recorded. And you will see a red button with every record.
  5. Anytime you can pause or resume the recorder.
  6. Once your task finished stop the recorder. (Alt+O)
  7. When save box appeared press the Save button. (Alt+V)
  8. Give a name to the file. The file will be saved with .zip extension.
  9. When you open the saved file, it will opened with your browser. 
And while using this app, you may find many useful tricks. Don't forget to share your ideas with us. Comment below! 


Stay with Marks PC Solution to get more interesting IT topics!