Saturday, March 30, 2013

Guidelines for Using PC Properly


Dark spot at the right hand by using mouse

Look at the image above. Most of the regular users of desktop have this hand mark. Specially at the right hand and it is caused by your mouse. Even I have a mark too. Do you have this? 

Couple of years ago people were not too much interested to use computer. In that time the use of computer was actually confined to the software developers, web developers, gamers etc. But when the social sites specially Facebook gained popularity across the world the trend gets changed. Now the general people spend much more time on PC than developers!!

Today I'm gonna talk about some ways (Tips n Tricks) to use your PC properly. The discussion will be divided into two parts. The first part is about your health. And the second part is about your PC health. Okay let's start.

Remember: If you're a blogger or something like web developer or programmer then this tips is not for you. This applies to normal people.


How to sit properly in front of a computer


Part 1: For your Health
  • Never use your PC for more than 3/4 hours a day. 
  • Make sure you've sufficient lighting and air facility in the place where you use PC.
  • Keep the place free of dust.
  • The chair and table you're using should be comfortable enough. Use only computer table. (Look at the image for proper positioning)
  • Never look at the screen continuously for a long time. Take break at least after every 5 minutes to avoid eye strain. Look at the wall or window of the room.
  • Sitting in front of PC for a long time is not a good idea. You can go for a little walk after every 30/40 minutes. Then you can back.
  • Never use PC in a dark room. Keep the light on while using PC. If you use PC in a dark room it will create a huge pressure on your eyes. The result will be the loss of vision! 
  • Keep the brightness of your monitor to a minimum level. High brightness may create eye strain.
  • Try to limit the use of social sites. Because surveys show these are not good for mental health. 


Part 2: For PC Health

  • Turn your PC on and turn it off properly. 
  • Never use too many programs at a time that your PC can't afford.
  • Use a reliable antivirus or security software that can protect your operating system from virus.
  • Close the unnecessary programs after using.
  • Never install too much programs on your PC. If you have unnecessary programs installed on your PC, just remove them.
  • Perform maintenance activities on a regular basis (Defragment, Disk Check, Clean Up etc.)
  • Open your casing at least two times a year. Clean it up properly and carefully. Check the internal and external connections. Unplug and plug them again if necessary.
  • Keep the place free. A small place is not good for a PC. Make sure the place is cool enough. Heat is always bad for a PC.
  • Never keep your PC turned on for a long time if the room is not air conditioned. Otherwise it will be over heated and thus it will affect the lifetime.
  • The cable used in the PC should be high quality. The main switch should also be perfect. Otherwise it may create short circuit. 

I will try to update this post later. Keep in touch . . .


Maintenance Tasks: Extend Your PC Life


Stay with Marks PC Solution to get more interesting IT topics!


Thursday, March 28, 2013

Statistics of Marks PC Solution on Alexa


Marks PC Solution Logo Alexa Logo PNG


Dear readers! Hope you're fine. And also hope you are getting something from this site. At least we are trying hard to provide useful tips for you. But this post is not related to any tips or tricks. You have the right to know about Marks PC Solution. In this post I will show you the statistics and ranking of Marks PC Solution on Alexa.

Hope you all know about Alexa - The Web Information Company.  Alexa collects the information about the websites. Normally a new site is not listed on Alexa. But when people use this site with Alexa toolbar or when this site has enough visitors, in that time Alexa enlists that site in its directory. 

Marks PC Solution was started at the end of 2011. In that time the ranking was more than 25,000,000. But now its 3 month ranking is only 192,000! And one month ranking is 162,000! 

You know without your contribution it is not possible to improve the rank so fast. Look at the Alexa Widget below. It shows the live rank of Marks PC Solution (Changes every day).


Statistics Summary for munnamark.blogspot.com

Munnamark.blogspot.com has a three-month global Alexa traffic rank of 192,937. About 45% of visits to the site are bounces (one pageview only). Search engines refer approximately 2% of visits to the site. Munnamark.blogspot.com is based in Bangladesh. Visitors to the site spend approximately fourteen minutes per visit to the site and 79 seconds per pageview.

Munnamark.blogspot.com’s Regional Traffic Ranks

Country
Rank

If you continue with Marks PC Solution certainly it will be easier for us to get a better ranking. 

Stay with Marks PC Solution to get more interesting IT topics!


Tuesday, March 26, 2013

Create Backlinks- Get Visitors by Posting in Popular Blogs and Forums


SEO Backlinks Forum Posting Blog Posting


Certainly this is a Double Benefit Scheme for your blog or website. If you write in popular blog and forums with a link back to your site you will get two thing at a time. Number one is Backlink. And number two is visitors! So why do you skip this effective method of SEO? 

To be honest, still this site can't get enough visitors from Search Engines. At best I get 15 to 20% visitors from search engines. You may ask- where do the other visitors come from? Well this is a good question. The top sources of visitors of Marks PC Solution are as follows:
  • Different Social Sites: Twitter, Facebook, Google Plus etc.
  • Social Bookmarking Sites: Digg, StumbleUpon etc.
  • Search Engines: Google, Bing, Yahoo and others.
  • Friends and Acquaintance: People who are requested by myself to visit my site.
  • Engaged Users: It's my pleasure to get some engaged visitors in my site.
  • Recommendations: Sometimes a few number of visitors refer my site to their friends.
  • Backlinks: The last but not the least one. A huge number of visitors come from the links that I made to different forums, blogs or other websites. 

Today I'm gonna talk about forum posting and blog posting. I've already said that this is a double benefit scheme. You are getting Backlinks as well as visitors by posting on other sites. But there are some rules you should no. If you skip the rules it will be really tough to get visitors from Backlinks! 

Guidelines for Forum & Blog Posting: 

  • Select the popular forums and blogs in your country and foreign countries.
  • Make sure they have enough visitors and most of the visitors are active.
  • Create a profile for you. There should be an option to put your blog or website's link. You should give the link there.
  • Write the uncommon topics which are very exclusive. Make sure the topic is interesting and can attract people most.
  • Carefully place your link in the post so that visitors never get angry. And never try to force them to visit your site unnecessarily. Otherwise they might think you're spamming or deceiving them.
  • Never get nervous or aggressive by the negative comments of the readers. Some of them should be really stupid and they will try to misjudge you. In this case, you can pursue them. If they don't change then reply them with a satisfactory point. 
  • Try to answer the question (if any) in a proper way so that the person is grateful to you.
  • Try to focus on new and interesting topics. Before you write, you should search in that site whether this topic is discussed before or not. If it is discussed earlier but not strong enough then you can take a chance to write the topic again.
  • You can also ask the reader to visit your site politely. But before that you should write the post in that site in detail then you can suggest them to visit your site.
  • If the admin of that site is not pleased with you then he may warn you. In that case never misbehave with him. Keep in mind that it's your loss if you got banned from that site. 
  • Create an image of yourself on the forums you are writing. So that people treat you with care. Thus you will get some loyal persons.
  • If someone detects any mistake of you, thank him and say sorry. 
  • While others show hostile behavior with you, never take it personally. Try to avoid their misbehavior if they are wrong. But also think- are they really wrong or right? If they are right then you should apologize. 

Create Online Accounts:

This is very useful and easy way to create Backlinks  Though only creating online accounts can hardly give you traffic they can be useful to create link of your site. For example you can put your site's link on your Twitter, Google Plus or Facebook account. Or in any other sites where there is a chance to create a profile there should be an option to give your website's link. There you can put your home page URL. At least it will create a link of your site. 


Precautions in Creating Online Accounts:

  • Try to avoid using your main email ID. Use a secondary ID that is not very important for you.
  • Avoid using your important account passwords. Never use your email, facebook, twitter or wordpress password. Choose an easy to remember password for non important accounts like that- abc 123, 12345678, abcdef etc.


Stay with Marks PC Solution to get more interesting IT topics!


Friday, March 22, 2013

How to Change the Size of Virtual Memory/ Paging File


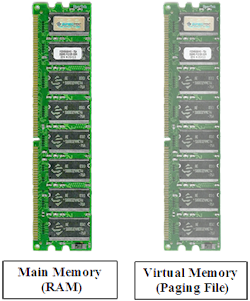
PNG Image of RAM, Virtual Memory, Main Memory


In my previous post I talked about virtual memory. Today I'm gonna discuss about how to change the size of virtual memory. Before starting the main discussion I would like to say something about virtual memory again. But I recommend you to read my previous post about virtual memory. 

A part of your hard disk space is used to support or accelerate the operations of your PC. This part is know as Paging File or Virtual Memory. When the amount RAM is low, it is virtual memory that supports RAM to carry out its activities. The term Virtual Memory and Paging File are used interchangeably. 


By default Windows sets a virtual memory on your PC. Sometimes it may not be accurate. Or it may not be in the way that you would like to set. In that case you can change the size of virtual memory. 

For example: 
  • You may need to increase or decrease the size or virtual memory
  • You may like to change the drive for virtual memory etc. 

Before starting the operation, check the amount of RAM installed on your PC. Right click on My Computer > Properties > Check the RAM

Or type dxdiag in the Run option. Read more


You can change the size of virtual memory as:
  • Increasing the Size (Keep it equal to the size of your RAM)
  • Or Decreasing the Size
  • Or setting No Paging File (Not Recommended) 

Whatever you wanna do, follow the steps below: 
  1. Press Start + Pause/Break to open System. Or right click on My Computer and hit on Properties.
  2. Now, Windows XP user should find the System Tab. And Windows Vista/ 7/ 8 user should go to the Advanced System Settings.
  3. Here a new window appears named System Properties. Go to the Advanced Tab of this window.
  4. Hit on the Settings located under the Performance section.
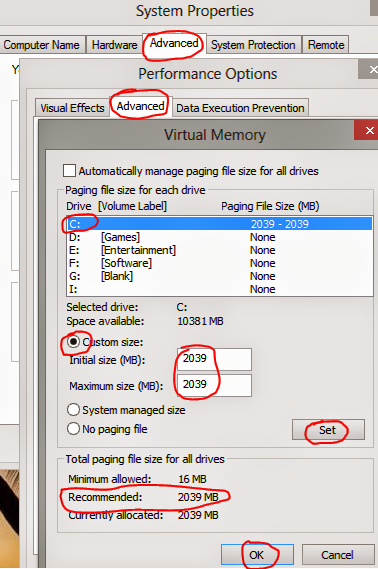
  5. Go to the Advanced Tab and click on the Change button.
  6. Now select the drive where you wanna set the virtual memory or paging file. (Use Drive C)
  7. Select the Custom Size. And look at the below of this Window. Minimum Allowed, Recommended and Currently Allocated. I suggest you to use the numeric value shows in the Recommended. 
  8. Look at the image below. Recommended is 2039 MB. I used 2039 MB both in Initial and Maximum size. You should also set an amount that shows in the recommended. 
  9. Type the recommended value both in Initial and Maximum size. Then hit on the Set button. Then hit OK > OK > OK.
  10. Restart your PC if required. 

Increase or Decrease the Size of Virtual Memory and Paging File


Short Instruction: 
Start + Break > Advance/ Advanced System Settings > Advanced > Settings under Performance > Advanced > Change > Custom Size > Type your required amount of virtual memory both in Initial and Maximum Size > Set > OK > OK > OK > Restart. 


After setting the virtual memory, you will see a file named pagefile.sys in the drive where you set the virtual memory. If you set the size of virtual memory 2 GB, then the size of pagefile.sys will be 2 GB. That means your hard disk space will be compensated. So, never set this unnecessarily high. 


Caution: You can choose no paging file from the step 8. But deleting or disabling the paging file is not recommended! 


Stay with Marks PC Solution to get more interesting IT topics!


Wednesday, March 20, 2013

What is Virtual Memory and Why it is Necessary?


Today's computers are so powerful that users are not concerned or informed about virtual memory. Actually they don't need to! Because most of the modern computers comes with sufficient main memory or RAM. It may be 2 GB or more. And a PC with higher than 2 GB RAM hardly requires to use virtual memory. 


A minor part of your hard disk is used as Virtual memory. Generally Windows OS automatically uses some space of your installation drive (In most cases Drive C).  You can change the amount of virtual memory by yourself. 

If you're running a program that requires a huge amount Random Access Memory, and if your computer lacks sufficient memory, Windows uses virtual memory to run that program. 

In fact, virtual memory is used to boost the capacity of RAM and to accelerate the operations of your computer. It combines the RAM with temporary space on your hard disk. When RAM is low, virtual memory transfers data from RAM to a space named Paging File. Transferring data to paging file frees up the RAM to perform its task.  


The more RAM you've on your PC, the faster you can operate it. So, if your PC is slowing down due to the lack of RAM, then you should increase the amount of virtual memory by compensating a part of your installation drive. This part or virtual memory will be used  by Windows as RAM. 


But increasing the virtual memory is not the ultimate solution. Because it is not as fast as RAM. And your PC can't read data from hard disk as quickly as it can read from RAM. So adding RAM is a better solution. 


Stay with Marks PC Solution to get more interesting IT topics!


Monday, March 18, 2013

Backup your Blogger Blog before It's Too Late!


Restore Blogger Blog


Anytime you might loose your blogger account. After hacking your blogger account along with your blog the hacker can do anything. He can either delete, export or use your blog in his own name! Maybe you have spent thousand hours to establish the site. And you lose everything. Isn't it very terrible? So why don't you back up your site before it's too late? 

Blogger has an option to back up the whole blog with comments! So, if you have the backup copy of your site, anytime you can open a new blog and restore your previous blog with comments. 


Even you can restore your backup copy of blogger blog in WordPress Site. WordPress is capable of restoring blogger sites from the .xml file.


Couple of months ago, I discussed about how to restore & backup blogger template. You can read that post to know about how to back up the template of your site. 


Backup your Blog: 
  1. Sign in to your blogger account.
  2. Go to Settings from Design or Dashboard.
  3. Hit on the Other options from Settings tab.
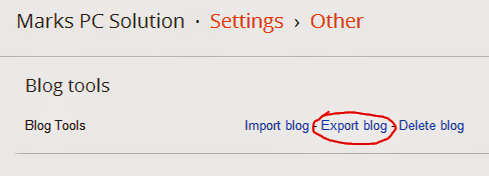
  4. Look at the Blog Tools: Import Blog - Export Blog - Delete Blog.
  5. Hit on the Export Blog.
  6. Now click Download Blog.
  7. Save the .xml file in your hard disk.

If you wanna restore your blog from a previously saved copy then follow the above steps again. Just in the Blog Tools- Choose Import Blog. Then choose and upload the .xml file that you've already in your hard disk. 

Take the help of image below. 

How to Download or Backup Blogger Blog

First you've to click on the Export Blog button. And then you will get another window. It contains the Download Blog button. Hit on the Download blog and immediately you will get a save option. Now just save it. 


How to Download Blogger Blog


Remember, there is no fixed download size like. It varies depending on your total number of posts and comments. In my site there is currently more than 250 posts with 1100 comments. My blog size is currently 4 MB.

Note: This .xml file will back up your site fully, I mean blog posts, comments and related images. Pictures will be saved as links with the xml file. Without restoring it, you can't view those images. But your site's template will not be saved with this .xml file. You have to back it up in another way. 


Backup/ Restore Blogger Template: 

If you're using a premium blogger template or if you've modified your template in your own way, then you should also back up the template. I also discussed about how to back up blogger template earlier. You can read that post or just have a look at the below steps:
  1. Go to the Template option from the Settings.
  2. Hit on Backup/ Restore button from the top right corner.
  3. Hit on Download Full Template button to download the template.
  4. Or Choose File to select and upload your desired template. 

Screenshots of the tasks are not given in this post. If you wanna see the related images then go to the above links. 


Stay with Marks PC Solution to get more interesting IT topics!


Sunday, March 17, 2013

Features and Advantages of Marks PC Toolbar


Marks PC Solution Toolbar Features


If you're a regular visitor of Marks PC Solution you might know that we've a nice toolbar named Marks PC Solution toolbar. This toolbar has many features and several advantages. Specially if you're a site owner or active in social media then I promise, this toolbar will help you a lot! 


Features of Marks PC Solution Toolbar: 

This toolbar has been equipped with lots of features. There are 15 buttons in this toolbar. Most of the buttons are useful for every net users and some of them are very specific to the Marks PC Solution. Now have a look at the functions/ usage of the buttons:
  1. Favicon of Marks PC: This button/ icon is very specific to Marks PC. Whenever you click on it, no matter where you're, our site will be loaded immediately on your browser. 
  2. Google Search Favicon: The second button is the icon of Google. If you click on it, the search giant Google will be opened in a new tab. Thus you can access Google search by a single click.
  3. Google Plus: Google Plus is located just next to the Google Search. Clicking on it will result a new tab with Google Plus. 
  4. Gmail Button: This is the most attractive button of this toolbar. You can view and compose new mail using this button. And whenever you got new mails you can see them here. Maybe you need to sign in first. 
  5. Hotmail:  If you click on this button a new window will be opened in a new tab. And if you're signed in to your Hotmail account you can view you Hotmail messages. 
  6. Yahoo Mail: Just after Hotmail button, yahoo mail icon is located. Make sure you're signed in to your Yahoo ID. You can view your Yahoo mail from here. 
  7. Facebook: Next one is the most widely used social network. I mean Facebook. Just click on it. You will be taken to your Facebook Home Page. 
  8. Twitter: By this button you can tweet the page that you're currently visiting. You can also read your twitter messages from here. In fact this is a personal twitter button. Make sure you're signed in to your twitter account if you wanna use this button properly.
  9. Important Web Links: The number nine button is a drop down icon. Here you will get some important links. 
  10. Like: This one is specific to Marks PC Solution. If you click on it, you will be taken to our Facebook Page. If you like this page, you will get new tips whenever we publish something new. 
  11. Join: This is our Facebook group. If you click on this button you will be taken to our group. Join this group for getting solutions to different problems that you usually face. A group of experts are there to serve you! 
  12. Follow: If you're a fan of twitter, then Follow us on Twitter. We regularly update our twitter page with new tips and tricks! 
  13. RSS Feeds: This is the RSS feeds of Marks PC Solution. Here you can see the headline of some recent posts published by Marks PC. If you wanna read any tips then hit on it. 
  14. Search Option: If you wanna search Marks PC Solution then type your query here and press Enter. No matter where you're. You will see the search result on Google. But all results will be related to Marks PC Solution.
  15. Toolbar Control Button: The last button is located at the end of the toolbar. This is the option button. Here you can control this toolbar. 


Advantages: 

The above discussion was related to the buttons of Marks PC Solution Toolbar. Now consider the advantages of this toolbar:
  1. If you use this toolbar while visiting your blog/ website, your Alexa Rank will improve dramatically! 
  2. When you search something on Google, you will see the Alexa rank of the sites in search result showing in a small blue bar. 
  3. This toolbar consumes low resources. Your bandwidth will not be wasted. And your browser performance will not fall. 


Download and Installation:

The download size is more or less 200 KB. To download the toolbar click here or hit on the button below. A new window will appear. Click on the download. Wait few seconds if it requires time. Then choose download or keep what appears depending on your browser. Then install it. 

Get our toolbar!


Browser Compatibility: 

This toolbar works fine with Google Chrome, Firefox and Internet Explorer. But we recommend to use this with Google Chrome for best experience. Because you can hide and show this toolbar with a single click on Google Chrome. 


Operational Manual: 

Google Chrome: After installing this on Google Chrome, you will see the icon of the toolbar at the top right corner. It looks like M. Click on it to hide or show the toolbar. Hit on the option button to send button usage statistics report to the Alexa.

Firefox: If you're using Firefox then go to the View > Toolbars. Mark the Marks PC Solution Toolbar to show this. Unmark the Marks PC Solution toolbar to hide this. Use the option button to choose the options.


Feedback: 

You can send feedback about this toolbar by commenting here. Definitely we will consider the report of the users. :) 


Stay with Marks PC Solution to get more interesting IT topics!


Monday, March 11, 2013

Use 7-Zip to Open .Rar file or .Zip file


Isn't it very strange to write about such an easy topic in this site? Maybe. But I'm gonna share a personal experience with you. After that you answer whether this post is unnecessary or not. 

Few days ago I joined as an Internee at Uttara Bank Ltd. My first assignment in the bank was to print a file that officials failed to open. The Branch Manager knew about my computer skills. He asked me to troubleshoot the problem. 

The task was very easy. It was simply a file with .rar extention. A mail was sent from Head Office. There were two files. So it was compressed by WinRar. As officials were not familiar with this file type they were confused. Then I just visited to the Filehippo and download the 7-Zip. After installing this I opened the file and printed this. :) 


By the way, all of you (except new users) might be familiar with zip or rar files. There are many free as well as premium applications to compress the files or unpack the zipped files. But today I'm gonna discuss about 7-Zip


Let's have a look at what 7-Zip is actually- 
  • 7-Zip is an open source file archiver with a high compression ratio.
  • It is mostly used to zip and unzip the files and folders.
  • Supported Packing and Unpacking Formats: 7z, XZ, BZIP2, GZIP, TAR, ZIP and WIM
  • Supported Unpacking Formats: ARJ, CAB, CHM, CPIO, CramFS, DEB, DMG, FAT, HFS, ISO, LZH, LZMA, MBR, MSI, NSIS, NTFS, RAR, RPM, SquashFS, UDF, VHD, WIM, XAR and Z.
  • Finally the installation size is really smart. Less than 3 MB! 


First you've to download 7-Zip from the above link. The download size is approximately 1 MB. Then install this on your PC. Installation process is very simple. There is no confusing option. 

Portable version is also available. You can download it from here. [Note: If you use portable version you can't get the app shortcuts when right click on files or folders]

After installing it on your PC, 7-Zip icon may appear on your Desktop or Program list. And when you right click on any file or folder you will see the options of 7-Zip. 


To Open/ Extract a .Rar File or Folder: 
  1. Make a right click on that file/folder. 
  2. Choose 7-Zip > Open Archive.
  3. Now you can see the files stored on that folder.
  4. Hit on Extract button to unzip those files. 

To Compress/ Zip Files or Folders: 
  1. Make sure the necessary files or folders are kept in the same folder.
  2. Now select the files and Click right.
  3. Choose 7-Zip > Add to Archives.
  4. Choose the Archive Format > Compression Level and other options as your need.
  5. Hit OK.


Instructions for Portable Version: 

The portable version is same as installed version except one thing. You will not get the shortcuts in mouse right click. All you need to do is just open the application from your PC where you've stored it. The application should be named as: 7-ZipPortable.exe

When you need to run this program, simply click twice on it. Immediately after clicking on it, 7-Zip will run. Now, if you wanna archive something first go to the proper Location > Select the Files or Folder > Hit on Add > Choose the Destination Folder, File Format > Compression Level etc > Hit OK

And if you wanna extract something then simply select the files and hit on Extract. If you do not choose any specific location for the extracted file then they will be extracted to the current folder. 


Also have a look at the image below. Important buttons for using 7-Zip are marked there! 


How to zip and unzip using 7-Zip


Stay with Marks PC Solution to get more interesting IT topics!


Thursday, March 7, 2013

Full Tutorial on Blogger Comment Optimization


Comment PNG Icon


In my very last post, I talked about word verification in blogger blog. Reducing spam comment was also discussed there. Today you're getting a full tutorial on optimizing comment option in blogger. What you should do and shouldn't do in Comments setting will be discussed today. Enjoy . . . 


The aim of this tutorial is:
  • To make your blog's commenting process easier
  • To keep your blog free of spam
  • To make your visitors engaged with your site

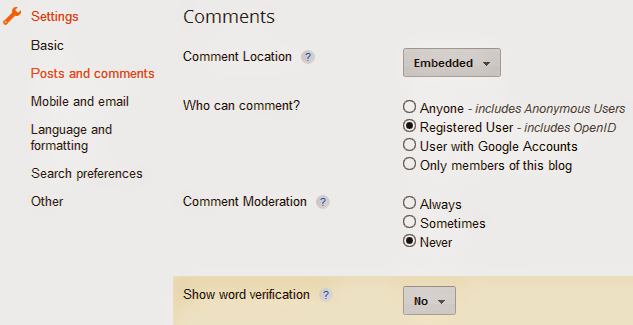
Make sure you're signed in to your blogger account. Go to the Settings option from design or dashboard. Click on Post and Comments. Go to the Comments area. Now do the following:
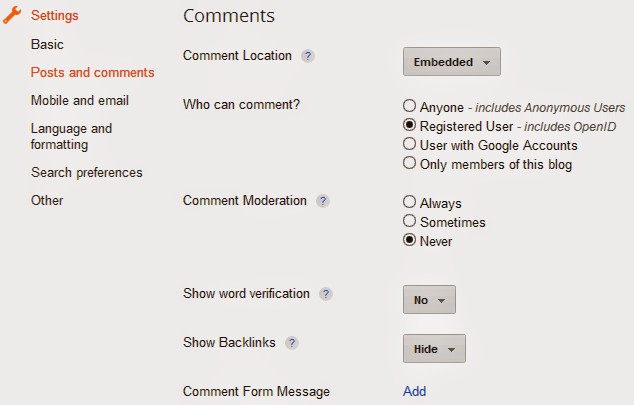
  • Comment Location: By default the location is embedded. You shouldn't change this to Full page, Pop up or Hide. Visitors like embedded comment box. This will appear just below your post. 
  • Who can Comment?: There are four options: Anyone, Registered User, User with Google Accounts, Only members of this blog. Choose the second option. I mean Registered User. Default setting is Anyone. But it allows anonymous users to comment on your site. To be honest, anonymous comment has no value. Anyone can comment by hiding his/ her ID. Even you can comment on your site anonymously. And it is not possible to track who is the person actually. 
  • Comment Moderation: You can choose either Never or Sometimes. But choosing moderation always may not be good. In that case someone may comment again and again and thought something is wrong with your site as his/her comment doesn't appear. I suggest you to choose Never. If you find any spam comment then you can manually delete them. Besides blogger has an automatic spam filter. So, don't worry.
  • Show Word Verification: Default setting is Yes. But I recommend you to use No. If you're interested to know more about Word Verification then read this.  
  • Show Backlinks: This is not very important. You can choose either Hide or Show. If you choose Show then a link will be shown under the comment box- Create a Link to this Post. Then if someone click on this link he or she will get a link of the current post. 
  • Comment Form Message: This is up to you. Not very important. If you wanna give any message for the commentator you can write it here. It will be shown just below the comment box. For example you can write any advice or rules regarding comment. You can say HTML link is allowed. Or you can say spam comment is strictly prohibited etc. 

Also have a look at the image below. Just try to make your comment option as the box shows:


Blogger Blog Comment Option Image


Few Suggestions for you: 
  • Most of the cases commentator would like to create backlinks on your site. Allow them. Keep it mind that they comment on your site costing their valuable time
  • When the comment is too much irrelevant or only for the purpose of creating links then never remove it immediately. The first thing you can do is to request the commentator to make the comment relevant. If he/she doesn't change then you can remove his/ her comment.
  • Always check your spam box. You will find it under the Comment just below the Pages option in the left pane. If any normal comment is detected as spam then choose not spam for this comment. 
  • Sometimes you might notice few spam comments are not detected by spam checker. In that case you can mark these comments as spam

One final thing you should know- Showing strictness with the commentators is a very bad thing. If you misbehave with the commentators you will lose engaged users. Always value the visitors and their comments. Because they are actually your customers. 


Suppose a visitor comes your site only for creating links. Never show hostile behavior with him. There are many sites for creating links. But he picks your site. It's your credit. So why do you show hostility. What is the guarantee that he will not be a loyal user of your site in the future? 


Stay with Marks PC Solution to get more interesting IT topics!


Wednesday, March 6, 2013

How to Disable Word Verification (Captcha) in Blogger Comment


Captcha

By default blogger blogs are designed to show word verification when visitors comment in a post. Though this is a very useful tool to avoid spam, but real users often get bored by this option. Besides blogger has an automatic spam checking tool. So you can remove the word verification option from the comment in order to let your visitors express their opinion easily. 

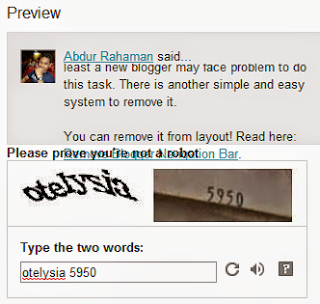
While commenting on blogger blogs or other websites you may face a word challenge. And this is a very common thing. Specially when you open any online account. Sometimes words used in the verification option are too hard to guess. And users are very annoyed with this. 

Captcha in Blogger Comments


Look at the image above. When you comment on blogger blogs or someone comments on your blog he/she will face a challenge like this. Normally this option doesn't show any hard challenge. But sometimes they are also difficult to guess. Users have to try this again and again. If they are annoyed they will loose interest to express their opinion. 


Since blogger has its own spam detection technique, you can remove it from your blog. Instead of showing captcha you can allow only registered users to comment on your site. That means you can disallow the anonymous visitors to write comments.


To Disable Word Verification:
  1. Make sure you're signed in to your blogger account.
  2. Go to the Settings from the left pane.
  3. Now hit on Post and Comments option
  4. Move to the Comments option. 
  5. Find Show Word Verification. Select No.
  6. Hit on Save Settings
From now users will not face any verification while commenting on your site. 


But there is a problem too. If you remove or disable captcha from comment option then you may notice too many spam comments. Even after blogger checks the spam. Here you can use another technique. 


To Avoid Anonymous Comments:
  1. Go to the Settings.
  2. Then move to the Post and Comments option.
  3. Look at the Comments section.
  4. Who can comment? Select- Registered User.
  5. Now hit on Save Settings

This is very easy. Even you don't need to write the full post. Just look at the image below. You just need to set your comment options as the image shows below:  


how to disable anonymous comments in blogger blog


Stay with Marks PC Solution to get more interesting IT topics!