Tuesday, May 28, 2013

How to Show the File Location in MS Word and Excel?


Document File Path


In MS Word and Excel you can show the location of your file (File Path). Usually the file path is placed at the footer of the document. And when it is placed at the document footer, it automatically appears at the each page of that document. 


Why to Use the File Path (Location of the File): 

Well this is really important for those people who want to keep the source of the document printed with it. If the file path is printed with the document then it is quite easier for us to trace the path next time when you search for it on the hard disk. It looks like the image below: 

File Location on the Document Footer

Thus it is easier for you to locate a saved document. 


Why You Shouldn't Use the File Path: 

Definitely it is revelation of information. If the file is a highly classified document and if the file path is used there, then others (who do not have access to that file) might be accessed that file through the path printed with the document! For example: it may be the question of the Varsity Admission Test or Job Test. 


How to Show the File Path in a Document: 

Well this is not a difficult task but really tough to find if you are not familiar with this option previously. And I will discuss about how to show the file path as well as how to hide. I am an user of Office 2010. But don't like to avoid the Office 2003 users. :) 


Show/ Hide File Path in Office 2003: 

Ms Word 2003: There are two ways available for you to do this task. You can follow any of the two methods. But at first you have to make sure that the file is previously saved. If you apply this to an unsaved document then it will show only Document 1 instead of showing the file path. 

Method 1: Open a Document > Go to the View Menu > Choose Header and Footer > Go to the Footer > Insert Auto Text > Hit on Filename and Path. Done! 

Take help of the image below: 


Insert File Path from Header and Footer Option


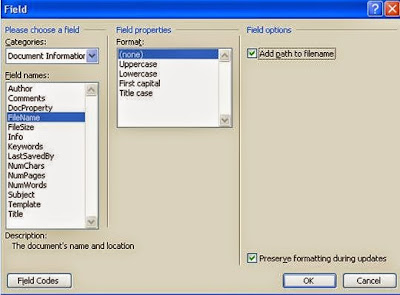
Method 2: Somewhat difficult. Open a Document > View Menu > Header and Footer > Go to Footer > Insert Menu > Field > Choose Document Information from Categories > Select FileName from Field Names section > Select Add path to filename from the right most column > Hit Ok. Finish. 

Look at the image below: 

Insert File Location from Field


MS Excel 2003: 

There is only one method and this is very easy. Open a previously created MS Excel Book. Simply go to the View Menu. Click on the Header and Footer option. Now select Edit Footer.  Here you you can insert the file path.  


Show/ Hide File Path in Office 2007 and 2010: 

Here the procedure is somewhat different from Office 2003. Because Office 2007 and 10 has the ribbon instead of menu. 


MS Word 2007 and 2010: 

Don't know why the Auto Text doesn't show the file path. But you can insert the file path from field. 

First you have to open a saved document. Then go to the footer (Just double click on the footer margin to activate footer). Now go to the Insert Menu > Quick Parts from the right side > Hit on the down arrow and choose Field > Select Document Information from Categories > Choose FileName > Mark Add Path to FileName. Done! 


Insert File Path in Office 2010 from Field


MS Excel 2007 and 2010: 

Open a saved excel book. Go to the Insert Menu > Hit on the Header & Footer from the right side of the ribbon > A new menu will appear named Design > Now move to the Document Footer > Select File Path > Done. 

Look at the images below: 


Field option under insert menu


Insert File Path in Excel 2010


How to Remove the File Path? 

You may notice that I have only talked about how to insert file path. But nothing was discussed about how to remove it! If you have already inserted the file path and can't remove it then simply go to the footer. Press Ctrl + A and hit the delete button to remove everything from footer. Or just select the file path from the footer and delete it. That's it. 

Stay with Marks PC Solution to get more interesting IT topics!


Monday, May 27, 2013

Windows 8 Activator for All Editions (Guaranteed) !!!


Windows 8 Transparent Logo PNG Format


Problems regarding activation of Windows 8 has been solved last year. Those who are the users of Windows 8 and having trouble to activate this version of Windows hope you already got the solution. Just after the release of the final version of Windows 8, we have provided an activator for you that works with all editions. 

At least 70% of the comments were positive about that activator. And unfortunately 30% of them were negative. They reported this activator was not working for them. And we promised if we can manage a new activator we will inform them. Today I will share another activator with you with proof! 


This activator works same as the previous one. All you is just to make a double click on the activator. Within 10/ 15 seconds your PC will be restarted. And you will see the confirmation message about Windows 8 activation. 

Okay let's start. This is a very simple and easy activator. First, download the file by hitting on the download button: 

Download

  1. After download the file you need to unzip it. 
  2. Then double click on the activator. 
  3. Wait for few seconds for processing.
  4. Now your system will be restarted and you will get the activation message. 


Cautions: 
  • Windows Defender may detect this file as virus. I think as it is a cracking tool that's why defender may consider this as a threat. But this is safe (Though I'm not 100% sure but using it on my PC).  
  • .Net Framework 3.5 is required to run this activator. If your Windows doesn't have .Net 3.5 installed then install it now. 
  • For any reason, if this activator doesn't work, then you follow this method

After successfully activating the Windows, you will be shown the confirmation message. And you can also find it by pressing Start + Pause as the image shows below: 


Windows is Activated message at Windows Activation Window


Most of our visitors found the previous activator useful. But some of them were unable to activate their Windows. That's why we've shared this new activator. But you can also try the previous one. 


Activate Windows 8 Just by Double Click (All Versions) !!!


It has the following advantages: 
  • Just hit and activate. 

Disadvantages:
  • Quite useful but depends on luck sometimes. (30% of the attempts were not successful)
  • Sometimes you might not see the Windows is Activated message in the Activation Window. 

Troubleshooting Tips:

Many of our visitors have reported that this doesn't work at all. Instead of activating Windows, after rebooting, they got only black screen! 

If you wanna get rid of this problem, please don't install any other third party security software like Avast, Norton or Kaspersky. Built in security of Windows 8 will take care your PC. 


Leave comment and let us know whether it works for you or not. Keep in touch . . . 


Stay with Marks PC Solution to get more interesting IT topics!


Saturday, May 25, 2013

How to Remove Borders from Blogger Image?

Transparent Image with No Boundary
Transparent Image with no Border


Marks PC Solution logo with Boundary
Transparent Image with Border


Look at the two images above. Both of them are almost same. Except the second one has borders outside. The first one is transparent and it has no shadow or border. And the second one is transparent but there is a boudary outside of it. Which one do you like?  

If you are a regular visitor of Marks PC Solution, then you should notice our images has no borders. In fact no borders at present, previously out images has borders. Most of the time I like to use transparent image with PNG extension. And outside of each image, there was a border which looks very odd. But adding a CSS code removes this problem. 


Few days ago, one of my acquintances shared a code with me. He said this code removes the outside border of the uploaded images in blogger blog. I applied this code in Marks PC Solution. And magically there is no borders outside of my images. All images are now fully transparent! 


By default, blogger blogs automatically add borders and shadows outside of your uploaded images. In case of non-transparent images (maybe PNG, JPEG, GIF) it doesn't matter. But when you upload a transparent image with PNG format the borders look really odd. It affects the transparency of the image. Though blogger template designer allows you to change the shadows and borders of the images. But you can't fully remove the borders. 

Today I will show how can you fully get rid of your blogger images from borders. 


Well, this is not a tough job at all. All you need is just to add a CSS code in your blogger template. Then you will be able to see this magic. Okay let's start. 
  1. Make sure you're signed in to your blogger account.
  2. Go to the Admin Panel/ Design/ Dashboard or whatever you call it. 
  3. Click on the Template button from the left pane.
  4. Now hit on the Customize option.
  5. At the left side you get a list. Select Advance from here. 
  6. Now another list will appear. Drop down and choose Add CSS from that list. You can also take help of the image below.  
  7. Now a box named Add Custom CSS will appear at the right side. 
  8. Copy and paste the CSS code below in the Add Custom CSS box. 
  9. You're almost done! Now hit on the Apply to Blog button from the top right corner. 
  10. Done! Visit your blog and see the magic! 


.post-body img, .post-body .tr-caption-container, .Profile img, .Image img,
.BlogList .item-thumbnail img {
  padding: none !important;
  border: none !important;
  background: none !important;
  -moz-box-shadow: 0px 0px 0px transparent !important;
  -webkit-box-shadow: 0px 0px 0px transparent !important;
  box-shadow: 0px 0px 0px transparent !important;
}

There are 10 steps to do this task. Doesn't this process look very long? Okay I'm gonna shorten this! Just follow the simple way below: 

Template > Customize > Advance > Add CSS > Add Custom CSS Box (Copy and Paste the above code here) > Apply to Blog. 


How to Add Custom CSS in Blogger Template
Add Custom CSS Option in Blogger Blog

Stay with Marks PC Solution to get more interesting IT topics!


Friday, May 24, 2013

HTML Tutorial 3: Most Common Tags Used in HTML Documents


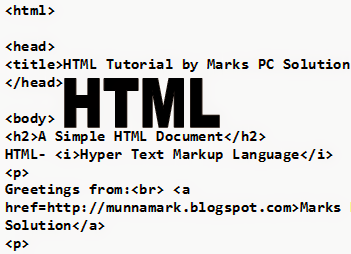
HTML Example


I'm sorry for the delay to publish new posts but something was wrong with my PC. That's   why I was in trouble with this and not able to write something new. Well I'd like to continue the HTML tutorial. 


In this post I will discuss about some tags which are very common in preparing HTML documents. But before you go, don't forget to look at the following posts if you haven't already gone through:


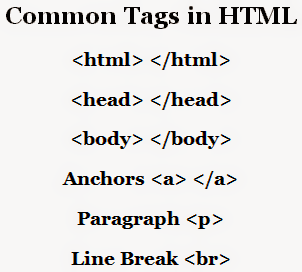
Let's talk about the most common tags of HTML documents. You should also have a close look at our example document. Some of these tags are also used in that document. I think this will be helpful for you. 


Most Used Tags of HTML


  • Structural Tags: <html>, <head>, and <body> are the main structural tags of any HTML document. Each and every HTML document must contain these tags. Title   tag - <title> is also very important for an html document. Besides there are tags which are very common for all HTML documents. These are discussed below:

  • Anchors <a href> </a>: This tag is used to create anchor text. For example: <a href=http://munnamark.blogspot.com>Marks PC Solution</a>. The browser will show only Marks PC Solution hiding the link of our site. When someone clicks on the text, he will be directed to Marks PC Solution home page 

  • Paragraph <p>: This tag is used to create a new para. It has no end tag! You just need to place a <p> tag when you want to create a new para. 

  • Line Break <br>: This tag is used to break the current line. It is similar to pressing Enter button in Word Processors like MS Word or Wordpad. This tag has no end tag too!  You can break a like just by typing <br> before that line. 

  • Bold <b> </b>:  This tag is used to bold the text. For example: <b>Bold</b>. The result will be Bold

  • Italic <i> </i>: This tag is used to italicize the text. For example: <i>Italic</i>. The result will be Italic

  • Underline <u> </u>: This tag is used to underline a text. For example: <u>Underline</u>. The result will be Underline

  • Heading Tags: Start Tags: <h1>, <h2>, <h3>, <h4>, <h5>, <h6>.                                       End Tags: </h1>, </h2>, </h3>, </h4>, </h5>, </h6>. These tags are used to define the titles of the document. For example, <h1> is used for the document header title. <h1>Marks PC Solution</h1>. <h2> is used for the document section title. <h2>Your Ultimate Choice for Computer, Internet, Blogging, SEO & PC Troubleshooting Tips</h2>. Thus <h3>, <h4>, <h5> and <h6> decreases the font size of the title. 


Don't be confused by someone or by yourself! There are many other common tags for HTML documents. But these are just for giving you an idea. 


You should be careful while using the tags and their related attributes. Because any error in using the tags may result wrong output. Even a minor mistake may create serious problem. Because you may not be quick enough to find the errors! 

By the way, the rules and stadard of HTML varies from time to time. Sometimes your browser is able to show the document correctly even if there is any error in the source file! But it doesn't mean that you will not try to keep the document accurate. Whatever you do, do it with care. Best of luck. 


Stay with Marks PC Solution to get more interesting IT topics!


Sunday, May 19, 2013

HTML Tutorial 2: Basic Parts of HTML Document


HTML Image with example Codes


In my previous post, I started writing about HTML. As it was the first tutorial of HTML, I just showed you the example of an HTML document without giving detailed information of that document. 

In this post, I'm gonna discuss about the essential parts of an HTML document. Essential parts mean those parts which are very common for each and every HTML document. I mean the HTML tag, the Header, the Title and the Body. 

Before you start, please have a look at the HTML Tutorial 1 if you haven't go through this already. 

After reading the tutorial 1 look at the image below:


Basic parts of an html document with name and code


Here you can see all the four parts that I used in the example document. Let's what are they actually:


The HTML Tag: <html>

Every HTML or XHTML document start with <html> tag and ends with </html> tag. Even if you right click on this page and hit on view source/ view page source option you will see the html of this post. At the top you will see <html> tag, and and the bottom you will see </html>. 

That means the whole document is considered as HTML by the browser. So, whenever you create a new HTML document, you must start it with <html> tag and end with </html> tag. 


The Document Head: <head> Tag

This tag is placed just below the <html> tag. This is the head of your document. It may include many other tags. Most importantly, the header tag includes the document title, I mean the <title> tag. 


The Document Title: <title> Tag

Your document should have a Title. Title should be started with <title> tag and it will be ended by </title> tag. Basically title is the name of your document. It will not appear in the document text! You will be able to see the title just at the browser tab. See the example image of Tutorial 1


The Document Body: <body> Tag

This is your actual contents. What do you wanna write or create in an HTML document should be within <body> </body> tag. It may include thousands of other tags which are necessary to decorate your document. 


By this time, hopefully you have a basic idea about an HTML document and its essential parts. You should notice every tag starts with <> and ends with </>. Actually some tags don't have any closing tag! And some tags don't need to be closed. 

Which tags don't need to be closed and which don't have any ending tag at all will be discussed later. And in my next post, I will discuss the different tags used in the Tutorial 1


HTML is not very tough learn. But the area of HTML is huge. Latest version of HTML is HTML 5. HTML may include new rules in the future just like as new words and phrases are added to a language. So you will never be able to finish your HTML course. It is a life long learning. 

All you need is patience to be skilled in HTML. Learn the rules one by one and step by step. Use them in your works and practice the rules. You should be fine with HTML. 

Stay with Marks PC Solution to get more interesting IT topics!


HTML Tutorial 1: Creating a Simple HTML Document


HTML Codes Example


If you're regular in this site, you should know I am not a programmer. Several times, I've mentioned that I'm a person with no programming knowledge. Even my HTML knowledge is not good enough. Just few days ago, I decided to enrich my knowledge on HTML. I will publish HTML lessons for you. Thus you will be also learning HTML with me! Whenever I learn something about HTML, I will publish it here. 


I'm not gonna discuss about the history of HTML. Hope you all know that HTML- Hypertext Markup Language. Whatever you see on your browser when visiting any site, your browser shows it through HTML. You can easily view what a website includes. Do as below:

  1. Open any website in your browser. 
  2. Right click on it. 
  3. A menu will appear.
  4. Click on View Source/ View Page Source. 
  5. A new window will open with the HTML of that website. You will see thousand lines codes! This is how your browser see a website. 


Today I would like to start with an example. In this lesson you will learn how to create a simple HTML document. I mean you will get an idea about the basic structure of an HTML document. 

Okay let's start. The following texts are the properties of an HTML document. 
  • Copy the texts, and paste them in a notepad file. 
  • Save the document as HTML Lesson 1 with .htm or .html extension. I mean the saved file name should look like this: HTML Lesson 1.htm or HTML Lesson 1.html
  • Remember, you can save it by any other word but it should end with .htm or .html extension.
  • I recommend you to save the file on your desktop for quick access. 

<html> 
<head> 
<title>HTML Tutorial by Marks PC Solution.</title> 
</head> 
<body> 
<h2>A Simple HTML Document</h2> 
HTML- <i>Hypertext Markup Language</i>  
<p>                
Greetings from:<br> <a href=http://munnamark.blogspot.com>Marks PC Solution</a> 
<p> 
Prepared by: <b>Md. Abdur Rahaman</b> 
<br>&copy;2013 Marks PC Solution
<br>Protected by: DMCA 
</body> 
</html> 


After saving the document a new file will be appeared on your desktop named HTML Lesson 1. Double click on that file. It should be opened with your default net browser. If it doesn't then right click on that file and choose open with a browser. 

After opening the document in a browser you will get the following result in the browser window:

Basic HTML Document Example


You should notice the difference between your input (HTML Code) and output (Result in the browser). In compared to the HTML you have written on the notepad is more than double what you're getting in the browser window! Are you confused with that? Actually no unnecessary commands are used in the above HTML code. Each and every symbols and characters of the above HTML code are the basic properties of any HTML document. Without them, no HTML document can be prepared. 


In my next lesson of HTML, I will discuss about the basic parts of an HTML document. And I will also try to clarify the tags, symbols, codes used in this example. Get ready for that! 


Note: In the above code, I have created gaps between parts. After html tag, head tag I have used enter. Basically in the document this space will have no effect. This space is only for your better understanding. 


Stay with Marks PC Solution to get more interesting IT topics!


Thursday, May 16, 2013

Stat My Web: Get Detailed Analysis of Your Site


Stat My Web PNG Image


There are many sites that collects and shows information about blogs and websites. Some of them are very reliable and some of them are not. Alexa, Google Analytics, Web Rank Stats are some of the examples. 


Today I am gonna discuss about such a site that gives you detailed analysis and information about your blog or website. Maybe some of you are familiar with Stat My Web. This website shows you a comprehensive analysis of your site. It provides a statistics summary, inpage analysis, alexa status, safety & security, popular pages, keywords and many other information about your site. 


Look at the image below. This is the statistics summary of Marks PC Solution on Stat My Web.

Website Statistics by Stat My Web


But this is a minor part of the statistics. If you enter the URL of your site on Stat My Web then you will find the details. 


Okay let's find out the statistics for your site. First you need to visit Stat My Web. Remember, no sign up is required! This is a great thing. You don't need any account for getting analysis. There is a search box at the top right corner just below the tabs. You can either search your site by Name (ie. Marks PC Solution) or simply copy and paste the URL of your home page (ie. http://munnamark.blogspot.com). 

I suggest you to enter the URL directly instead of searching it by name. Because information will be gathered automatically if you enter the URL in the search box. 


Analyzing the Results

After entering the URL, results will be arranged in a few parts. 

Brief Description: This is the first part of the result. See the example of Marks PC Solution brief description.  

Munnamark.blogspot.com is ranked #162,025 on the world wide web by Alexa. The lower the Alexa rank, the more popular the website is considered to be. Munnamark.blogspot.com has an estimated earning potential of $118 USD per day from advertising revenue, giving it a value upwards of $38,071 USD. We have found the average page load time to be 0.100369 seconds. This website has a GooglePageRank of 0 (out of 10), and has a reach of 931 average unique visitors per day, with about 8,380 daily average page views.This website is listed in Yahoo directory. The primary IP address is 74.125.227.43. We give this website a SEO score of 23.8%.

Web Statistics Summary: The second part of the result is statistics summary. Here you will get Alexa rank, Google Pagerank, Daily Visitors, Revenue Status etc. 


Inpage Analysis: It gives you a knowledge about the structure of your page. It might be useful for webmasters. I don't know much about it. 


Alexa Traffic Analysis: This part is taken from Alexa. And almost similar to what information you see about your on Alexa. 


Safety and Reputation: This part is taken from the WOT (Web of Trust). It measures the Trustworthiness, Vendor Reliability, Privacy and Child Safety. Marks PC Solution gained Excellent Rating in all the four aspects.


Popular Pages: This part shows the 10 most popular page URLs. With this analysis, you will be able to know what topics are driving the most visitors to your site. 


Keyword Rankings: Here you will find some keywords which play an important role in driving traffic to your site. You can target the keywords which are very popular. 


Others: There are some other tools which are not very important for you. I mean you might have nothing to do with these tools. Such as- HTTP Header Analysis, DNS Records, Directory Listing Analysis, Web Hosting Server Location Map etc. 


Besides you will get more information by navigating the site. Look at the right pane of Stat My Web. There are three sections: 
  • Navigation Menu
  • Advanced Charts
  • Website Tools

The last one is important for you. Yes I mean, Website Tools. There are few tools which may be useful for you. Such as: 
  • Website Worth
  • Domain Look Up
  • IP Address
  • Domain Availability
  • Ping Test
  • Get Website Information
  • Speed Test 

I expect, this post will help you to know about the site Stat My Web. And thus you can get the detailed information about your blog or website. Leave comment to share with us . . . 


Stay with Marks PC Solution to get more interesting IT topics!


Ad Placement Guidelines for your Site


Guidelines for Placing Ads on Websites/ Blogs


Naturally people get bored when they see too much ads on TV Channels, Newspapers, Magazines even on blogs and websites. But a clever publisher's task is to make the ads interesting and useful for the visitors. Today I would like to share some rules for ad placement with you. Read the full article carefully and express your opinion if any. 


Ad Placement Guidelines:

  • Place ads in a place where the visitors can easily see them.
  • You can place ads at the top, at the right side bar and within your posts too. 


Ad Categories:

Make sure the ad categories are related to your site. For example if your site is related to Computer, Internet, Hardware or something like that, then ad categories should be like - Antivirus, Software, Technology etc. Irrelevant ads will not be able to impress the visitors. Even they may feel uneasy if any adult ads appear while visiting your site. 


Never do the Following / Ads Behavior:

This is an important issue while placing ads on your site. Consider these carefully: 
  • Never place the ads which appear in a pop out/ fly out window. It does nothing but irritates the visitors. I usually never back to the sites that use pop out ads. 
  • Never use full page ads. Maybe it pays you better, but when you lose visitors it will give you nothing! 
  • Never use adfly ads or something like adfly on your site. People just hate it! :) 
  • Never place any ad that automatically redirects users in a new page or that automatically open a new window.
  • Never place any ad that makes your site down. Be careful while placing heavy ads like flash. 
  • Never place any boring and irrelevant and adult ads on your site. 


Always Remember: 

Visitors should be your primary concern. You should always try to retain your existing visitors. Never do anything that bores your visitors. Your site must be fast, safe, reliable and good looking. But it doesn't mean that you use too much colors and ads on your site. 


While placing ads within your posts, make sure it doesn't create any problem to read the text. Because a person actually visits your site to collect information. If he faces any problem to read the text then why will he back to your site in the future? 

Finally I would like to advise you, never try to deceive people. Never try to force them to click on ads. Let them understand what is the ads and what is your contents. If the visitors think the ads as your contents and hit on these then they might be angry with you. 


Those who are using AdSense Ads or trying to get AdSense approved for your site, please read the following article: 

Guidelines before and after Getting AdSense


We are waiting for your feedback. Visitors' comments are considered by Marks PC Solution

Stay with Marks PC Solution to get more interesting IT topics!