Showing posts with label Microsoft Office. Show all posts

Tuesday, July 2, 2013

Protect your Documents, Workbooks & Presentations by Password !!


Protect your Documents, Workbooks and Presetations by Password


If  you're a regular visitor of Marks PC Solution you should notice, we've published lots of tutorials on Microsoft Windows, Microsoft Office and other software. We've also published many tutorials and tips regarding security issues. You can find those tips by using the search box. Or you can search by categories: Tips n Tricks, Tutorials, Microsoft, Windows, Security etc.  Today, I would like to share another tips on security.


Many of you might be familiar with the password protection system of Microsoft Office. If you're working with highly confidential documents, workbooks and presentations (ie. Exam Questions, Online Account Information, Personal Information, Other Secret files),  then this is a good idea to encrypt those files by password.


But if you are not acquainted with the password protection system you should go through the whole post. You should know, the different versions of MS Office keeps the password option differently. You will not find it similar in Office 2003, 2007 and 2010. That could be difficult for you to find the password option. That's why I'm gonna discuss about all versions. :)

Note: The procedure is very similar in MS Word, Excel and PowerPoint.


Setting Password in MS Office Documents


Office XP and 2003:

These two versions are almost similar. All the options and tools are located at the same place. Maybe they are different just by color! Let's start -

Open MS Office Document (Word/ Excel/ PowerPoint) > Go to Tools Menu > Select Options > Hit on the Security Tab > Type your Password on Password to Open Box > Hit OK > Save the Document.

Now whenever you will open the document, first you have to enter the password. Then you will be able to access the file.

I apologize for not sharing any image. I don't use 2003 anymore. I have been using Office 2010 for last two years. But this is very easy. You will have no problem to set password in Office 2003. Upgrade to Office 2010 or 2013 to enjoy exiting features!


Office 2007:

You know Office 2007 brings a dramatic change in the interface. Its ribbon interface is absolutely different from Office 2003 or XP. But Office 2010 and 2007 are almost similar except small changes in few options. Okay start -

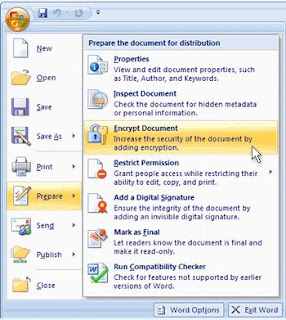
Open any of the Office Programs (Word, Excel or PowerPoint) > Now hit on the Office button from the top left corner > Choose Prepare and then Select Encrypt Document > A small Password box will appear > Type the Password > Hit OK > and then Confirm it > Save the Document.

Look at the image below:


Office 2010:

Though Office 2007 and 2010 are very similar, but there are some significant changes in some of the options. A major change is the disappearance of the Office button. Instead of Office button, you will see the File button in 2010. See how to do -

Open either Word, Excel or PowerPoint file > Click on the File button from the upper-left corner > Choose Info > Hit on the Protect Document from Permission section > Choose Encrypt with Password > Type your desired Password in the box and hit OK > Type again to confirm it > OK > Save the Document.

You can take help of the image below:


Note: If you don't save the document after setting the password, then it will be removed automatically. Password will be enabled after saving the document. And remember, this password has no recovery options as you can do in Gmail, Yahoo or Facebook! So be careful!


Removing/ Changing the Password

Sometimes you may set a password for testing purpose only. For example you set password in a document that doesn't need password at all. And every time you're required to type it when accessing that file. Or maybe you want to change it. But when you try to remove or change that password you can't find any option to remove it. How disgusting!  :)

Well this is easier than you think! If you wanna change the password then repeat the whole process again until the password box appears. Then type a different password and save the document.

And if you would like to remove the password then just leave that box blank and save the document. Password will be removed. 


Hopefully this post will be helpful for you . . . :)


Stay with Marks PC Solution to get more interesting IT topics!


Tuesday, May 28, 2013

How to Show the File Location in MS Word and Excel?


Document File Path


In MS Word and Excel you can show the location of your file (File Path). Usually the file path is placed at the footer of the document. And when it is placed at the document footer, it automatically appears at the each page of that document. 


Why to Use the File Path (Location of the File): 

Well this is really important for those people who want to keep the source of the document printed with it. If the file path is printed with the document then it is quite easier for us to trace the path next time when you search for it on the hard disk. It looks like the image below: 

File Location on the Document Footer

Thus it is easier for you to locate a saved document. 


Why You Shouldn't Use the File Path: 

Definitely it is revelation of information. If the file is a highly classified document and if the file path is used there, then others (who do not have access to that file) might be accessed that file through the path printed with the document! For example: it may be the question of the Varsity Admission Test or Job Test. 


How to Show the File Path in a Document: 

Well this is not a difficult task but really tough to find if you are not familiar with this option previously. And I will discuss about how to show the file path as well as how to hide. I am an user of Office 2010. But don't like to avoid the Office 2003 users. :) 


Show/ Hide File Path in Office 2003: 

Ms Word 2003: There are two ways available for you to do this task. You can follow any of the two methods. But at first you have to make sure that the file is previously saved. If you apply this to an unsaved document then it will show only Document 1 instead of showing the file path. 

Method 1: Open a Document > Go to the View Menu > Choose Header and Footer > Go to the Footer > Insert Auto Text > Hit on Filename and Path. Done! 

Take help of the image below: 


Insert File Path from Header and Footer Option


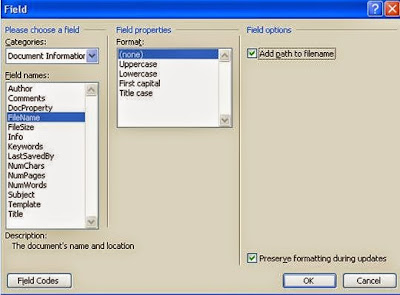
Method 2: Somewhat difficult. Open a Document > View Menu > Header and Footer > Go to Footer > Insert Menu > Field > Choose Document Information from Categories > Select FileName from Field Names section > Select Add path to filename from the right most column > Hit Ok. Finish. 

Look at the image below: 

Insert File Location from Field


MS Excel 2003: 

There is only one method and this is very easy. Open a previously created MS Excel Book. Simply go to the View Menu. Click on the Header and Footer option. Now select Edit Footer.  Here you you can insert the file path.  


Show/ Hide File Path in Office 2007 and 2010: 

Here the procedure is somewhat different from Office 2003. Because Office 2007 and 10 has the ribbon instead of menu. 


MS Word 2007 and 2010: 

Don't know why the Auto Text doesn't show the file path. But you can insert the file path from field. 

First you have to open a saved document. Then go to the footer (Just double click on the footer margin to activate footer). Now go to the Insert Menu > Quick Parts from the right side > Hit on the down arrow and choose Field > Select Document Information from Categories > Choose FileName > Mark Add Path to FileName. Done! 


Insert File Path in Office 2010 from Field


MS Excel 2007 and 2010: 

Open a saved excel book. Go to the Insert Menu > Hit on the Header & Footer from the right side of the ribbon > A new menu will appear named Design > Now move to the Document Footer > Select File Path > Done. 

Look at the images below: 


Field option under insert menu


Insert File Path in Excel 2010


How to Remove the File Path? 

You may notice that I have only talked about how to insert file path. But nothing was discussed about how to remove it! If you have already inserted the file path and can't remove it then simply go to the footer. Press Ctrl + A and hit the delete button to remove everything from footer. Or just select the file path from the footer and delete it. That's it. 

Stay with Marks PC Solution to get more interesting IT topics!