Thursday, February 28, 2013

Send Blog Posts to Specific Persons by Email


Mail Delivery PNG Image


Blogger has its own Subscription named Follow by Email. If someone subscribes his email from this option he will receive an email whenever you publish new post. But if you wanna deliver your posts to someone who are not subscribed to your blog then what? Read more to know. 

You can send your blog updates to people who are not subscribed. But this option will allow you to deliver newsletter at best 10 persons. Google will deliver the new blog posts  to the selected persons. 

Intermediate users of blogger blog might be familiar with this option. But beginner might not be familiar with this. Or they may be confused with this option. So I'm gonna clarify it. 

You don't need to add any gadget to do this. All you need to do is just mention the email of those people from the settings option. And any time you can remove or change those email addresses. 

Hope you're signed in to your blogger account. Let's start: 
  1. Go to the Design or Dashboard
  2. Move to the Settings option. 
  3. Select Mobile and email.
  4. Look at the Email Posts to box. Just below of this box- Choose from contacts- hit on it. 
  5. A new window will appear with your Gmail Contacts. Choose Email addresses (10 or less).
  6. If you don't have an address in your contact list then you can type it in the box. 
  7. Finally, hit on the Save Settings. Done! 

Select people to send new blog posts


If you wanna stop this service then hit on the Remove button under the Email posts box. And if you wanna stop sending mail to a specific address then manually delete it from the box. 


If you would like to let your visitors to subscribe to your blog for free newsletters then you can simply add a gadget from layout option. Follow the instruction below: 
  1. Go to the Settings option.
  2. Move to the Layout.
  3. Hit on Add a Gadget from anywhere you wanna place this. I recommend to place it at the top right or at the bottom. 
  4. Choose Follow by Email.
  5. Now you can change the Gadget name if you need.
  6. Make sure feed URL is there. Otherwise you've to create feed address by yourself.
  7. Save it. 


Stay with Marks PC Solution to get more interesting IT topics!


Sunday, February 24, 2013

How to Add Facebook Like box on Website or Blog


Facebook Like Box by Marks PC Solution


If you have a Facebook fan page or an official Facebook page of your blog or website, then you can place it in your site. Certainly this will ease your interaction with visitors or fans. Another issue you should keep in mind that it is also a part of SEO. Placing a like box may attract visitors to visit your site! 

Earlier I wrote about how to create a pop out like box in your site. And also discussed how to create Facebook fan page. Remember: You must have a fan page to create a Facebook Like Box. If you don't know please read this first: 


If you're ready then I can start. Read carefully. 

To add a like box in your website or blog you have to place two codes in two different places. These are as below: 

Code 1: Place this code on your page once, just after the opening <body> tag. If your site already has this code then you don't need to place it again. 

<div id="fb-root"></div>

<script>(function(d, s, id) {
  var js, fjs = d.getElementsByTagName(s)[0];
  if (d.getElementById(id)) return;
  js = d.createElement(s); js.id = id;
  js.src = "//connect.facebook.net/en_US/all.js#xfbml=1";
  fjs.parentNode.insertBefore(js, fjs);
}(document, 'script', 'facebook-jssdk'));</script>


Code 2: Place this code on your page wherever you want the plugin to appear on your page.
<div class="fb-like-box" data-href="http://www.facebook.com/markstips" data-width="240" data-height="350" data-show-faces="false" data-stream="false" data-header="false"></div>

You know, the second code is the main code. And the first one is just to help the second one. If your HTML has already the first code then you don't need to paste the code again. 


Customization: The Red Parts of Code 2
  • Name: The word markstips should be replaced with your page name.  
  • Width: Current width is 240. You can increase or decrease. 
  • Height: Current height is 350. Change it if necessary. 

Tips: Try to place the second at the footer of your page. It will be helpful to load the site faster. Not only this code, you should place any Java Code at the bottom. If more java codes are placed at the header it will dramatically affect your site's loading time


Implementing the Code on Blogger: 

Code 1: Template > Edit HTML > Proceed > Now find <body tag by pressing Ctrl + F > After few lines paste the code from code 1 above > Save. If you placed any code like it earlier then you don't need to paste again. 

Code 2: Layout > Add a Gadget > HTML/ JavaScript > Copy and paste the code from Code 2 above > Save


Now view your blog or refresh it. You will be able to see this within few seconds. If the server is down, then the like box may delay to appear on your site. Until then, keep waiting. 


Advice: If you don't think the like box not important for you, or if you think it consumes your site space then you can try this one: Pop Out Facebook Like Box. 

If this code is not working properly, or if you face any problem to implement the code, then try to make the code directly from Facebook Developers


Stay with Marks PC Solution to get more interesting IT topics!


Saturday, February 23, 2013

Chromebook Pixel: An Innovation


Google Chromebook Pixel PNG Image


Chromebook pixel is another innovation of Google that comes with the perfect combination of hardware, software and design. And certainly Google expect that Chromebook  can challenge the other products available in the market. Basically Chromebook is a laptop with super displaying capacity, touch friendly interface, Google products, better performance and read more to know! 


Day by day the people are being interested to smart devices. Apple starts the path. Following Apple, Samsung explores the path and down the market share of Nokia. Observing  the success of Apple and Samsung, other organizations like Microsoft, Google are now producing devices like smart phones, tablets or laptops. 

Microsoft Surface, Nokia Lumia, Google Android are the example of such devices. Now Google has introduced Chromebook Pixel to boost their hardware market. Read more to know the amazing and unique features of Pixel! 


Order Now PNG Button


Amazing Display: 

Can you imagine? 4.3 million pixels. Each pixel is invisible to the unaided eye. It's 12.85" screen has the highest density of pixel compared to any laptop. In a word it will be the best for viewing. 


Chromebook Pixel Screenshots


Touch Friendly Interface: 

Its touch screen will give you the flavor of Tablet PC. You can organize windows, switch through apps, and edit photos with the tip of your finger. It has a 0.55 mm layer or touch- enabled Gorilla Glass that provides smooth touch interactions while preserving the picture clarity. 


Best Products of Google: 

As a device of Google, Chromebook comes with your favorite Google Products- Gmail, YouTube, Hangout, Drive. 
  • Google Drive: Pixel comes with 1 TB (Oh my God!) of cloud storage, free for 3 years! By which you can share your files, documents, videos or photos on the web. 
  • Google+ Hangouts: Its integrated HD webcam, microphone, noise cancellation capability will enhance your Google+ Hangouts experience for sure. 
  • YouTube: The bright, colorful and high resolution display of Pixel will make your YouTube experience awesome. 
  • Gmail: Nothing to say new about Gmail. You already know about this. But Pixel's touch facility will ease your E-mail activities. 

Better Performance: 
  • Boots-up in seconds and stays fast
  • Requires almost zero setup or maintenance tasks
  • Built-in virus protection system
  • Stays up to date
  • Built-in LTE for faster connectivity
  • Supports 4G network


Crystal Clear Sound: 

Chromebook Pixel gives you crystal clear sound. Its powerful and high quality speakers are hidden beneath the keyboard to preserve the smoothness. A custom digital signal processing engine helps tune the speakers for clarity, ensuring that they deliver natural audio. 


A Smart Look: 

Pixel's tight tolerance, hidden vents, invisible screws gives it a smart look. Stereo speakers are seamlessly tucked away beneath the backlit keyboard.
  • Backlit Keyboard: Its backlit keyboard let you clearly see the keys. But when you're watching a full-screen video, the keyboard automatically dims to an appropriate level so that you eyes do not catch the light of keyboard. 
  • Glass Touchpad: Though you can control the Pixel using its touch screen but don't forget about its touchpad! It comes with an exceptional high quality touchpad to change your touch experience. 
  • Connect Fast: It has an industry leading WiFi range which can boost your download speed up to 100 Mbps. 
  • High Resolution Touchscreen: Its display has the highest number of pixels per inch in compared to any other laptop screen. And of course it is touch enabled. It has the highest picture clarity, richest color and 178 degree viewing angles. 
  • Piano Hinge: Its Piano Hinge let you open and close the Pixel with a single finger. But  it is also designed to augment the range of WiFi  and act as a heat sink to keep the machine cool.
  • Lightbar: About lightbar Google Says- Just because it looks cool. 

Google Chrome Book Pixel


Stay with Marks PC Solution to get more interesting IT topics!


Friday, February 22, 2013

Take Online Typing Test to Boost your Speed


Typing Test Speed Score


Typing speed is an asset for a person. In many cases people may rate you by your typing speed. You can measure your typing speed by taking online typing tests. There are many sites available for taking typing tests. Today I'm gonna talk about some popular and useful sites for taking typing tests. 

This is my second post about typing. If you're regular on this site then you should notice this post- Typing Speed Secret!. In that post I discussed about how to increase typing speed. 


Today I'm gonna share 4 sites from where you can take typing tests. It's totally free of cost and online. You don't need to install any software or anything. All of them have some advantages and disadvantages. You can choose any of them. Whatever you do, make sure you're trying regularly. Otherwise nothing and none can increase your speed. 

  • TypingTest.com: This is the most strong and popular site for taking typing test. In fact, this site is a part of famous Typing Master Software. After visiting this site you've to set the language, duration and article. Then hit on Start Test. Immediately you will be redirected to the test page. Start typing to begin the test. After finishing the test, you've to carefully analyze the result. 

  • Free Online Touch Typing Speed Test Another popular site for typing test. The most important feature of this site is- simple. Ya this site is really very simple and easy to use. When you visit the site a new article will appear. To start the test, hit on Start the Clock button. When you finish hit on Stop the Clock. After stopping the clock you will get the result. 

  • Rapid Typing Zone: Well this site is more interesting. At least this site has attracted me. Know why? Because it stores your result! When you visit this site you can see the list of recent test results. Your name and speed will also be displayed there after taking the test. And you can also see the list of speed winner! To start the test, type your name and set your text. Then hit on Start test, and when you finish click on Done

  • Speed Typing Online: This site is fantastic! I've never seen such a marvelous system. This site doesn't show the text separately. The given text is gray colored. When you type the color will be green. If you're wrong the text color will be red. Speed and accuracy will be counted immediately. 

These are the online methods of taking typing tests. But these methods are only for those people who don't wanna install typing master. But if you have any typing software then you may get something more from it. 

First, I personally suggest you to use Typing Master software. When your speed is more than 30 wpm then you should go for the online test. 

Remember: Before memorizing the keys do not try to increase the speed. If you do so, then your accuracy will not be satisfactory. 

Tips: While trying to increase the speed, also focus on accuracy. 

Stay with Marks PC Solution to get more interesting IT topics!


Thursday, February 21, 2013

Create an Official Facebook Page for Website, Person or Place


Facebook Fan Page

Facebook Fan Page is a very common way to communicate with public. Almost all major organizations, websites, places or brands have their own Facebook page. You can also create a Facebook page for your business, blog or website. This is very easy and free of cost!  

To create a Facebook page go to the link below. Before that make sure you're signed in to your Facebook account.  


There are six types: 
  1. Local Business or Place
  2. Company, Organization or Institution
  3. Brand or Product
  4. Artist, Band or Public Figure
  5. Entertainment
  6. Cause or Community

Select any of the types which is suitable for you. Then choose your page category and give it a name. Agree with the terms and conditions and hit on Get Started. 

Now do the followings:
  • Set a profile picture
  • Give a description of it
  • Set a Facebook address
  • Enable Ads or Skip it
Now your page is almost ready. Invite your friends to like it. Try to build audience. You will find several options to build audience and to invite friends to like it. 

Keep posting for the audience. Post only necessary contents. So that people find it useful. It will help to grow the page quickly. Never abuse it. 


Stay with Marks PC Solution to get more interesting IT topics!

Wednesday, February 20, 2013

How to Add Twitter Tweet & Follow Button on Blog or Website


Twitter Birds PNG Logo


Social sharing options are great tools to spread your web contents throughout the world. There are many powerful social sites like Facebook, Google, Twitter etc. These sites have their own social sharing buttons. Today I will talk about Twitter Buttons

In this post you're getting two buttons. The first one is Tweet button which you can use for sharing on Twitter. And the 2nd one is Twitter Follow button. But if you want you can use the two buttons in a single gadget! View the demo below: 


Look at the codes below. There are two codes. The first one is tweet button. And the second one is Follow button. If you wanna use both the two then copy and paste these codes into your HTML. You can place them separately or combined as your wish. 


<a class='twitter-share-button' data-size='large' data-url='http://munnamark.blogspot.com/' data-via='markspcsolution' href='https://twitter.com/share'>Tweet</a>
<script>!function(d,s,id){var js,fjs=d.getElementsByTagName(s)[0];if(!d.getElementById(id)){js=d.createElement(s);js.id=id;js.src=&quot;//platform.twitter.com/widgets.js&quot;;fjs.parentNode.insertBefore(js,fjs);}}(document,&quot;script&quot;,&quot;twitter-wjs&quot;);</script>

<a href="https://twitter.com/markspcsolution" class="twitter-follow-button" data-show-count="true" data-size="large">Follow @markspcsolution</a>
<script>!function(d,s,id){var js,fjs=d.getElementsByTagName(s)[0];if(!d.getElementById(id)){js=d.createElement(s);js.id=id;js.src="//platform.twitter.com/widgets.js";fjs.parentNode.insertBefore(js,fjs);}}(document,"script","twitter-wjs");</script>


Installing Codes on Blogger:


Blogger > Layout > Add a Gadget > HTML/ JavaScript > Copy and paste the above code(s) > Save > View your blog. 


Remember: Notice the red parts of the codes. Replace the URL and twitter username which are marked in the code. 

For other websites, you need to copy and paste the above codes in appropriate place. But try to keep this code at the bottom for fast loading of your page. 


You can also customize your buttons directly from twitter


Tips: Always try to place java codes at the end of your site. It will help to load your page faster. 


Stay with Marks PC Solution to get more interesting IT topics!

Tuesday, February 19, 2013

How to Add an Author in Blogger


Add Blog Authors in Blogger


If you've a blog on blogger and if you wanna grow it up then you can invite your friends or other people as author in your blog. Because an individual can't generate lots of ideas. And it is very tough for a single person to write contents regularly unless he is a professional. Of course you can control every posts written by the others in your blog. 

In Wordpress Blogs users can register and write if the Admin allows them. But in Blogger there is no such option. Rather you can invite people to write with you. In this post I'm gonna show how to add multiple authors in blogger blog

Well this is very easy and many of you may know it by this time. Let's begin: 
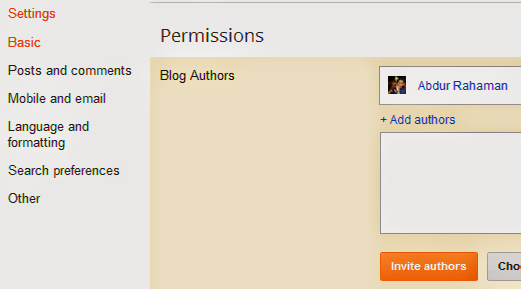
  1. I hope you're signed in to your blogger account
  2. Go to Settings > Basic > Permissions
  3. Look at the right of Blog Authors option where is name and email is shown. 
  4. Hit on Add Authors option just below this. 
  5. Now invite people by Email address. You can invite 2 or more people. Separate each email by comma. You can also choose email from Contacts. (Only Gmail Address is allowed)
  6. Now hit on the Invite Authors button. Invited people will get a confirmation mail. After accepting the mail, they will be able to write in your site. 
You can also control the permission from here. You can choose whether the invited people will be only Author or have Administrative power. Don't make someone admin unless you trust him fully. 


How to invite authors in blogger blog


Stay with Marks PC Solution to get more interesting IT topics!


Monday, February 18, 2013

How to Remove Navigation Bar from Blogger Blog


Blogger Transparent Logo


By default your blogger blog will have a generic navigation bar like other blogger sites. But it doesn't look professional if your site has common navigation bar at the top of it. And this is actually not very essential for your site. So you can remove it without any hesitation. Of course you can get it back any time if you change your mind. 


Blogger Blog Navigation Bar


To be honest the default navigation bar of blogger has few advantages. It will allow your visitor to:
  • Search your site 
  • Share your site on Google +
And it also allow you to:
  • Sign in to your site or sing out from your site
  • Access your blogger dashboard
But professional bloggers neither like to navigate from here nor let the visitors to use this. They like to use custom sharing and navigation options within the blog area. So, if you would like to give a professional look to your blogger blog then you can remove it from your site. Just do the following: 
  1. Make sure you're logged in to your blogger account
  2. Go to the dashboard and hit on the Layout
  3. Find the Navbar widget and click on Edit as shown in the image below. 
  4. There are 6 types of navigation bar. And at the end there is Off option. 
  5. Select Off and Save it. That's it. Now visit your site. 
You can get it back anytime. To turn on this bar follow all the above steps. Just choose any of the 6 type of bars in the step 5. 


How to turn off or turn on the navigation bar from blogger site


Stay with Marks PC Solution to get more interesting IT topics!


Sunday, February 17, 2013

How to Customize the Favicon of Blogger Blog


Favicons Transparent PNG Image


While surfing the different webpages you might notice that every website has an icon in the browser tab. Normally you can see the icon at the left of the title of the page. This is known as favicon. If you make your blog using blogger, then your favicon will be the icon of the blogger. 


Favicon in the Browser Tabs


Look at the above image. There are two favicons. The first one is showing the favicon of blogger. And the second one is showing the favicon of the Marks PC Solution


Today I'm gonna show how to change or customize the favicon of blogger blog. This is however a simple task if you know. Okay let's start. 
  1. First you've to make an icon which will be used as favicon. (Less than  100 KB)
  2. Sign in to your blogger dashboard. 
  3. Go to the Layout from the left pane.
  4. Hit on the Favicon.
  5. Click on Choose File and then select your favicon image from hard disk.
  6. Then upload the icon and save it. 
  7. Don't hurry! Favicon will not be shown immediately. Because your browser has cached the image. Clear the browser cache or wait for 2 days. 


Customize the Blogger Favicon


Stay with Marks PC Solution to get more interesting IT topics!


Friday, February 15, 2013

Index Drives to Search Files Faster on Windows 8


Search Icon PNG


If you have switched to Windows 8 from Windows 7, you might notice that search option is not very strong. When you search something on Windows 8 it doesn't show the files stored on Hard Disk. It only searches on some specific locations. Because other hard drives are not automatically indexed. 

If you wanna enhance your search experience then you should index all the drives of your computer in the indexing service. If your drives are indexed then your search item will appear immediately as you type. 

Okay let's start: 
  1. Go to Control Panel (Hint: Start + R > type Control > press Enter
  2. Hit on the Indexing Options
  3. Click on Modify button
  4. Select all the Drives as shown in the image below
  5. Hit OK
  6.  That's it. Now within few hours your all files and folders will be indexed to the indexing service. 
Note: If you wanna omit any drive from indexing then unmark it.


How to add drives in search index


Stay with Marks PC Solution to get more interesting IT topics!


Thursday, February 14, 2013

Can't type @? Fix it Now by Adding US English !


at symbol


If you're using Windows you may face problem to type @. Specially when you are sending an email to someone. Because an email address essentially includes the symbol @. But all users of Windows 8 doesn't face this problem. Because they aren't using UK English! 

Yes, this problem is only faced by the users of Windows 8 whose input method is UK English.  In that situation you can add another language. 


However you can easily add a language in Windows 8. Follow the procedure below: 

Adding English US language

  1. Go to Control Panel (Hint: Start + R > type Control > Enter
  2. Hit on Language option
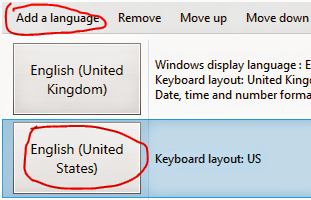
  3. Click Add a Language button
  4. Choose your language from the list. ie. English
  5. Here you will see all the available variations of English
  6. Choose English and double click on it 
  7. Select English (United States) and hit on Add button
  8. Now you will see the list of added language. 
  9. To remove any language select it first, then click on Remove button. 
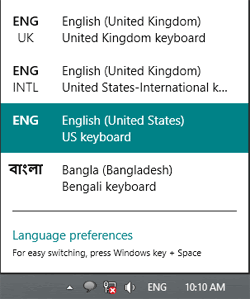
  10. Now look at the left of your clock in the Task Bar. You will see ENG. Hit on it and select English US Keyboard.
  11. You can switch language anytime by pressing Start + Space. That's it! 


How to Change Language in Windows 8

Stay with Marks PC Solution to get more interesting IT topics!

How to Hide or Unhide a File or Folder


Hidden Folder PNG


A common question asked by the beginner is how to hide a file or folder. Hiding a file or folder means you don't want others to have access in that particular file or folder. For example- You don't let your little brother access your games folder as I do normally! Or you may have any other private reason. For example- You don't want others to see a file which contains your online accounts information. 

Most of the PC users know how to hide or unhide a file. But some of you may not know this. For those guys I'm gonna write about this. 


Okay let's start hiding your files or folders: 
  1. First of all go to the location where your particular file or folder is located. For example: D Drive Games Folder.
  2. Right click on the file or folder you wanna hide and choose Properties
  3. Mark the Hidden option and hit OK
  4. That's it. Your selected file is now hidden. 

How to Unhide a file or Folder


Now if you wanna view the hidden item do as below: 
  1. Go to the Folder Options from My Computer. Windows XP users will find this under the View menu. 
  2. Hit the View in Folder Options.
  3. Select Show Hidden Files and Folder and Hit OK.
  4. Now you can see your Hidden File or Folder. 
  5. Right click on it and go to Properties
  6. Unmark the Hidden option and Hit OK. 
  7. That's it. 

If your files and folders are hidden by virus then read the following posts: 

Stay with Marks PC Solution to get more interesting IT topics!

How to Install or Uninstall Fonts in Windows


Font Icon


By default Windows Operating Systems include some essential fonts. Which you can use for any kind of writing. Though there are many English fonts but you may not have your local fonts. Or you may not have necessary stylish fonts installed with your Windows. In that case you can easily install new fonts if you need. 

Fonts Logo PNG


Those who already know how to install fonts may think- this post is quite unnecessary. But I've to write because many of you can't install fonts. I'm gonna show the easiest way to install new fonts on Windows PC. Hopefully this will work for all running versions of Windows. 

  1. First go to the folder where your necessary fonts are stored. 
  2. Select the fonts (Ctrl + A) and copy them by pressing Ctrl + C.  
  3. Now Press Start + R to open Run, then type Fonts and hit Enter
  4. Here you will see all the fonts installed on your PC. 
  5. Press Ctrl + V to install the fonts you copied in the step 2. 
  6. To uninstall a font, first select it and press Delete
  7. Use the search options if you wanna find any font. That's it. 

Stay with Marks PC Solution to get more interesting IT topics!


Wednesday, February 13, 2013

Download Free Mobile Dictionaries for Java Mobiles!


Flag Icon


Mobile phone users often ask for free mobile dictionary. And there are many sites for downloading mobile dictionary. Specially there are lots of options for Java enabled cell phones. Because Java is a popular file format for mobile apps and also very handy to install and use. 

Today I'm gonna share a site with you. And here you will get free mobile dictionaries for your java enabled mobile phone

Features: 
  • Support Online/ Offline Installation
  • Fast, Easy and Safe
  • Instant Translation
  • On Screen Keyboard for Touch Screen
  • Small File Size
  • Adjustable Font Size

Supported Mobiles:
  • Nokia
  • Samsung
  • Motorola
  • LG
  • SE
  • RIM Phones
  • Other Java Enabled Sets

Instruction: No special procedure is required for downloading or installing the dictionary. This is very simple. 
  1. First go to this site: Dictionary 9
  2. Select your flag or first language. ie. English
  3. Now choose your second language. ie. Bengali. (That means your dictionary will be English to Bengali) 
  4. Hit on the Download button.
  5. Immediately a box will appear. At the left side you get a link. On the right, you will get a download option. 
  6. Visit the link of the left side from your phone if you wanna install this immediately. Or you can download it from the right side link to keep a backup file on your PC. 

Installation Procedure: 

If you keep the file in your PC then you've to transfer the file to the phone memory. Then open your File Manager from mobile. You will be able to see Java File. Then select the file and hit OK to start installation. That's it. Enjoy surfing the word! 


Stay with Marks PC Solution to get more interesting IT topics!