Thursday, June 13, 2013

Explore Apps from Windows Store!


Windows Store Tile Image


Most of you are now familiar with the exciting features of Windows 8 - the latest Operating System released by Microsoft. But how many of you are familiar with the Windows Store? This is the most exclusive part of Windows 8. Because no internet browser can take you to the Windows Store unless you're a user of Windows 8! 


Windows Store only belongs to the Windows 8 users. Whenever you start Windows 8, you must find the live tile of Windows Store at the start screen. If you hit on the Store icon, a new window will open containing the apps. There are some categories such as Games, Entertainment, Education etc. But have you noticed that there is no search option? Isn't it very strange? 


Definitely this is very strange that Windows Store has no search option itself! But there is an alternative search option for you. Newly designed Windows Search option allows you to find the necessary apps from Windows Store. Today I will discuss how you can search necessary apps from Windows Store


Requirements: 

Nothing special is required to explore Windows Store. But you should know, only Windows 8 users have access to the Store. And you must have a Windows Live ID. It can either be Hotmail or Live Mail. 

For Example: markspc@hotmail.com, markspc@live.com etc. 


How to Use the Store: 

Very easy. But sometimes you might be confused. First time when I visited the Store, I was looking for the search option. Actually there is no search option in the Store. You have to use the Windows Search option. 

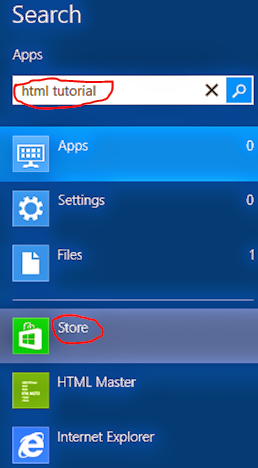
  • To find the apps > Simply press Start + F to enable Search, type something in the box for example- HTML Tutorial > Then hit on the Store > Immediately the Store will be running on a new Window. 
Hint: Actually you don't need to press Start + F ! Just press Start and type the name of your desired application. Search option will be enabled automatically. Also have a look at the image below to see how to search: 

Windows 8 Search Option to search Apps on Store


  • Choosing the Apps: The Store may gather more than hundred apps for you for a single search query depending on the number of apps stored on it. But you may need only one or two of them. You can shorten the list in many ways. You can use the price, rating or reviews to select the apps. If are now willing to pay money, then choose only free apps from the category. When you will select only free apps, the list will be sorted fast! 

  • Installing the Apps: Before installing any app, check the rating and reviews of that app if any. And you should also read the details of that app. And you must check what permissions that app wants from you. If everything is okay then you can hit on the Install button. If you're not signed in with Windows Live ID, you may need to type the email and password. Now the app will be downloaded and installed. No action is necessary during the installation. Everything will be done automatically done. 

  • Uninstalling the Apps: This happens to me very often! Several times I've removed the apps immediately after installing them. Sometimes apps may not be as how you want. It that case you can remove it and look for a better alternative. To remove an app, press Start > then right click on the app you wanna remove > hit on the Uninstall button from the bottom. 


Ads with the Free Apps: Free apps may include the ads of Microsoft. Some apps don't required net connection to operate. But they will shows ads from Microsoft. If you don't like ads then you can disconnect your net while running those apps. But you must be connected to the net to run the apps that require internet access. 


Enable/ Disable Live Apps: Some apps are live. They consume your bandwidth even when you are not using them! If you don't want them collect data from internet then go to the start screen by pressing Start button > Right click on that app > choose Turn Live Tile Off from the bottom. Or when you wanna enable it do the same thing again. 


The last thing I would like to tell you, Store is a great place to find free and premium apps. It's a good step taken by Microsoft. Previously Microsoft had no app store for the users. But apple has a very rich app store for their users. We should use the Windows Store to use the apps, and we should also help to enrich it by rating and reviewing the apps. And I think it will be helpful for the Store to supply more apps for us! 


And if my post is being read by a developer I request you to cooperate the Store :) 


Stay with Marks PC Solution to get more interesting IT topics!


Tuesday, June 11, 2013

How to Disable Blogger Redirection to Local Domains?


How to Prevent blogger from redirecting to country-specific url


If you're running a blog in blogger platform, you should notice, sometimes your site is redirected to local domains. I mean your site is redirected to country specific URL. But it doesn't happen in all countries. Maybe 15 - 20 countries have their own blogger domain. But Google will implement the local domains for blogger blogs in other countries very soon! 


Let's give me an example: 

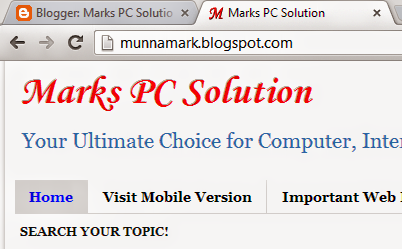
You know the URL of Marks PC Solution is - http://munnamark.blogspot.com
  • If you're Italian you will see my site's URL as- http://munnamark.blogspot.it
  • A Canadian will see my site's URL as -  http://munnamark.blogspot.ca
  • An Indian will see my site's URL as- http://munnamark.blogspot.in

Okay fine! Blogger has its own local domains for different countries. But what's wrongwith this country specific URL? There are a number of problems: 
  • Your social stats (+1, Likes, Tweets) may fall dramatically due to the variations in domain. 
  • Your search ranking might be affected. 
  • If blogger is banned in a country with the help of local domain, your site can't be visited from there!   
Though Google says, they are trying to minimize the negative consequences of hosting blogger. But why are you waiting for Google's effort? You can force local domains to redirect to .com version of your site with a simple code! 


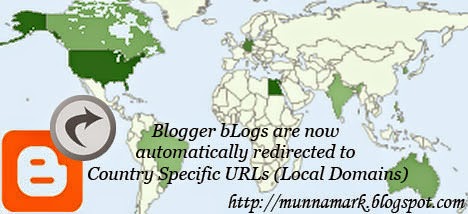
World map indicating blogger blog visitors


Prevent Blogger's from Redirection: 

Officially Google never mentioned any permanent way to stop redirecting. But it said if you type /ncr just after the domain name for example- http://munnamark.blogspot.com/ncr, then it will not redirect to your local domain. 

And if you want to do this for individual post then it should be like that: 
http://munnamark.blogspot.com/ncr/exaplepage

Anyway, as a blog master your shouldn't let the visitors follow any boring way to prevent redirection. Because you can control the redirection by the code below! Okay let's try: 

  1. Make sure you're signed in to your blogger's control panel I mean design or dashboard.
  2. Now go to the template option. (Backup your template if necessary)
  3. Click on Edit HTML. Now you can see the code of your template. 
  4. Hit on the template box and Press Ctrl+F to enable search within the code box.
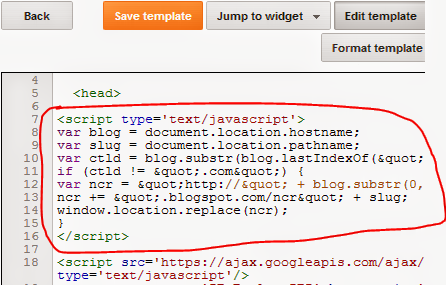
  5. find the <head> of your template and then copy the code below and place it just below the head tag. (Look at the image below)
  6. Save the template. Done! 

<script type='text/javascript'>
var blog = document.location.hostname;
var slug = document.location.pathname;
var ctld = blog.substr(blog.lastIndexOf(&quot;.&quot;));
if (ctld != &quot;.com&quot;) {
var ncr = &quot;http://&quot; + blog.substr(0, blog.indexOf(&quot;.&quot;));
ncr += &quot;.blogspot.com/ncr&quot; + slug;
window.location.replace(ncr);
}
</script>


Prevent your blog from redirecting by a simple code


From now and then your visitors will only be able to visit the .com version of your site. I mean like that: http://munnamark.blogspot.com. 

You can also test whether it works or not. Type http://munnamark.blogspot.it in your browser. But it will redirect you to http://munnamark.blogspot.com. Also check this for your site. 


Removing the Code: 

I don't think it is necessary. For any reason, if you are reluctant to use this code, follow the steps above again. And then at the 5th step, delete the code and save your template. Or if you have a backup of your template, you can also restore it. But deleting the code is much easier. 


What about the Registered/ Custom Domain? 

If you blogger blog is registered I mean if you have a custom domain like .com or .org you don't need implement this code. Because the redirection is not applicable for a site with custom domain. 


What happened if blogger is banned in a country? 

Naturally when blogger is banned by the Govt. of a country the visitors from that country will not be able to see your site. But they will be able to visit the .com version of your site by  using /ncr just after the domain. But if you use the above code in your site, visitors will automatically be able to visit your site!  

I think now you understand the importance of using this code . . . :) 


Stay with Marks PC Solution to get more interesting IT topics!


Monday, June 10, 2013

Add Total Posts & Comments Widget in Blogger


How to show total number of posts and comments widget in blogger blog


Hello Guys! Hope you all are fine. Today I have come with another post for bloggers! You know there are many tips and tricks published for bloggers. You will find them in the blogging category. And several times I have also discussed about adding attractive widgets in blogs. Today I'm gonna share another one with you- Total Posts & Comments Widget.


Adding this code is very easy. All you need is just to add an HTML/ JavaScript Gadget in your site. And before that you must decide where you will place this gadget. It maybe at the bottom, or maybe at the right pane (if any) of your site. Or if your site has any page views/  hit counter then you can place it just before that counter. 

Okay let's start: 
  1. Don't forget to sign in your blogger account. Then go to the blogger control panel I mean design or dashboard. 
  2. Go to the Layout option from the left side. 
  3. There you will find several Add a Gadget options. Select one that is suitable for you. 
  4. Find and select HTML/ JavaScript Gadget. (Usually found at the 11th position)
  5. Now copy and paste the code below in the Content box.
  6. Hit the Save button and rearrange the widget by dragging through by mouse if necessary. 
  7. That's it! View your site to check. 
<script style="text/javascript">function totalPosts(json) {document.write('Total Posts: <b>' + json.feed.openSearch$totalResults.$t + '</b><br>');}function totalComments(json) {document.write('Total Comments: <b>' + json.feed.openSearch$totalResults.$t + '</b><br>');}</script><script src=" /feeds/posts/default?alt=json-in-script&callback=totalPosts"></script><script src=" /feeds/comments/default?alt=json-in-script&callback=totalComments"></script>


And also look at the Demo below. This is exactly what you will get in your site after adding the above code in your template. 


Stay with Marks PC Solution to get more interesting IT topics!


Friday, June 7, 2013

How to Remove Blank Space Above Blogger Header?


Blogger Title with No Empty Space


If you're using one of the default templates of blogger then you may need to fix several issues regarding the header of your site. Such as Navigation Bar, unnecessary space above the header, customizing the header style etc. etc. Better you may like to use a third party template. But a third party template is not always 100% compatible with blogger. That's why I personally prefer to use the default one. Today I would like to show you the easiest way to remove the unnecessary space above the header


Look at the above image. This is the header style of Marks PC Solution without Navbar and Unnecessary Space. If you follow this post, you will be able to make your header like this one. 


There are also two bonus topics for you! Though these two were published before I'm gonna link them back here. Read them if you think necessary: 

Before removing the navigation bar, your site's header will be look like the image below:


Navigation Bar before Blog Title


And certainly, this bar damages the professional look of your site. I've already published the post about removing the navbar from blogger.  


However, I'm telling you in short about removing the navigation bar. Because to remove the empty space above the header, first you have to remove the navbar from your site. Follow the steps below: 
  1. Hope you're signed in to your blogger account. Go to the dashboard/ design/ setting or whatever you call it.
  2. Now go to the Layout.
  3. Find the Navbar (Usually at the top)
  4. Click the Edit option > Select Off > Save
To know more - Click here


Assuming that you've already removed the Navigation bar from your blogger site. Now After removing the navbar, your header will be look like the image below: 


White Space before the Blog Title

If you have a close look at the above image, you will see there is an unnecessary empty space instead of navigation bar. And it looks very odd. Let's remove it. But before that, make sure you're signed in to your blogger account and navigation bar is removed from your site. Now start: 
  1. Go to the design or dashboard from your blogger account.
  2. Hit on the Template option from the left pane.
  3. Hit on Edit HTML button. (Backup your template to avoid mishap!)
  4. Here you will get the HTML of your template. You need to add a small code in it.
  5. Click on the HTML Code Box then press Ctrl + F to enable search. 
  6. Type </head> in the search box and press Enter. 
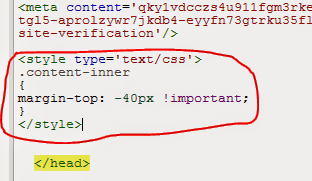
  7. Now copy and paste the below code just before the </head>.
  8. That's it! Hit on the Save Template button, view your blog and see the magic! 
<style type='text/css'>

.content-inner 
margin-top: -40px !important; 
}
</style>

Code should be placed like the image below: 


Code to Remove the White Space above Blogger Header

After successfully placing this code on your site, your site's header will have no unnecessary space on it. We always wish your success as a blogger. Continue with us to get more tips on blogging . . .


Stay with Marks PC Solution to get more interesting IT topics!


HTML Tutorial 4: Tags Without Ends


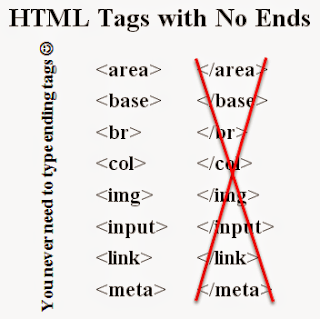
HTML Tags with no ending tags


After a long break I am gonna write another tutorial on HTML. This will be the number 4 tutorial of HTML. Today I would like to share some tags which don't have any endings! I mean you can just start these tags but they have no corresponding end tags. 


You might be interested to read the previously published HTML tutorial. These are as below: 


Now I can proceed to the Tutorial 4: HTML Tags with No Ends. Have a look at the image below. 

HTML Tags with no corresponding end tags


The above image doesn't include all the tags that have no ends. See the complete list below: 

  • <area> 
  • <base> 
  • <basefont>
  • <br> 
  • <col> 
  • <frame> 
  • <hr> 
  • <img> 
  • <input> 
  • <isindex> 
  • <link> 
  • <meta> 
  • <param>  

These tags have no corresponding ends. You just need to start them. 

For example: The <br> tag is used to create a line break. I mean it is used to create a new line. And when you create another line break the first one automatically ends. So it is needless to put an end tag to the <br> tag. That's why HTML standard excludes the corresponding end of the <br> tag. 

The same thing happened to the other tags mentioned in the list above. Another example could be the <img> tag. It is used to link to the image. Is it necessary to end an image with the help of an ending tag? Not at all. That's why the image tag is also don't have any ending tag. 


* XHTML always requires end tags. (Quite disappointing!) 


The <p> Tag: 

What about the <p> tag? By this time you all know about this tag. It is used to create a paragraph. And it has a corresponding end tag too. You can also guess - </p>. But many HTML authors even don't know this exists! 

However if you avoid the ending tag, I mean the </p> tag, your browser will never complain. The document will work quite fine. It is somewhat like the <br> tag. But the <br> tag has no end by rules. 

You can consider the rule as Omitting Tags. Yes, there are some tags in HTML which have end tags but you can avoid them. 


Hope you enjoy today's tutorial. Because this is an interesting feature of HTML in that sense that some tags have no ends. Some end tags you can omit as you wish. Stay in touch to get more . . . 


Stay with Marks PC Solution to get more interesting IT topics!


Thursday, June 6, 2013

Post Writing Guidelines for Bloggers

Top Tips in Writing Blog Posts!

Well this is not an easy topic to write about. You could never imagine how much responsibility is to be taken when you are discussing about any guideline. Because whatever you write as guidelines/ policies these might be applied by other people. If they get benefited then it's your credit. But if they face any problem by following your principles you should be held responsible for that. 

Anyway, I will try my best to provide you some guidelines which I believe must be considered before publishing a post. These tips will be very useful for you 
  • To increase search ranking
  • To increase visitors 
  • To retain existing visitors
  • Most importantly to improve your writing quality


Read the whole post carefully and participate through your valuable comment . . . :) 

  • Post Title: The first and most important part to the search engines to display your site at the first page. Attractive post title is also helpful to encourage visitors to enter your site. The title shouldn't be unnecessary long. And you must try to keep it as meaningful as possible. 
  • Post URL: You can create custom URL/ link for a post. Both blogger and WordPress let your customize the post URL. It is not only important to the search engines but also to the visitors of your site. Read more about customizing post URL.
  • Contents: The most important things to keep your visitors in touch! Your contents should be attractive and useful. Information provided must be accurate. Contents should be written in a clear and easy language. Try to make your contents unique and exclusive. But if you're not able to create unique contents never try to copy and paste from others. This is strictly prohibited by Google. When you write the contents from other website first you have to take permission and then you should refer to that site. 
  • Labels/ Tags/ Keywords: Labeling is also very important. Proper labeling helps the visitors to find the right post within your site. And definitely the labels have a great impact in search results. So you should carefully use labels/ keywords in the posts. But never try to use the irrelevant labels or tags in your posts. If you do so, you could be blacklisted both by the visitors and search engines! Be Careful! 
  • Formatting: Very very important. Make the texts bold, italicize or underline them when and where necessary. Also use different fonts to highlight some parts. Use numbers and bullets when giving a list of something. Use quoted text where applicable. You should keep sufficient space between paragraphs. Never type the whole post in a single para. It makes the reader bore and uneasy. 
  • Search Description: This is a lovely feature of blogger. Usually the first few sentences of a post are shown by search engines in search results. WordPress automatically do this for the users. But if you're the user of blogger blog, then you have to do this manually. This could be boring for you. But this feature lets you customize the search description. Because the first few sentences may not be relevant to your post or may not able to attract visitors. Read more about search description
  • Post Length: What is the optimum length for a post? Actually there is no rigid rule. Post should be descriptive enough so that it clarifies your message to the readers. But it doesn't mean that you will make your post unnecessary long. It should be precise, accurate and clear. Most of the bloggers try to write more than 500 words. You can also practice this rule. Because the more you write, the higher is the chance to be matched with the search queries of the visitors. 
  • Language: Your language should be friendly and attractive so that the visitors feel free to read the contents. It should be easy and meaningful. Never try to be over smart in using the language style. 
  • Grammar: Well 100% accurate grammar is not important for you unless you're writing something about language or grammar. But it doesn't mean that you will not care about grammatical accuracy. You should be careful enough to avoid mistakes. If the visitors find too much grammatical errors they may feel bore and lose interest to your site! 
  • Color, Text Alignment, Text Size, Font: These issues are crucial to look your posts attractive and readable. Use of color is okay but only when it's necessary. Black is the best. But when necessary, you can use any color. Text alignment should be justified but when required you can use left, center or right too. Font size shouldn't be too large or too small. It should be readable. Use large text when necessary. You can use any font. But always avoid stylish fonts (ie. Monotype Corshiva, Vivaldi, Vladimir) in normal text. I mean use a font that is easy to read and understand. My personal choice Georgia. 
  • Image: A single image might be worth of thousand words. So you should use relevant image with your post (never copy from others). In case of using image you should consider some factors. Image placement should be proper. Make sure it doesn't looks odd and hinders the visitors to read properly. Image should be attractive and creative. Use the post link with the image. Give it a proper title text and alt text. Avoid extra large size images. Because they consumes data and increase your site's loading time
  • Outbound Links: You can also use reference links with your post which may be helpful for the visitors to know more. And this is also important to Google. But never share too much links with the post. 

If you follow these rules I think you will be a good writer for sure. And your site will get more visitors and higher ranking soon. Along with these rules you must ensure that your site loads faster. Visitors never like a slow site. Site's design should be attractive. Never place too much social sharing buttons on your site. Be careful while placing Ads on your site


You should also follow my style. I think my posts are properly designed. If you think something is wrong then please inform me. Waiting for your feedback . . . :) 


Stay with Marks PC Solution to get more interesting IT topics!


Tuesday, May 28, 2013

How to Show the File Location in MS Word and Excel?


Document File Path


In MS Word and Excel you can show the location of your file (File Path). Usually the file path is placed at the footer of the document. And when it is placed at the document footer, it automatically appears at the each page of that document. 


Why to Use the File Path (Location of the File): 

Well this is really important for those people who want to keep the source of the document printed with it. If the file path is printed with the document then it is quite easier for us to trace the path next time when you search for it on the hard disk. It looks like the image below: 

File Location on the Document Footer

Thus it is easier for you to locate a saved document. 


Why You Shouldn't Use the File Path: 

Definitely it is revelation of information. If the file is a highly classified document and if the file path is used there, then others (who do not have access to that file) might be accessed that file through the path printed with the document! For example: it may be the question of the Varsity Admission Test or Job Test. 


How to Show the File Path in a Document: 

Well this is not a difficult task but really tough to find if you are not familiar with this option previously. And I will discuss about how to show the file path as well as how to hide. I am an user of Office 2010. But don't like to avoid the Office 2003 users. :) 


Show/ Hide File Path in Office 2003: 

Ms Word 2003: There are two ways available for you to do this task. You can follow any of the two methods. But at first you have to make sure that the file is previously saved. If you apply this to an unsaved document then it will show only Document 1 instead of showing the file path. 

Method 1: Open a Document > Go to the View Menu > Choose Header and Footer > Go to the Footer > Insert Auto Text > Hit on Filename and Path. Done! 

Take help of the image below: 


Insert File Path from Header and Footer Option


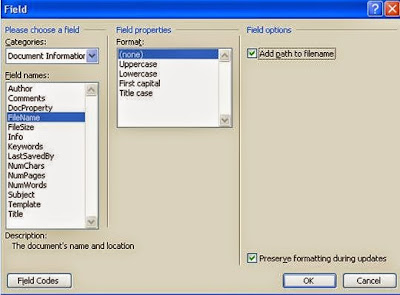
Method 2: Somewhat difficult. Open a Document > View Menu > Header and Footer > Go to Footer > Insert Menu > Field > Choose Document Information from Categories > Select FileName from Field Names section > Select Add path to filename from the right most column > Hit Ok. Finish. 

Look at the image below: 

Insert File Location from Field


MS Excel 2003: 

There is only one method and this is very easy. Open a previously created MS Excel Book. Simply go to the View Menu. Click on the Header and Footer option. Now select Edit Footer.  Here you you can insert the file path.  


Show/ Hide File Path in Office 2007 and 2010: 

Here the procedure is somewhat different from Office 2003. Because Office 2007 and 10 has the ribbon instead of menu. 


MS Word 2007 and 2010: 

Don't know why the Auto Text doesn't show the file path. But you can insert the file path from field. 

First you have to open a saved document. Then go to the footer (Just double click on the footer margin to activate footer). Now go to the Insert Menu > Quick Parts from the right side > Hit on the down arrow and choose Field > Select Document Information from Categories > Choose FileName > Mark Add Path to FileName. Done! 


Insert File Path in Office 2010 from Field


MS Excel 2007 and 2010: 

Open a saved excel book. Go to the Insert Menu > Hit on the Header & Footer from the right side of the ribbon > A new menu will appear named Design > Now move to the Document Footer > Select File Path > Done. 

Look at the images below: 


Field option under insert menu


Insert File Path in Excel 2010


How to Remove the File Path? 

You may notice that I have only talked about how to insert file path. But nothing was discussed about how to remove it! If you have already inserted the file path and can't remove it then simply go to the footer. Press Ctrl + A and hit the delete button to remove everything from footer. Or just select the file path from the footer and delete it. That's it. 

Stay with Marks PC Solution to get more interesting IT topics!